Health and Safety in Fossil Preparation
Fossil preparation is generally a safe hobby, but certain precautions must be taken and the correct Personal Protective Equipment (PPE). This means using things like Respiratory Protective Equipment (RPE) and suitable eye protection, which might mean safety glasses or goggles.
We don't want to scare you or anyone away from enjoying fossil prep because it is easy to look after your health if you know how (and why!). However, there is surprisingly little awareness of the risks, particularly amongst beginners and even more experienced fossil preparators may not be aware of the dangers. Because it's not a 'woops I chopped my finger off', blood-bath type hobby (we won't cover lapidary here..!), it's sometimes hard to appreciate that what you can't see can be a long-term problem.
This article is specifically aimed at fossil preparators to help them keep safe during mechanical preparation using air scribes, air abrasives and electric engravers. You can keep yourself safe by implementing a few things in your daily workshop routine. There is specific advice for PPE and handling in the safety data sheets of chemicals, but we will briefly cover the chemicals you might be using in conjunction with mechanical prep (like Paraloid/acetone, varnishes, etc.).
Most countries have employment laws around health and safety, so we have to pull pieces of literature and legislation from a variety of different industries (for example stone masonry, construction) to build up a full picture. In industrial circles, it is very well known that stone (rock) dust is one of the biggest killers today. If you are employed by somebody, it is their responsibility to establish the risk, reduce exposure (ideally zero exposure) and do everything reasonably practicable to keep their employees safe and monitor your health (where applicable). As an employee, you must follow the rules put in place. However, if you have found a few fossils and want clean them up in the home workshop, the information can be a harder to find and wade through. And that's only if you're aware that there are risks in the first place.
One of our best-sellers is the Dremel 290 kit with 3x fossil preparation styli, suited to beginners. We sell this both with PPE (FFP3 half-mask and impact resistant safety glasses) and without. In the product description, there is a section on Health and Safety, and the same again on our product packaging. At the time of writing, 93% of our kit sales in the last year are without PPE, despite the PPE only costing a fraction more. There’s obviously no obligation to purchase from us, and some customers will have their own PPE. However, we’re not sure that 93% of users are sourcing their own PPE. It is quite unusual for someone to have an FFP3/N99 dust mask at home. We believe that this is a result of a lack of awareness in the fossiling community.
Here's a quick overview of how you can stay safe in fossil preparation. Feel free to download and print this sheet out.
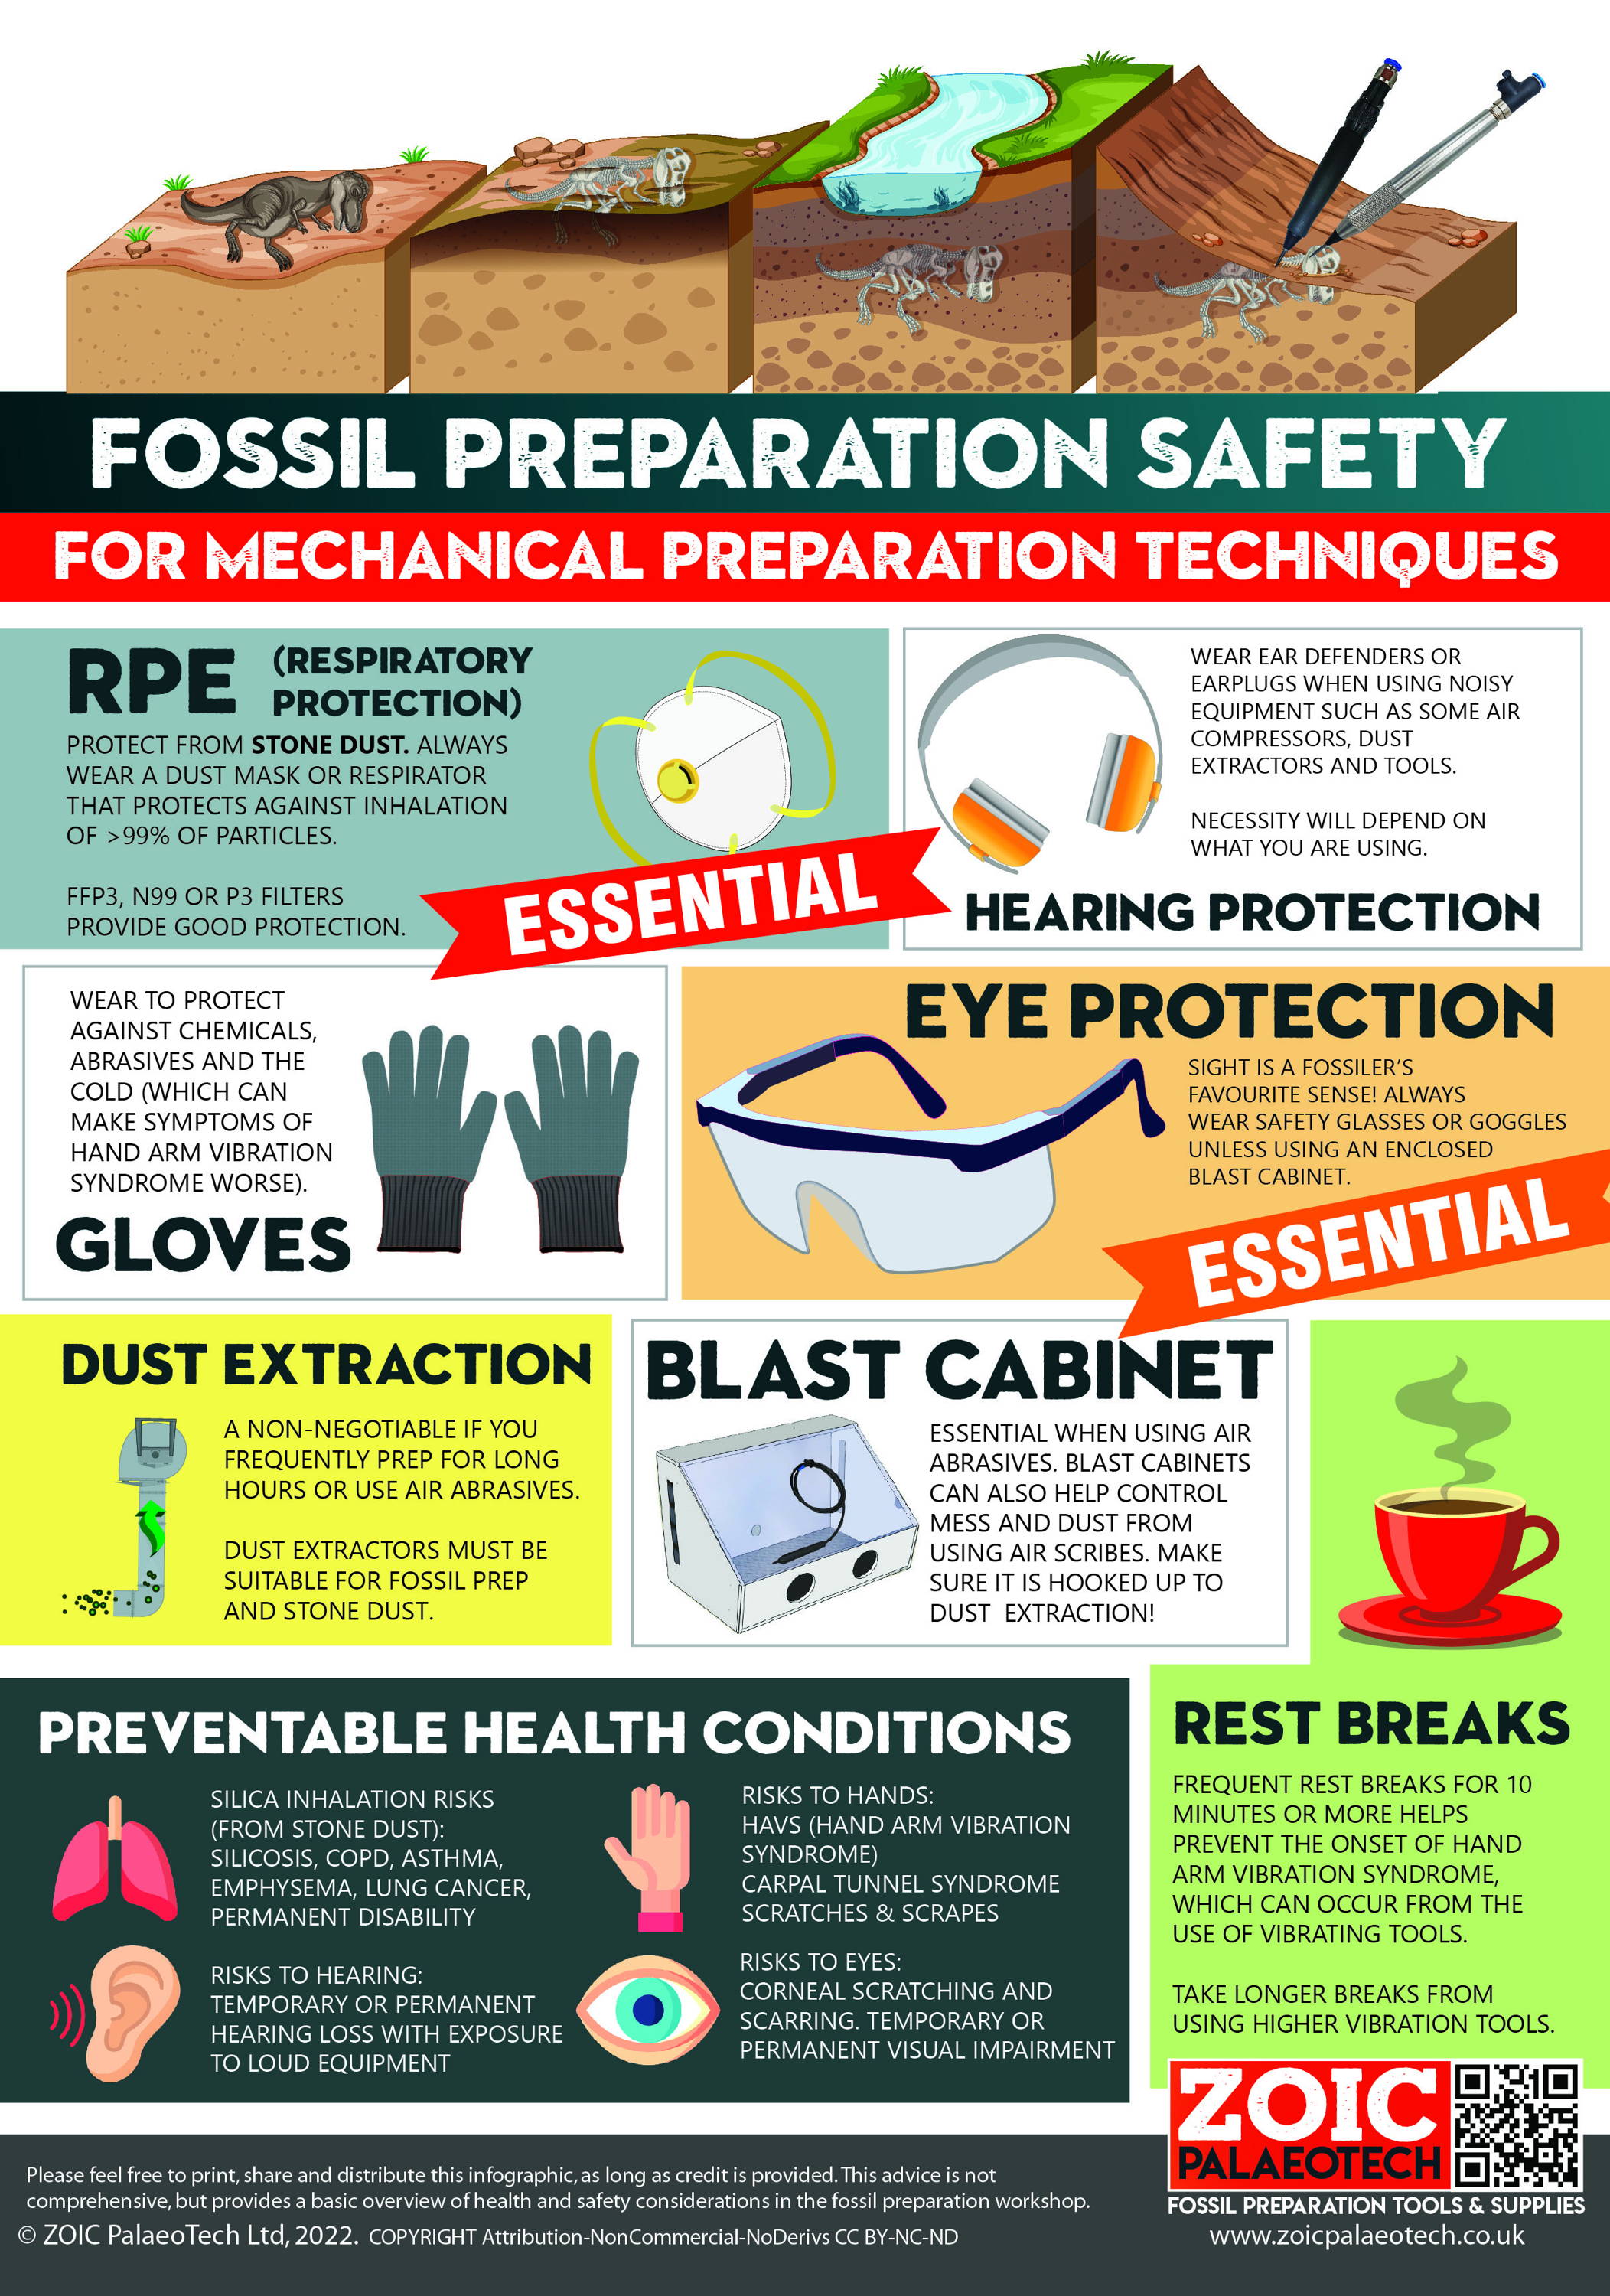
USING AIR SCRIBES AND THE DREMEL 290
DUST
Did you know that prepping sandstone is considerably more dangerous than prepping limestone? Not many people do. It’s because of the type of dust generated.
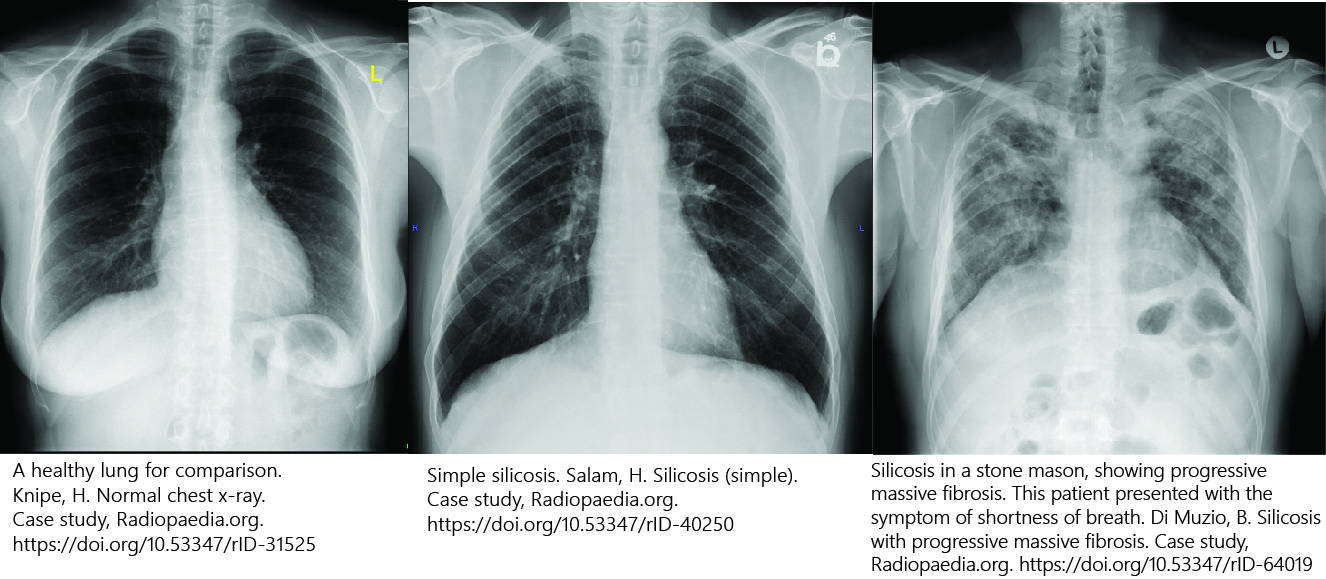
Stone dust is considered very dangerous and can cause a lung disease called silicosis, a type of lung scarring. The component of stone dust that is considered dangerous and even carcinogenic (cancer-causing) is crystalline silica, present in the common mineral quartz (SiO2). Large particles like beach sand aren't a worry, but the very fine particles of dust that can be generated is where the dangers lie.
Regularly breathing stone dust can cause diseases like lung cancer, asthma, chronic obstructive pulmonary disease (COPD – which includes emphysema and other breathing difficulties) and silicosis. It is estimated that there are nearly 800 deaths a year from lung cancers caused by previous exposure to silica in Great Britain (Rushton et al., 2012; HSE, 2021).
Diseases associated with inhalation of silica take a long time to develop and show symptoms, but once they are noticed the damage is often so severe it is life changing, causing permanent disability or early death. There is no cure, only prevention. It’s important to note that silicosis occurs from accumulation, typically over the course of years. Stonemasons in the UK have a 63 times higher risk of being diagnosed with silicosis when compared to the ordinary working population (HSE, 2001).
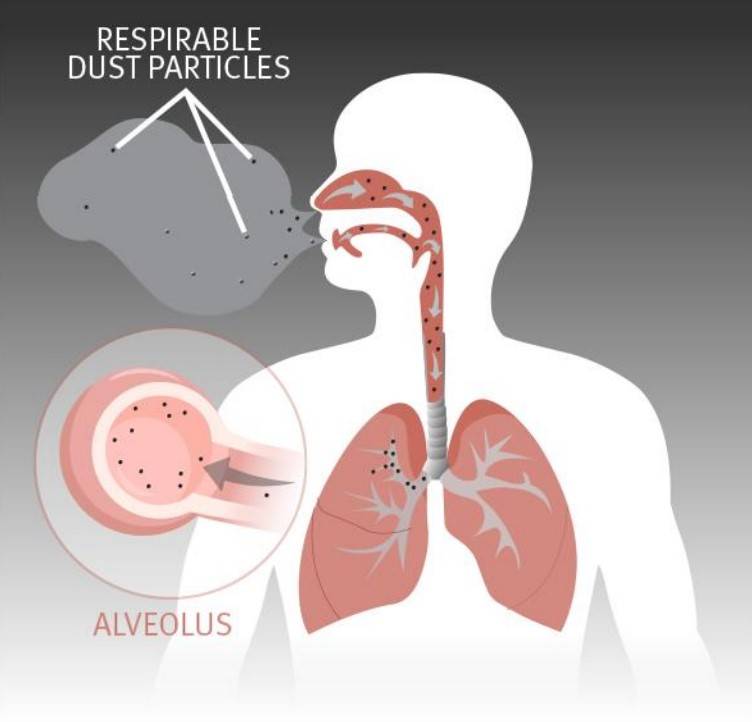
The very finest of dust is considered ‘respirable’ – which means it can get deep into the lungs. This is the dust that causes conditions like silicosis (Image courtesy of Department of Natural Resources and Mines, Australia, 2019).
Anything small and light can be inhaled. Typically, we talk about particles up to 100 microns, but only a certain amount is ‘respirable’, i.e. getting deep into the lungs. These particles are usually smaller than 10 microns. When we talk about respirable crystalline silica (RCS), we are talking about the dust that is so small you can’t even see it under normal light. It can only be observed by using a special ‘dust lamp’, which works a bit like a ray of sunshine showing up floating dust in the home. If you look up ‘Tyndall beam lighting’ you’ll find out how you can set this up to check the effectiveness of your dust extraction.
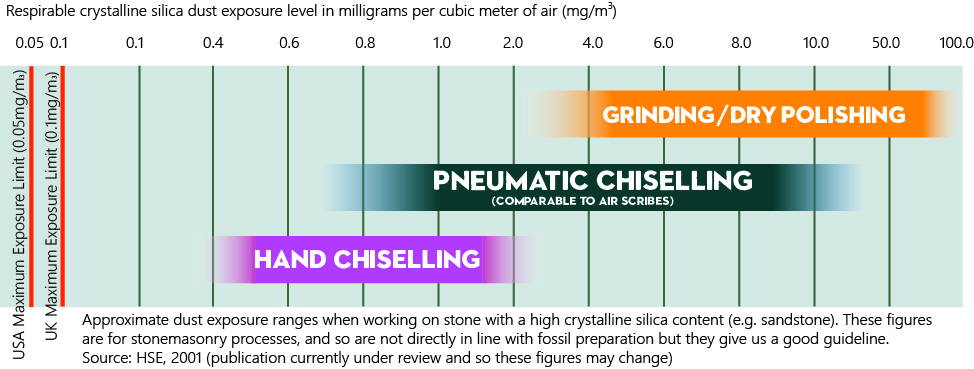
All mechanical fossil preparation techniques have the potential to create dust, ranging from the least amount of dust from hammer and chisel, through pneumatic chiselling (air scribes) in the middle and grinding as the greatest silica dust producer. Air abrasives also create a lot of dust, but the majority doesn’t contain silica.
Many countries have a ‘maximum exposure limit’ in employment law, which in Britain and the EU is 0.1mg/m3 of respirable crystalline silica dust exposure over the course of an 8 hour period. In the USA the level is half of that at 0.05mg/m3. This does not mean that this amount of inhalation is safe, just that it is reasonably practicable to keep exposure below these levels. It can take as little as a few minutes to reach this Maximum Exposure Limit when using air scribes without a mask.
Employers are legally bound to reduce employee exposure to below this limit to be considered safe, and even then there must be risk assessments and medical surveillance in place. Employees are to follow the rules that the employer is obliged to set.
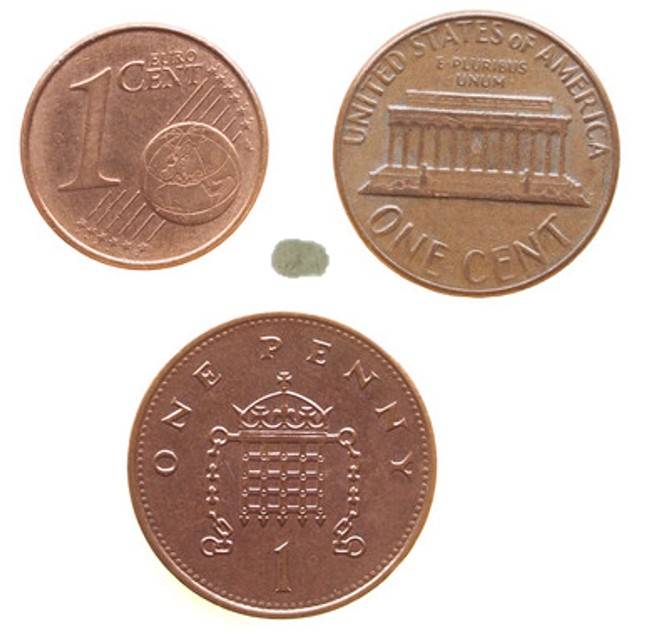
The maximum amount of silica someone in the UK should be breathing after using all the right controls is pictured next to these common coins. Note that this is double the amount allowable by employers in the USA.
Source: HSE, 2020
There are two key ways of controlling your dust exposure in the fossil workshop:
1. Dust Extraction (absolutely the best way of controlling dust in the workshop)
2. Respiratory Protective Equipment – respirators and FFP3/N99 disposable masks (which allow you to control the air you are breathing)
Many home fossil preparators don't use dust extraction when they are only using air scribes or air pens in their workshop for maybe a few hours a week due to the expense. Dust extraction is essential if you are using air abrasives or working long hours in your workshop on a frequent basis. If your respirator is well-fitting with suitable filtration, you'll find that you can control the air that you are directly breathing to make sure that it is free of the fine dusts that are so dangerous.
If you are an employer or employed by somebody as a fossil preparator, correctly installed, maintained and tested dust extraction is essential regardless of the type of fossil preparation you are doing. If there is stone dust, there must be extraction. The RPE is considered the last line of defence in what should already be quite clean air.
Conditions will vary depending on the workshop that you’re working in and the amount of dust that you are being exposed to depends on a number of factors; these include:
• The type of stone you are working with
• The type of tools you are using (air scribes, hammer and chisel, grinders)
• The duration of the session you have been working with the tool
• Is your extraction and ventilation actually effective and fully functioning?
• How effective your dust respirator is – does it fit and does it offer the right protection factor?
• How the workshop is organised, including the separation of dusty activities and those which are cleaner
• How often you clean your workshop (and how!)
Working on a hard stone will release more fine dust than a softer stone, but softer stone will release more fine dust if cut with a power tool or used with a grinder or even a brush. Some stones have a much higher silica content than others - sandstones for instance can be almost entirely composed of quartz, and some limestones may have as little a proportion as 0-10%. Blue Lias limestone (found at Lyme Regis is Dorset) for instance has 2% silica content.
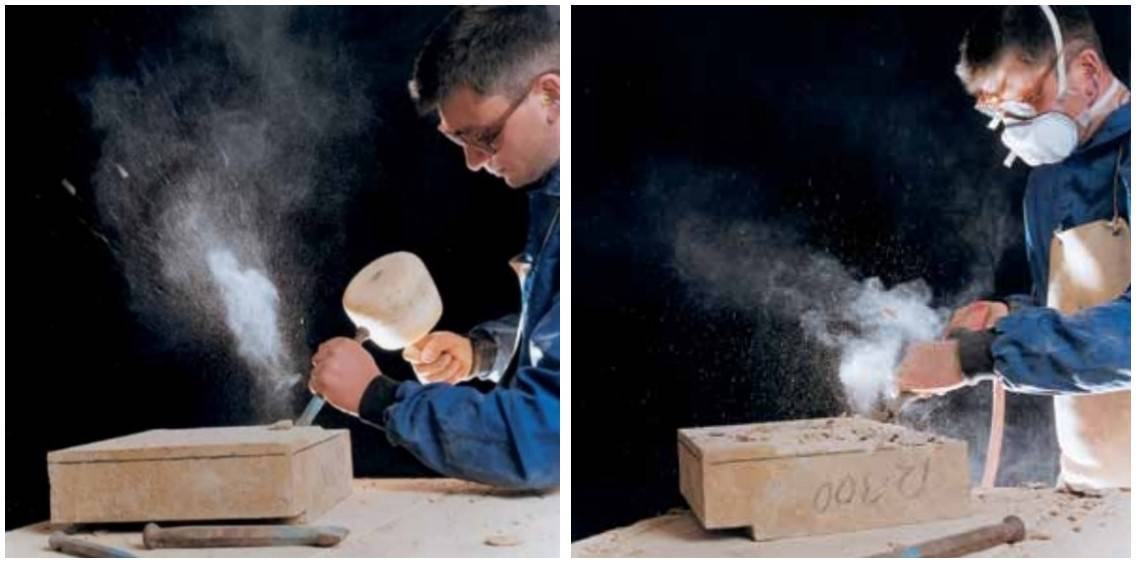
Left: It is easy to see the large chips when working, but usually the fine dust is not visible under normal light. This stone mason is just using a hammer a chisel, which is the least ‘dust-generating’ of the processes we use in fossil preparation. Photo, HSE, 2001
Right: This is an image of a stonemason using a pneumatic chisel, which is the closest comparison we have to an air scribe. Smaller air scribes will create smaller clouds of dust, but may create much finer dust. Think about how close you are to the fossil when you are working (especially compared to this stonemason) and how little distance the dust needs to travel to be inhalable. Source: HSE, 2001
Pneumatic chiselling (i.e. using air scribes), according to HSE, can produce between 0.3mg/m3 and 30mg/m3 when working on a stone with a high crystalline silica content (such as a sandstone). Even at the lowest end of the spectrum, notice that this is well over the threshold. Grinding stone can produce anything up to 150mg/m3 (HSE, 2001) – so that could be less than 10 seconds of working before you’ve reached the daily limit
We consider grinding to be an activity only to be performed in a blast cabinet, with excellent dust extraction (and wear a respirator too). Apart from being messy, this is the process that is the most likely top produce the largest amounts of respirable silica in the shortest amount of time. If you do not have access to this, you can smooth matrix effectively with the rounded chisel in the ZOIC Chicago, and if you want a super smooth look –try wet and dry sandpaper in a fine grit, but definitely use it WET to avoid creating dust!
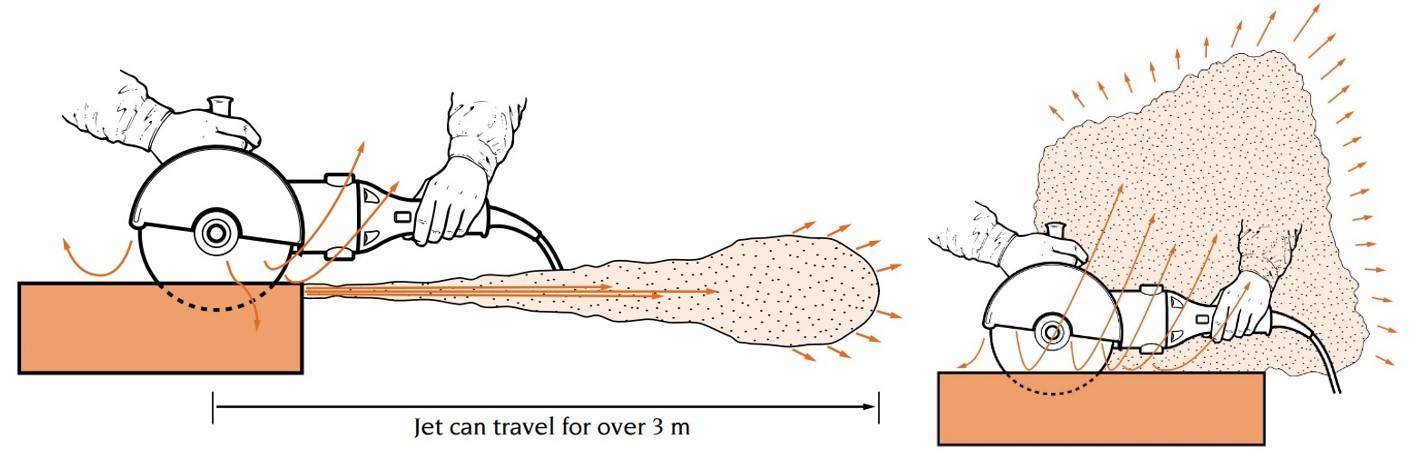
If you use an angle grinder to make larger rocks more manageable, this can create exceptional amounts of dust, which is directed into your face when you lift the grinder up or out of the rock. Most people will do their angle grinding outdoors in a respirator, goggles and overalls to reduce risk. Source: HSE, 2001
There will be some of you worried that you haven’t done much prep whilst wearing a respirator. The diseases caused by stone dust are caused by accumulated stone dust – so it’s never too late to start!
IMPORTANT: If you do present to a doctor with any lung complaints (even if apparently completely unrelated), it is important to mention that you are exposed to respirable silica. Many lung conditions appear similar on x-rays and scans and so silicosis can be hard to diagnose unless a doctor is aware of your heightened risk. Most doctors will ask what industry you work in, not realising that some of us are exposed as part of our hobby.
Respiratory Protective Equipment – what do I get that will protect me?
The simplest solution (and essential no matter how much dust extraction you have going on) is a dust mask, and not just any dust mask. A surgical or cloth mask that we're also familiar with these days just won't cut the mustard.
If using disposable masks, an FFP3mask or an N99 mask (these are the same thing with different names) provide a filtration rate of 99% of 0.3μm particles, and are used to protect even against asbestos. We will quickly draw your attention to the fact that disposable does not necessarily mean single-use. You can get a decent amount of use out of a disposable mask before having to chuck it!
You might have come across N95and FFP2 in recent years with the pandemic, but these only provide 94% protection and will let the fine particles through providing little protection against respirable silica. Don't worry, 'FF' doesn't stand for full face - FFP just means filtering face piece. If you have one that has a 'D' written on it, this means it has passed the 'dolomite clogging test' which is an additional test here in Europe. This is a check that means the filter material has been exposed to a large amount of dolomite dust and still performs as it should.
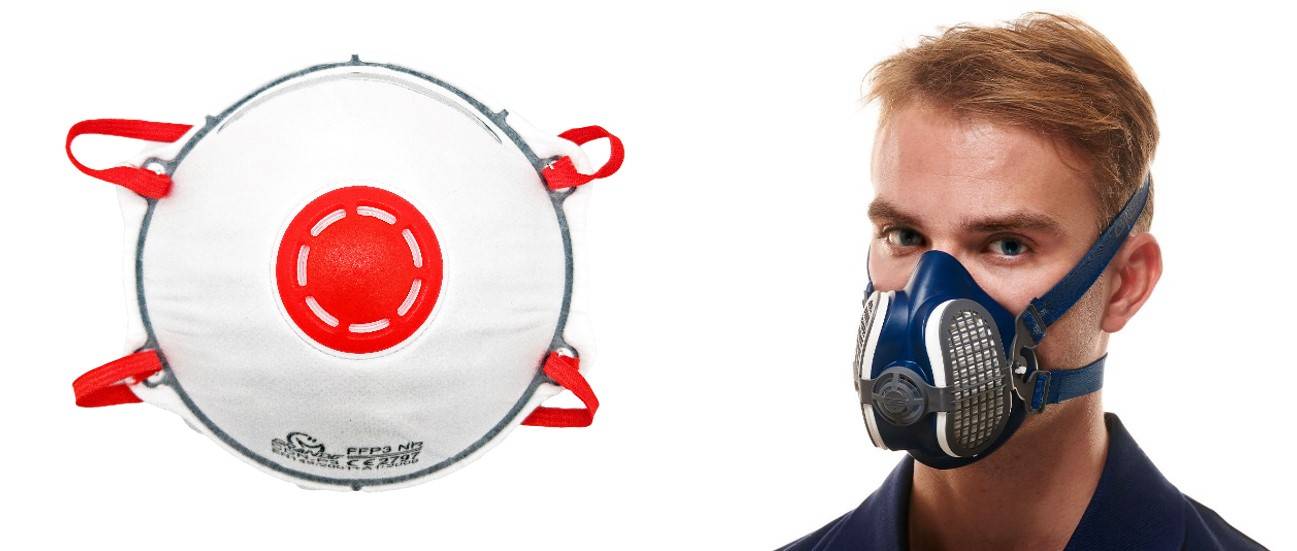
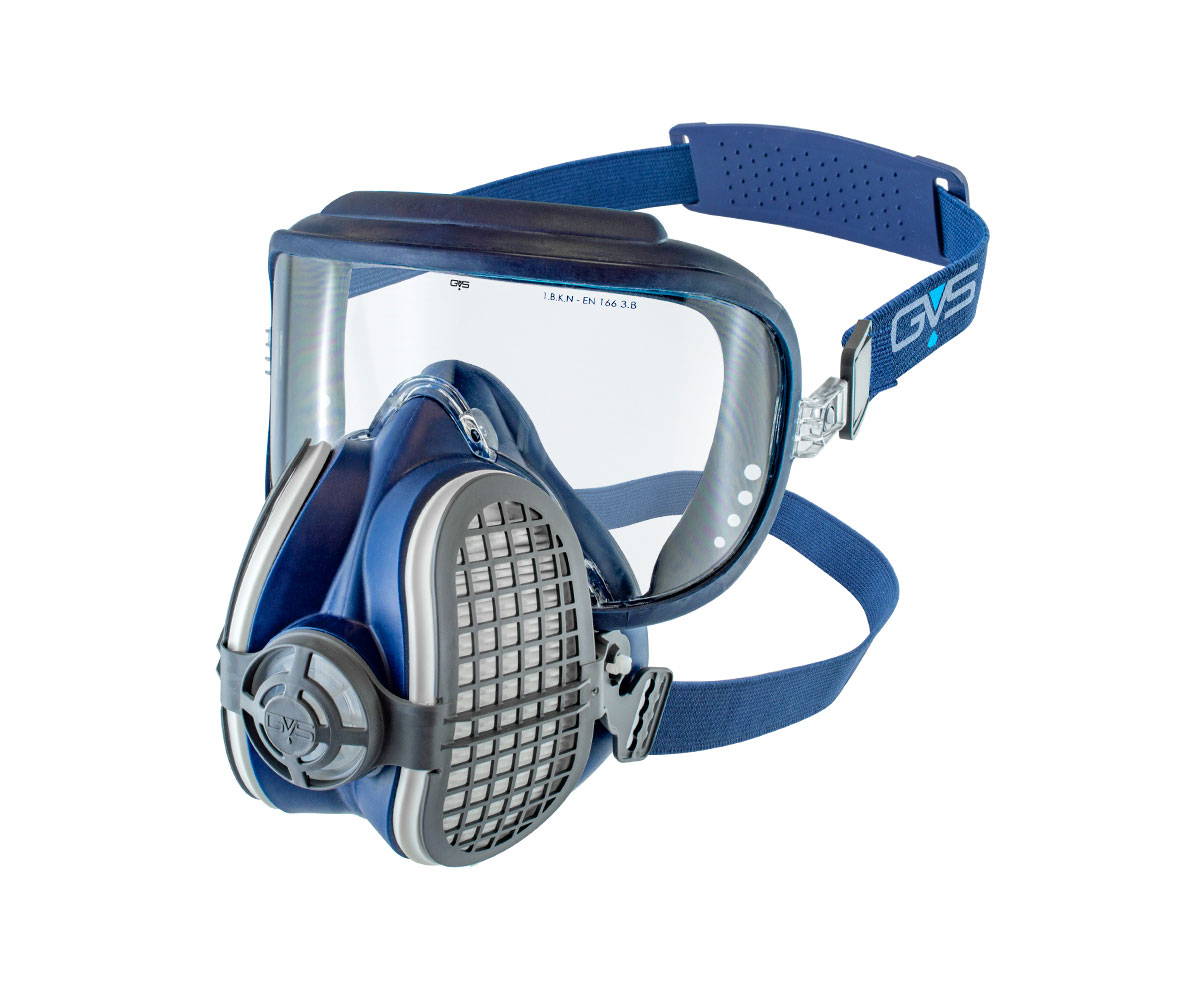
FFP3 disposable dust mask pictured on the left (can be used a number of times) vs. a half-mask respirator with P3 filters pictured on the right. Note that many dust masks and respirators look virtually the same as each other, but the filtration level can be very different. You need to look out for a particular grade of filtration when purchasing - it's that 99%+ you're looking for!
Different countries have different names, but the standards and tests performed are very similar. In South Korea, you want 'special grade', in Australia and New Zealand you're after 'P3', in Brazil it's 'PFF3', and there are probably plenty more. Just look out for that 99% (or more!) filtration.
For those prepping more regularly, a respirator (or reusable half mask) is worth the investment as it is more affordable in the long run. These are usually designed to be non-disposable and to be comfortable to wear. With these, you just replace the filters as they require it, and some have washable filters. In the UK, try to purchase P3 filters to fit on your respirator, and elsewhere P99 or P100. Again, these numbers simply refer to the grade of filtration.
Your protection is only as good as the fit – you can be wearing the best, fanciest half-face mask in the world but if it doesn’t fit you, you’re not protected. In order to establish the fit, there is something called a ‘face fit test’ – which can be performed by trained professionals. What fits you will depend a lot on your face shape and size (and may change if you gain/lose weight or have major dental work done). Some masks are too big or too small, some accommodate a different sized nose. These are quite personal items, so it's worth shopping around and finding something that suits you – and if you are an employer, in most countries you are legally obliged to provide face-fit tests for your employees. Some respirators are one-size and others are S, M and L. This will refer to the size of the rubber seal. If the mask or respirator only has one strap or has ear-loops - don't bother. The filtration can be as good as you like but the fit is almost certain to be poor. One of our contributor's enlightened us to a great saying - "if it's only got one strap, it's probably cr*p!".
There are undeniably some fabulous beards in the fossiling world. For the furrier folks amongst us, you should be aware that a beard (or even stubble) can interfere considerably with the fit of a mask. Speaking with manufacturers of face masks, we have learnt that it is impossible for a standard half-mask to pass a face-fit test on someone with a beard. If you have facial hair, you may consider a mask that has a separate, HEPA filtered air supply that is pumped into a hood. Although considerably more expensive than a standard mask, this would be the only way to guarantee your protection. Unfortunately, as always, beauty isn’t cheap and having facial hair will be considerably more expensive than being clean shaven in the RPE world. Feel free to contact us if you would like more information.
There is one very easy way to determine if your mask is at all effective - after a day's prepping - when you blow your nose what colour does it come out? This is plesiosaur expert Richard Forrest's 'black snot-test', and will tell you if particles are getting through which will mean either changing your filters or the mask. Be aware though that invisible particles may still be getting through.
Dust Extraction
Dust extraction is essential if grinding rocks, cutting rocks (dry) or using air abrasives. You will need sufficient dust extraction if you are prepping for long periods of time. Dust extraction the biggest step you can take to controlling dust in your environment, which we will cover in a separate article (which will be linked here when finished!).
In brief, the majority of dust extractors are not suitable for and may not protect you against respirable silica. They must be installed correctly, and must be fit for purpose. You can use accessories like captor hoods and blast cabinets (either fully enclosed or half enclosed) to maximise your protection by allowing the maximum amount of dust to be removed from the air.
One of the most crucial things to bear in mind is that if the air from your dust extractor recirculates into the room (rather than exhausting straight outside), that it must be sufficiently filtered to remove the very finest dust. Typical woodworking chip and dust extractors with the big bags are rated for much coarser dust (5 micron and larger), and will actually just send the dust around the room with more violence than if you weren’t using dust extraction at all. The grade of filtration is crucial information.
We will discuss common air abrasive dusts later.
Other dusts you don't want to inhale
Over 200 minerals are known or suspected to be poisonous or cancer causing (source: National Park Service), including asbestos (which refers to a group of naturally occurring minerals), mercury and many others. The majority aren't sedimentary minerals or elements, but they could be present (even in small quantities) in fossiliferous sedimentary rocks. Asbestos can even be found in some types of limestone, and other minerals that can cause the same kinds of lung cancers from (potentially) a single exposure. Most rocks and minerals we come across won’t do any harm to the skin, are extremely unlikely to be ingested, but inhalation of dust is a concern.
Respirable fibres
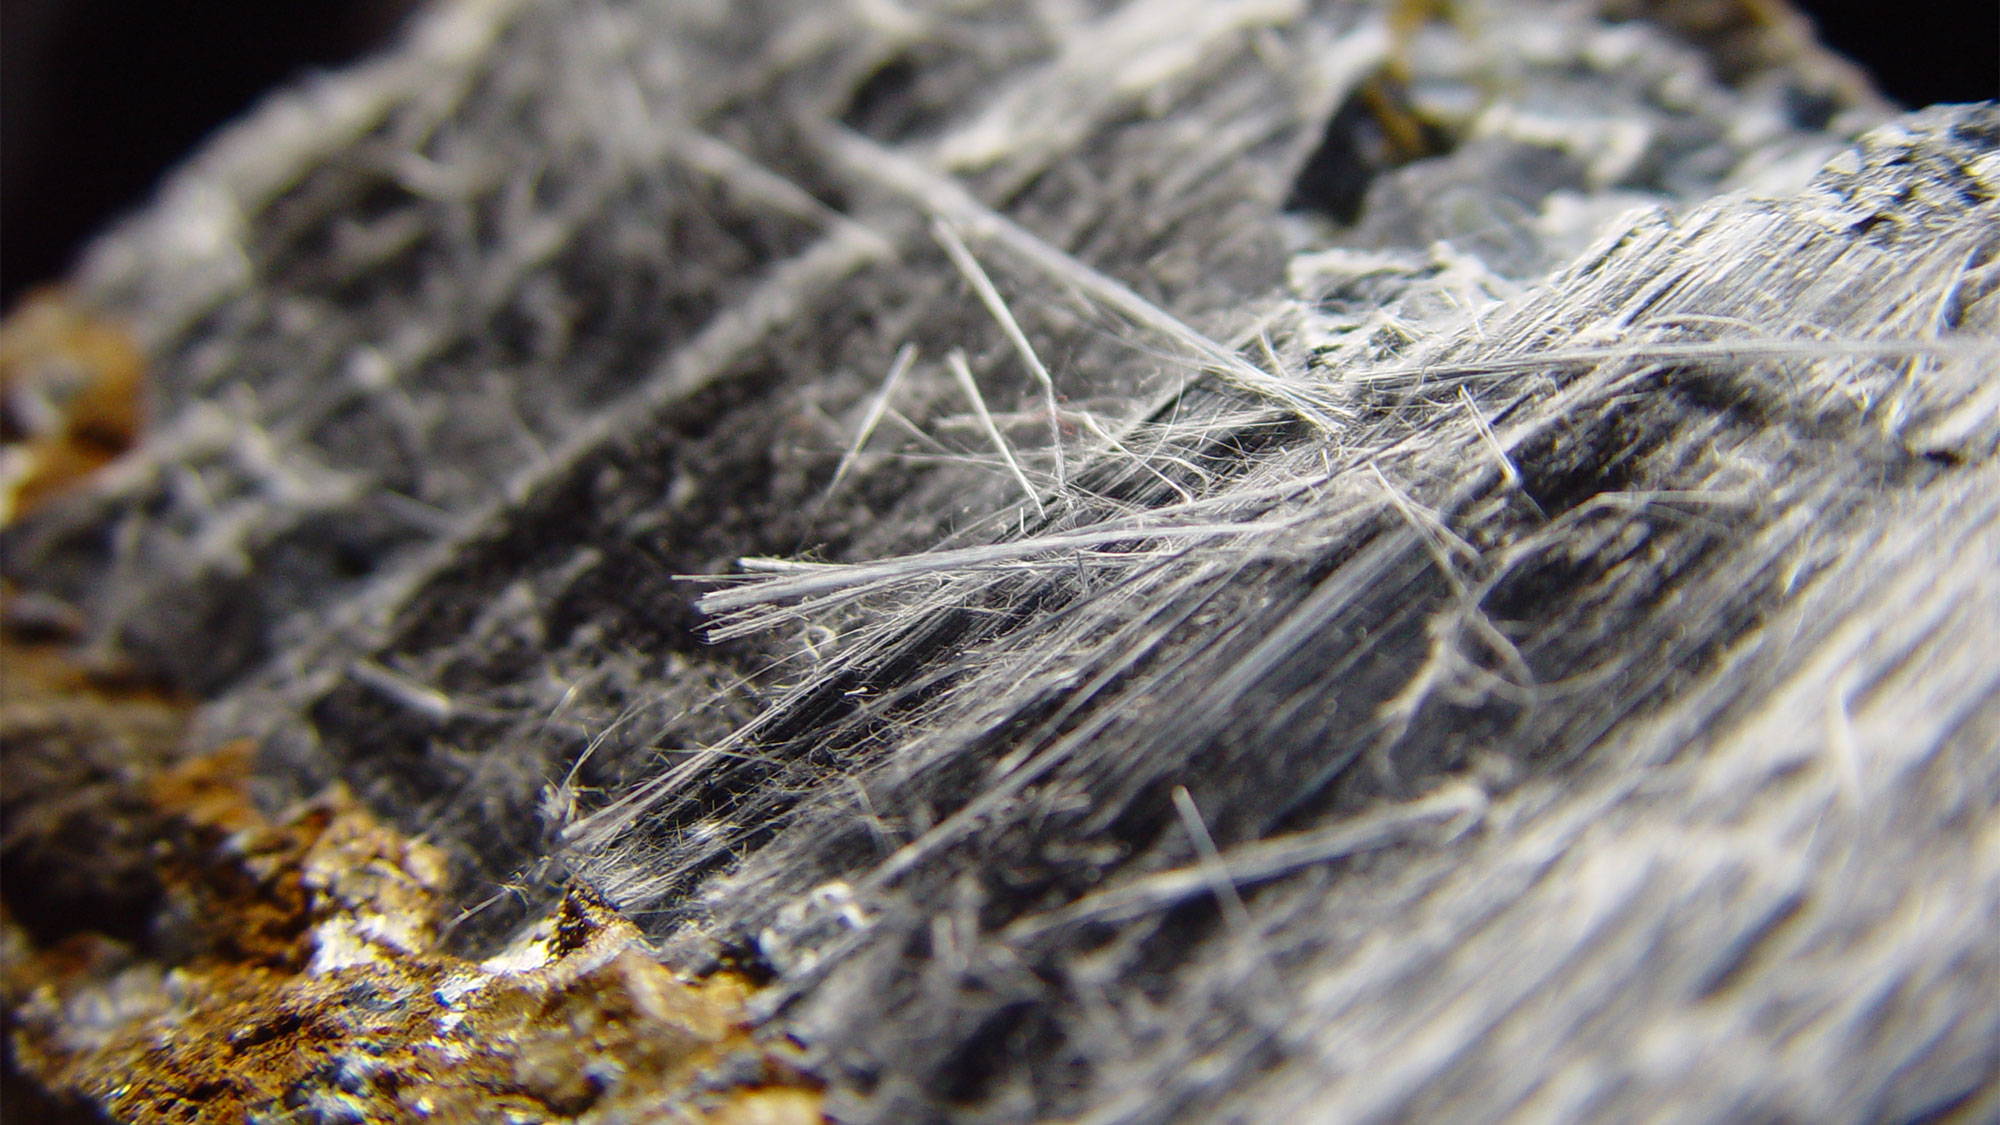
This is blue asbestos (known as crocidolite) in its natural form. No amount of exposure to asbestos can be considered safe. Asbestos can be present in some types of limestone.
Respirable fibres are a range of extremely small, needle like fibres; the most famous of which being asbestos. Respirable fibres are long and thin, can end up deep in the lungs. Asbestos (which is a word we use to describe a group of minerals) and other respirable fibres occur naturally in rocks and mineral veins. If stumbled across, these are far more dangerous than silica and minimal exposure can be a killer. Silica relies on a build up of inhalation over many years, rather than short lived exposures.
Minerals like erionite, mesolite, mordenite, natrolite, paranatrolite, tetranatrolite, scolecite and thomsonite (thank you, Patrick!) are types of respirable fibre that can be found in rock
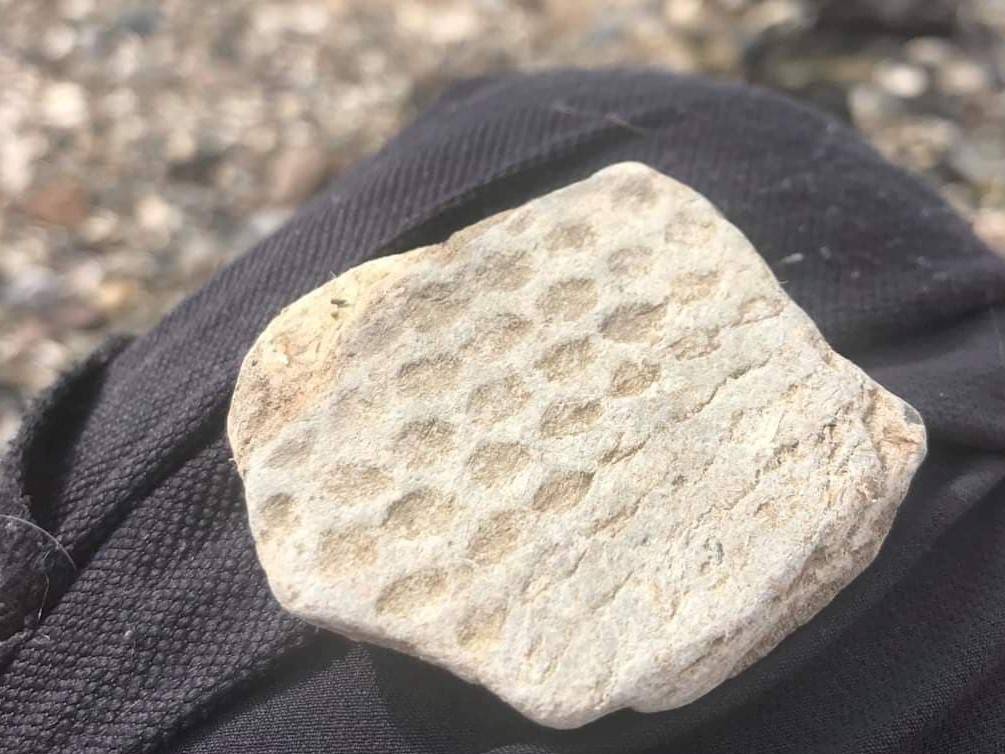
Seaworn and scrap asbestos cement is a common find on many British beaches and can easily be mistaken for a fossil – doesn’t this piece look like a fossil plant? It would be quite easy to the untrained eye to either hit it with a hammer or take a piece home and start ‘prepping’ it, but obviously, don’t. Photo credit: Joe Gibson Wood
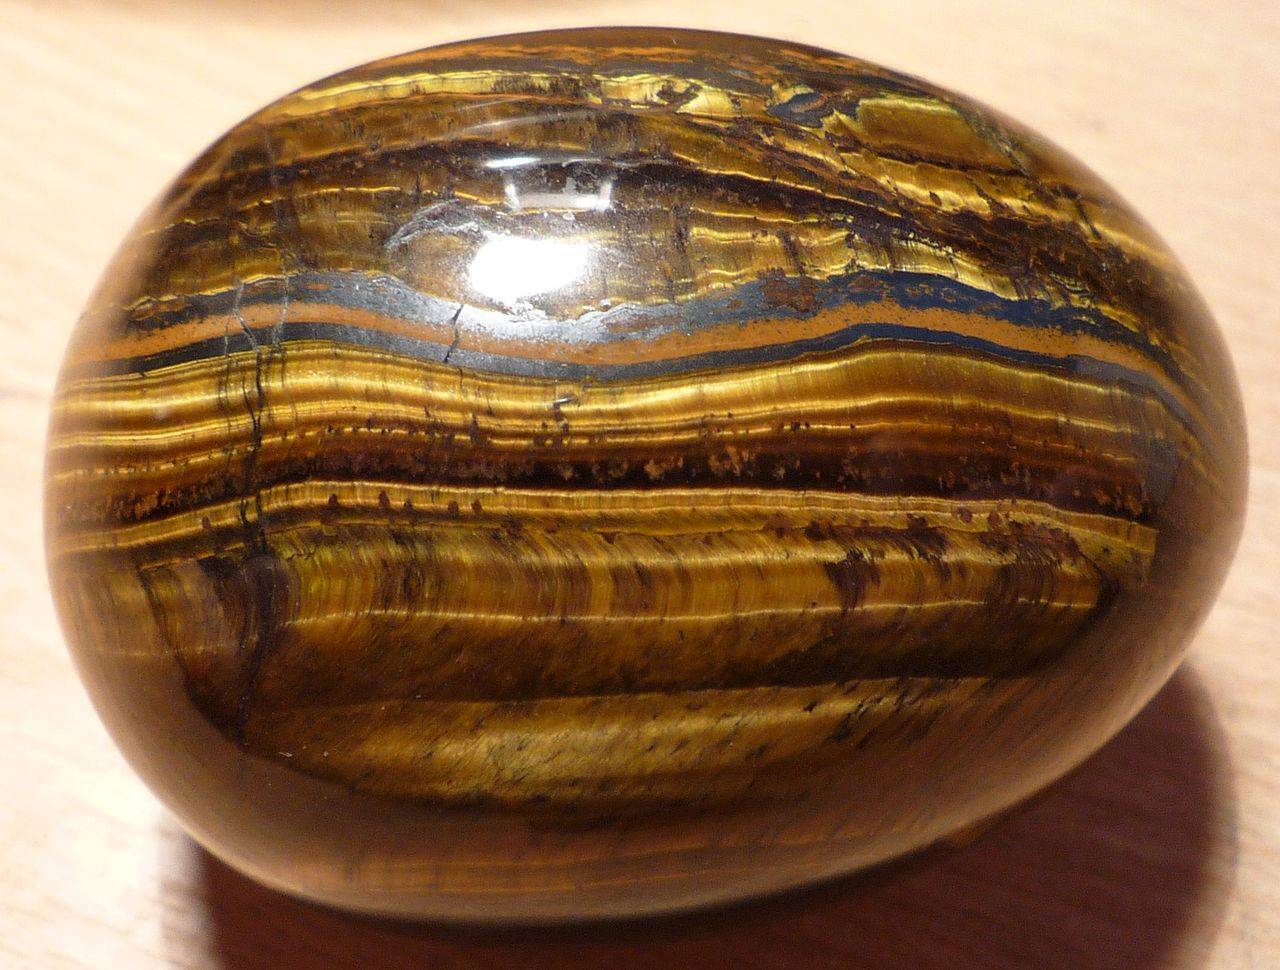
The gemstone commonly known as ‘tiger’s eye’ can contain a type of asbestos in some of the banding. Don’t be tempted to start prepping or working on gemstones with your fossil prep equipment without first doing your research! Image: Wikipedia
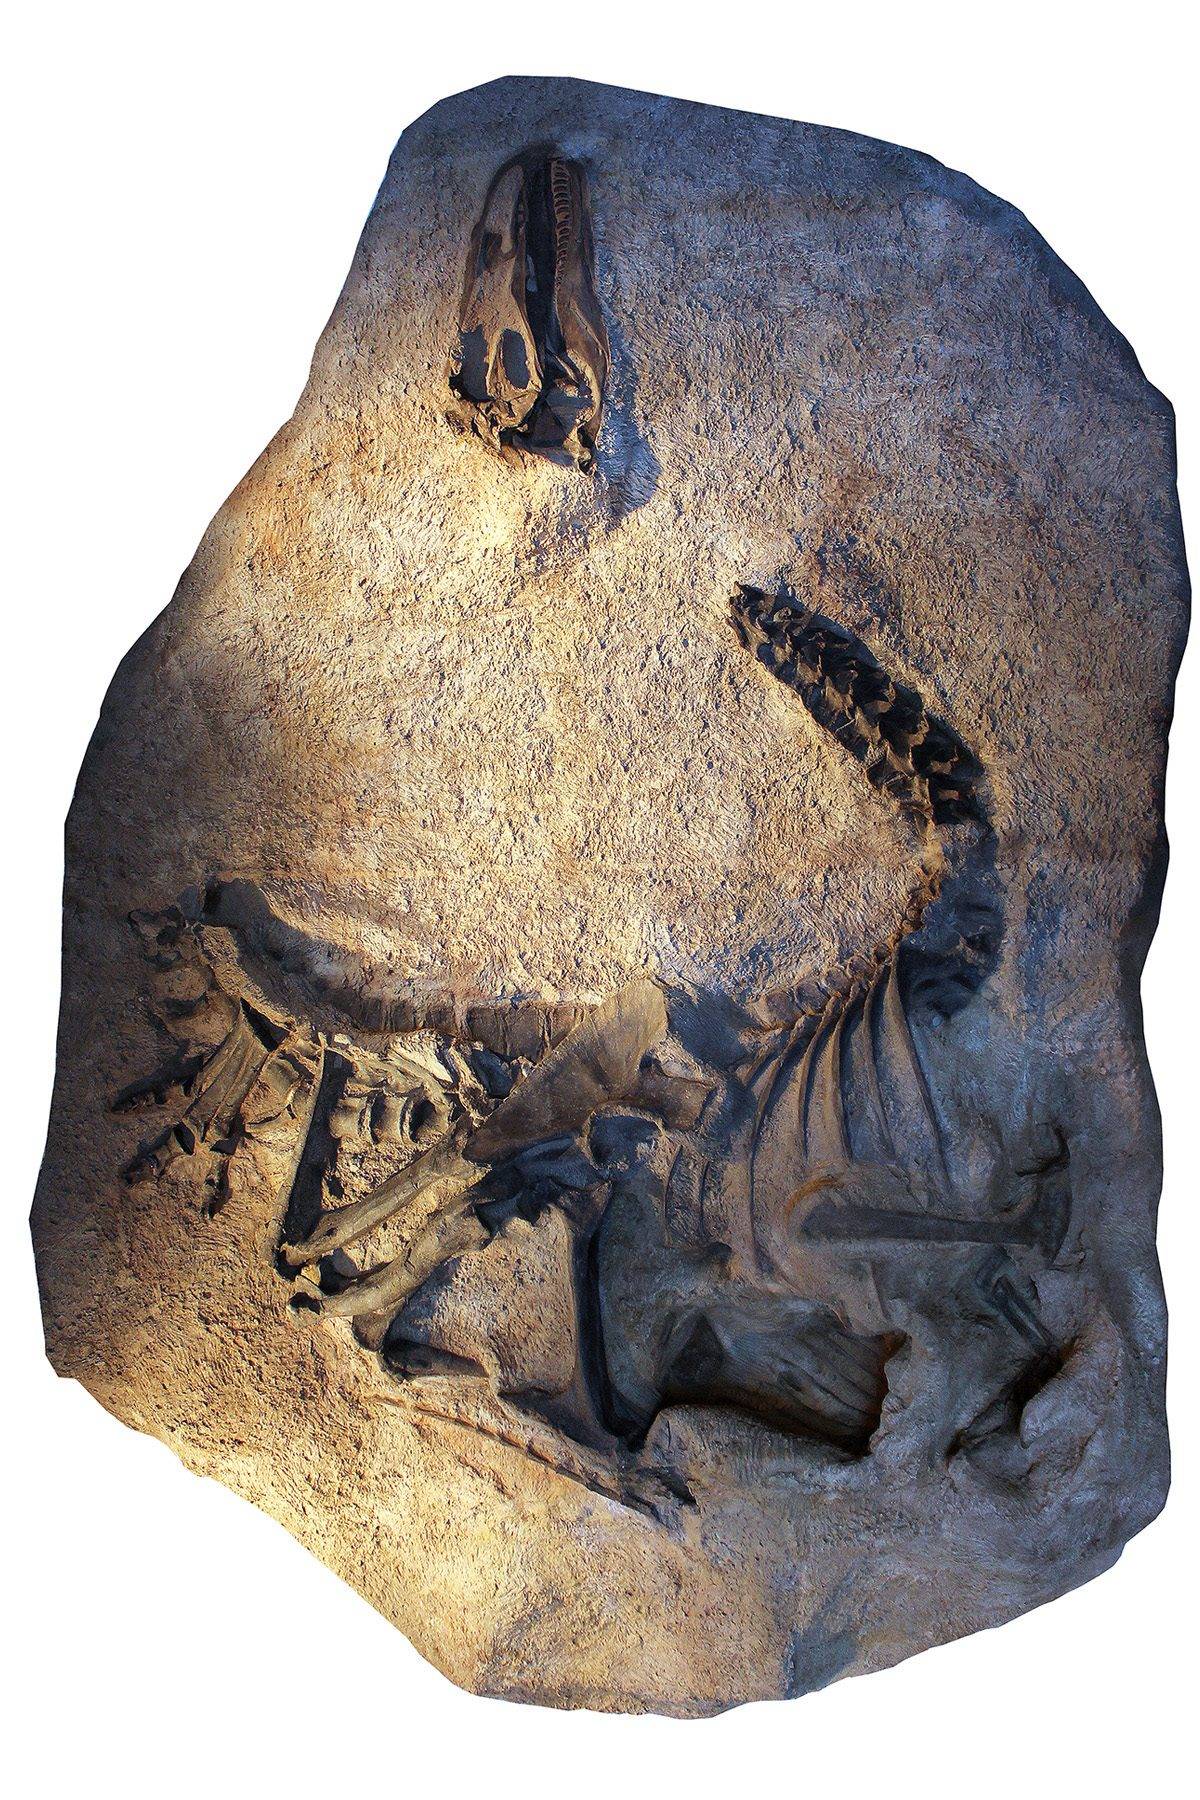
Perhaps the most famous example of these in fossiliferous deposits is the fibrous mineral erionite, a type of zeolite. Erionite is present in rocks from the White River Group (Chadron and Brule Formations) and Arikaree Formations in North Dakota. It has also been recorded from rocks in the White River Group in eastern Montana and northwestern South Dakota, but has not currently been found in the Badlands (pers. comm. Dr. Clint Boyd, NDGS). The most famous fossils from the White River Group are the mammal oreodonts, whose skeletons are quite common and the skulls are regularly seen in fossil shops.
If you’re prepping White River Group fossils from any of these locations, take particular care to wear the correct respirator, wear an outer layer to protect your clothes so you don’t carry the fibres around with you, perhaps work outside or in a blast cabinet with suitable extraction. Use a consolidant (like Paraloid B-72) to bind the surface of the rock together to prevent it from creating dust when handled. Use techniques that create the least amount of dust when working.
A lot of the time, there is no reason you would know if a rock contains any of the minerals listed here or not. Many of them can only be detected and identified correctly using a thin sections and a petrographic polarising microscope (a type of microscopes used by geologists). Have a look to see if there are any research papers on the geology of the deposits you’re interested in, and reach out to local geological institutions. The USGS in the USA is particularly helpful.

Left: Rhinocerid ribs being excavated in the field in North Dakota. The rocks here are known to often contain erionite, which can be very dangerous if inhaled. Photo kindly provided by the North Dakota Geological Survey.
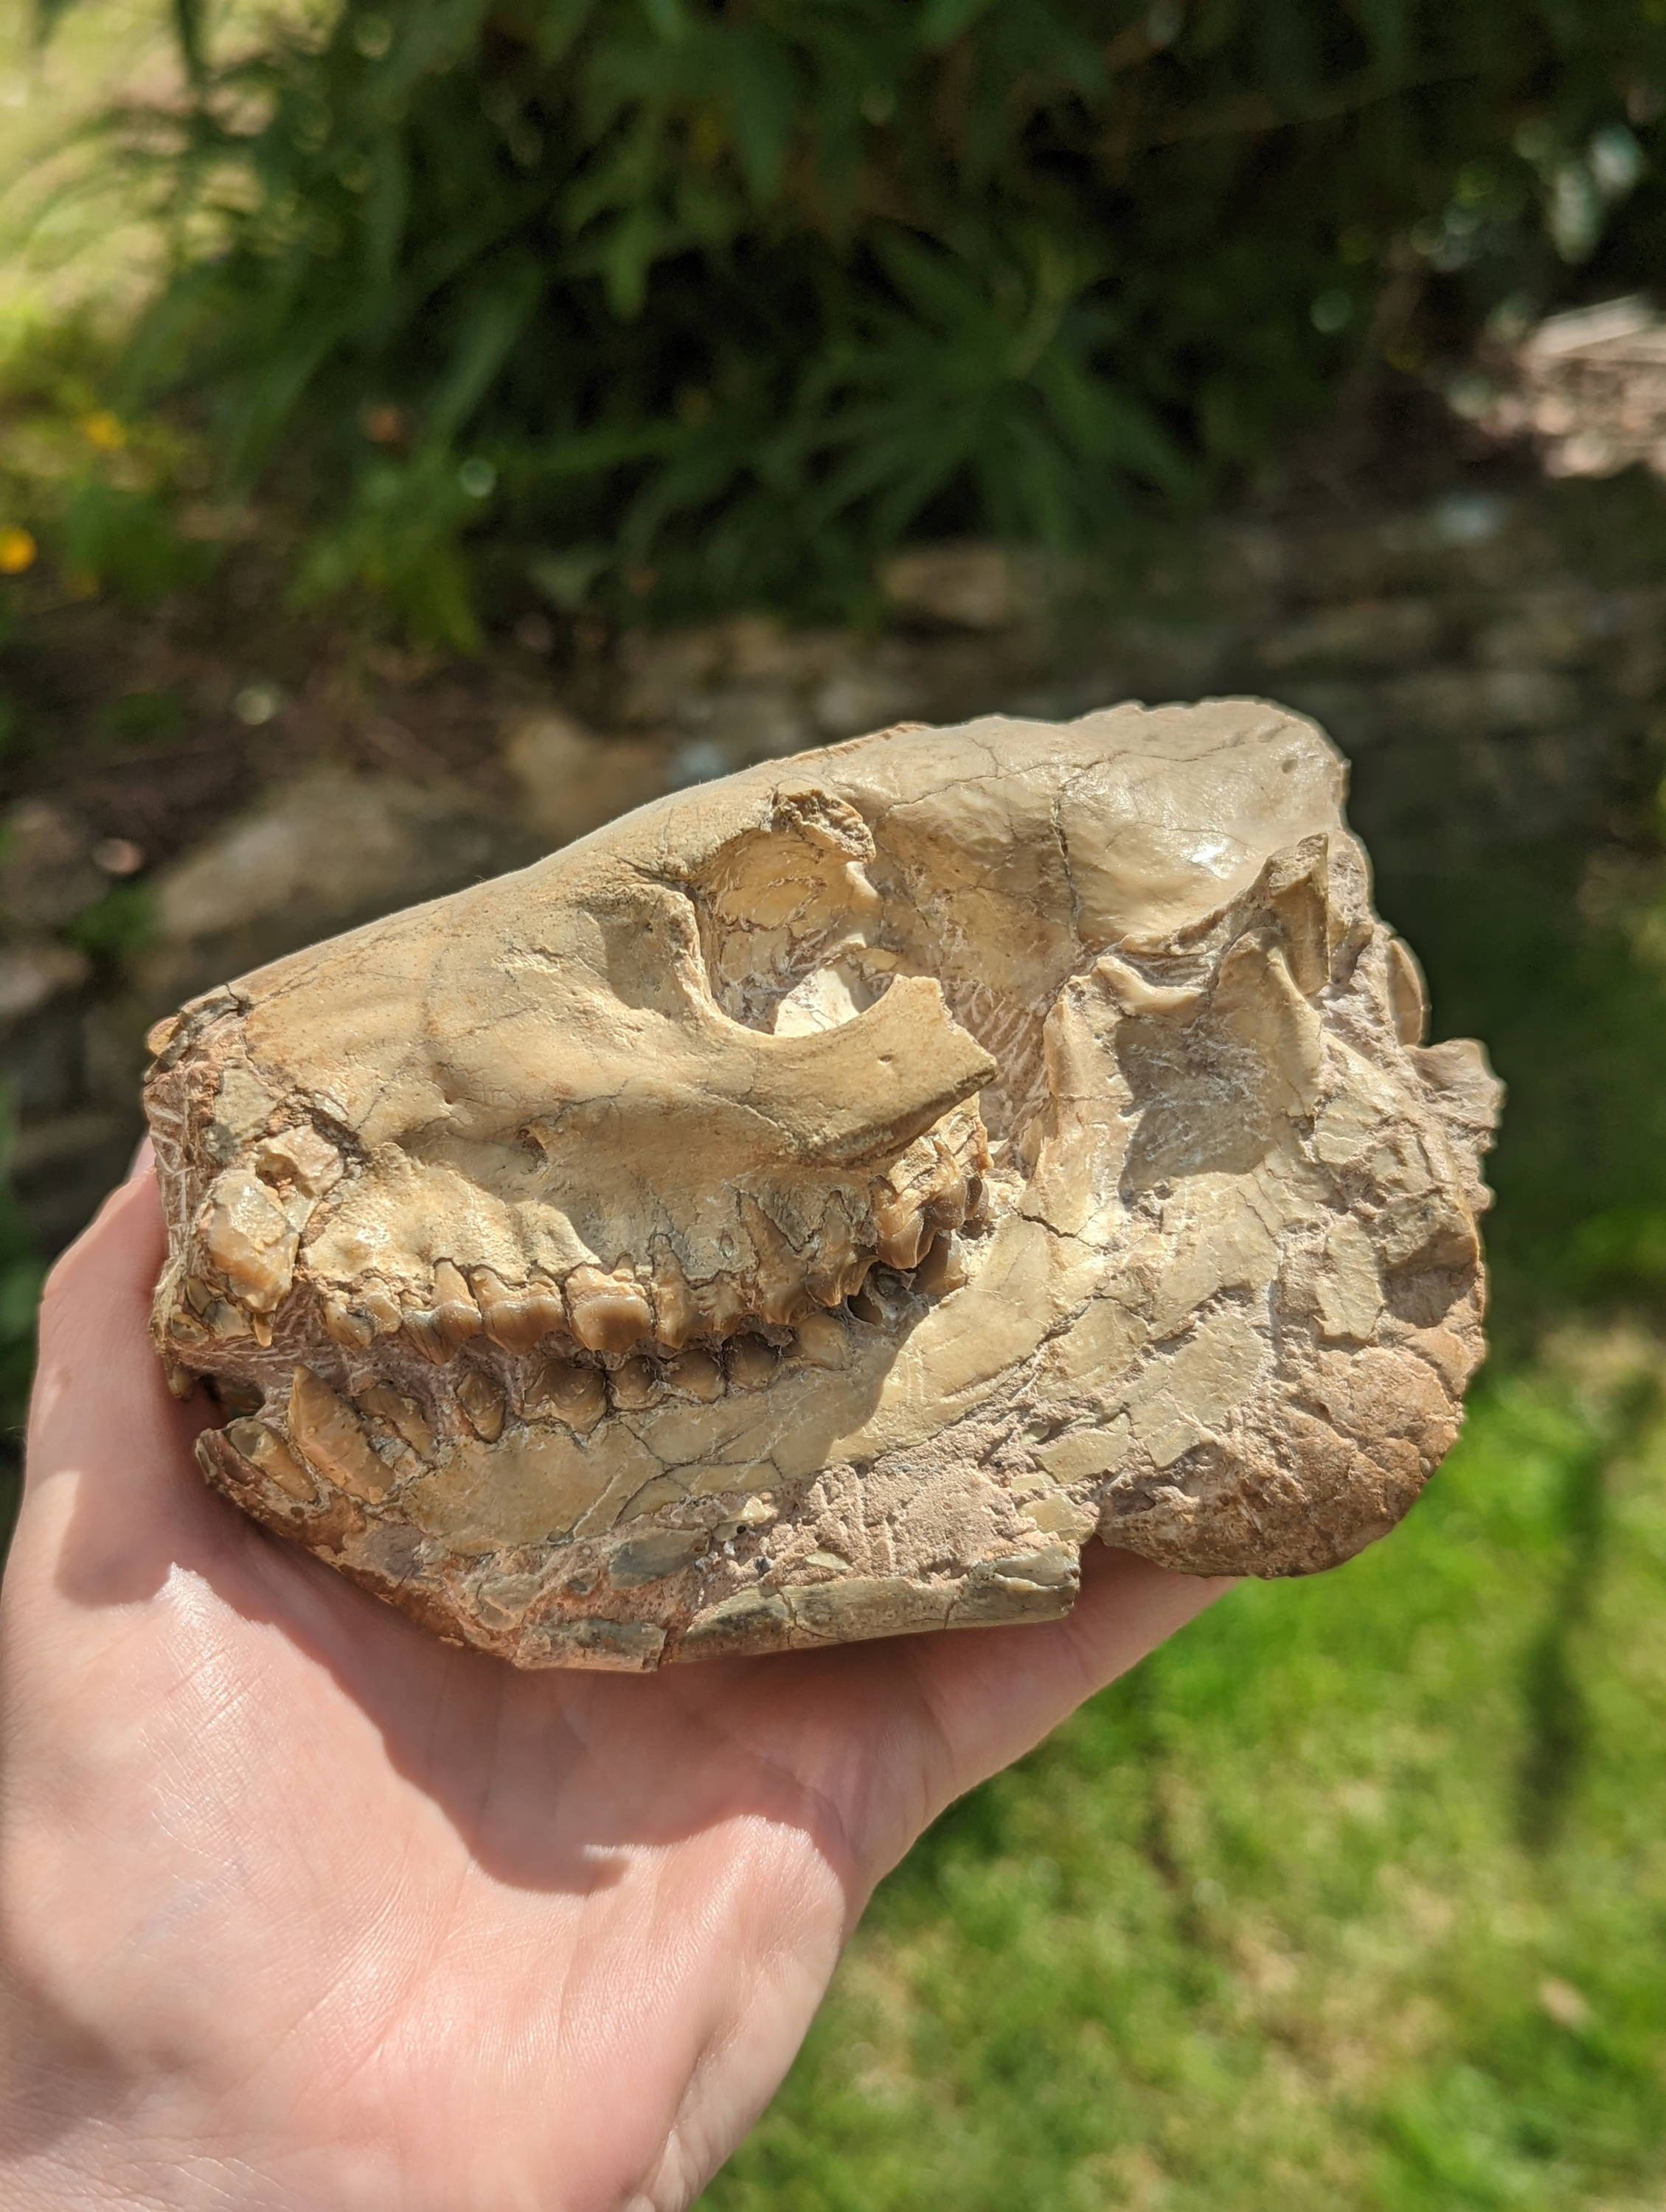
Right: An oreodont skull – these mammal fossils are quite common in the White River Group rocks.
If you do know or learn of any fossiliferous deposits that contain dangerous respirable fibres, please let us know so that we can add to our list. There must be many more out there and it’s the kind of information that could save somebody’s life.
Pyrite
We have found no direct information on the inhalation of pyrite (or marcasite) alone. However, it’s a common mineral in many fossiliferous deposits and so it’s important to discuss. Most research has been performed on coal miners, who have been exposed to pyrite alongside a number of other minerals and so working out what causes a condition known as ‘Coal Worker’s Pneumoconiosis’ (CWP) is very complex.
We all know that pyrite ‘decays’ or oxidises. This decay can occur outside the human body (on fossils).It has also been thought that pyrite oxidation is possible inside the lung if small enough particles are inhaled – although this is debated. One of the decay products (OH – hydroxyl radical) could potentially damage our RNA (part of our genetic makeup) (source: Cohn et al., 2006). Where pyrite is present, there may also be arsenic, mercury, nickel and cobalt. The inhalation of pyrite specifically has not been studied (studies conducted have only accounted for coal dust with up to 4% pyrite content), probably as it affects such a limited amount of people, but common sense would suggest that it is best not inhaled.
At least in our industry, where there is pyrite there is almost certainly respirable silica, so keep the mask on even if the pyrite alone doesn’t persuade you!
Iron Oxides
Iron oxide inhalation can cause siderosis (another lung issue similar to silicosis). Some formations are rich in iron oxides, e.g. Red Crag in the UK
This is the remarkable story of a radioactive fossil. The body and skull of this Allosaurus weren’t found at the same time. Remarkably, several years after the skeleton had been excavated, the radioactive skull was found using a radiation detector. Preparation of this specimen took seven years. This photograph is actually a cast of the original that is on display at Dinosaur National Monument. Image credit: Dan Chure
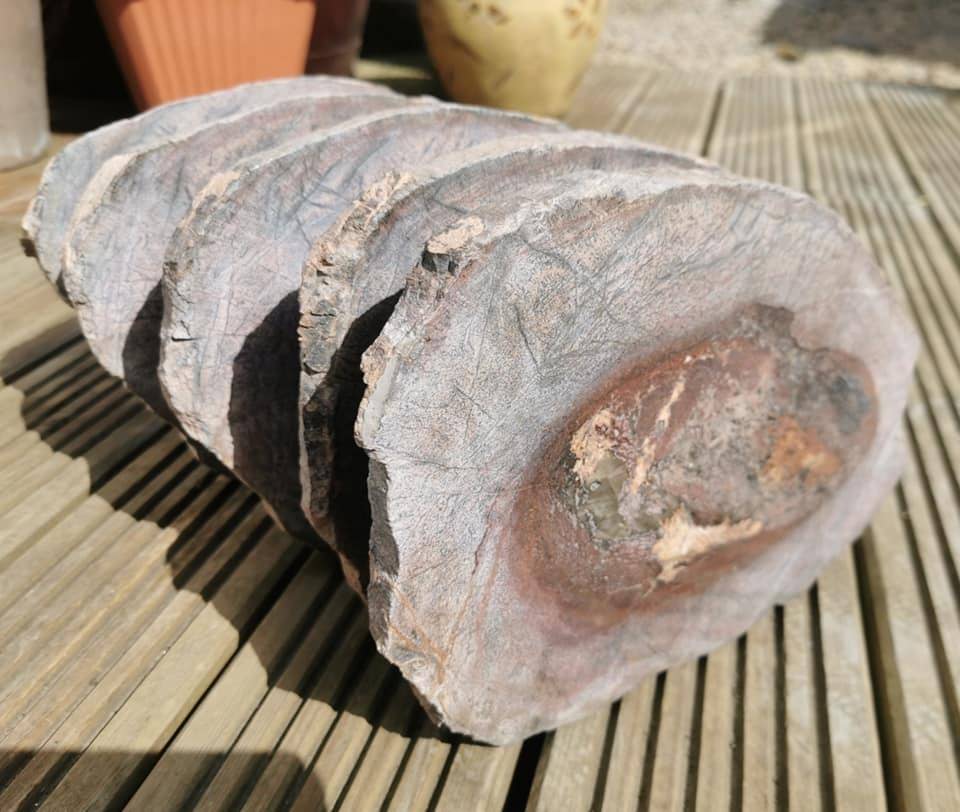
This leg bone from the Morrison Formation has taken a cut and polish really well. It is important to cut fossils like this and polish them wet, whilst wearing full PPE to prevent release of any radioactive dust. These slices are unlikely to pose a problem unless they are broken up. However, because of the beautiful polish that dinosaur bone can take, people also like to make jewellery out of it. Wearing a radioactive dinosaur bone ring or pendant for a number of years could cause you some problems. Photo courtesy of Mark Kemp, The Yorkshire Fossil Hunter
Radioactive and Carcinogenic dusts
Some fossils are known to be radioactive - a phenomenon particularly well known in dinosaur bones. The Morrison Formation (USA) is particularly famous for this, but levels of radioactivity in dinosaur bones is not unusual. Radioactive elements are really common in rocks and soils, and these can leach into pore spaces and cavities in and around the becoming part of its structure. In some cases, fossils can concentrate the radioactive elements around them.
Generally speaking, the levels of naturally occurring radioactive minerals will be minimal, and rarely emit sufficient radiation to become a serious concern. However, there are a few steps you can take to minimise your risk when working with potentially (or confirmed) radioactive specimens. If you're working on Morrison Formation material or other well known 'hot' material, it is essential to avoid breathing in the dust. Wear a respirator and use extraction. If you are cutting or grinding bone for whatever reason, do it wet to keep the dust levels down.
When cleaning your workspace, a wet rag that is then disposed of is a good idea. Always wash your hands. Do not grind radioactive minerals dry (only wet cutting, wet polishing and wet smoothing should be performed). Inhalation of dust is the most likely method of exposure and harm.
Some rocks and fossils are a source of radon gas. The gas itself is not known to cause a problem, but the products of its radioactive decay are solids that are attracted to dust particles. Long term exposure may lead to an elevated risk of lung cancer. Storage of these specimens is another thing to consider. Read this National Park Service article on handling and storage of radon gas emitting fossils.
With well documented fossil sites and locations, it will usually be well known if there is potential for radioactive specimens. Many museums and institutions will have a Geiger counter on hand to test specimens. In the home workshop, make sure you do some research to find out if there is a likelihood of radiation exposure from a certain locality and if you have a friend with a Geiger counter - why not do some quick tests?
If you are re-prepping old specimens – some radioactive specimens were coated in lead paint. If you re-prep one of these, you’re in for a double whammy.
VIBRATION
All pneumatic air scribes (and the Dremel 290) vibrate to a greater or lesser extent. Any claims otherwise are a falsification. Exposure to vibration over time can lead to:
1. Hand Arm Vibration Syndrome (HAVS)
2. Carpal tunnel syndrome (CTS)
Symptoms of HAVS can be tingling and numbness in the fingers, and a loss of ability to do fine work with your hands (such as picking up small items). Hand Arm Vibration Syndrome (HAVS) is a term that covers a vascular disease called ‘vibration-induced white finger’, neurological disease, and possible musculoskeletal damage to bones and joints.
It is thought that HAVS causes nerve damage and damage to blood vessels, which can progress and become a serious and permanent disability with a decrease in grip strength and fine motor skills. Damage from HAVS can restrict the ability to do fine work. It can progress into ‘vibration-induced white finger’. There’s a bit of a misconception in fossil prepping. If your fingers haven’t turned white while prepping that ammonite – then you haven’t got white finger so you’re OK? That’s unfortunately not the case. The fingers can turn white during cold or damp conditions and become very red and painful on recovery. This is more related to the cold, rather than the prepping (although the two can arguably go hand in hand on a cold day!).
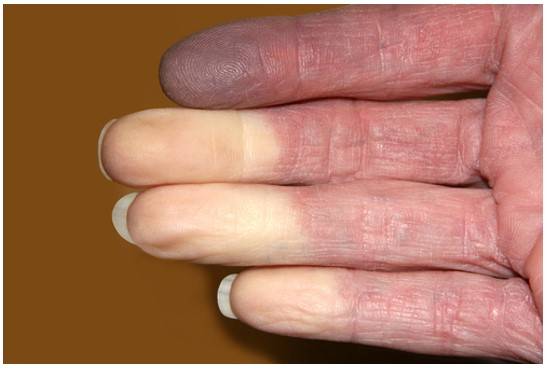
HAVS from vibrating tools used to be called ‘vibration white finger’. Nerve damage can prevent flow of blood in cold or damp conditions, which causes the fingers to appear very white. They become red and painful once they start warming up.
CTS may cause pain and weakness in the hand and wrist, and it is believed vibration exposure can affect the median nerve in the wrist causing carpal tunnel.
Symptoms of HAVS and CTS may come and go, but if you continue to be exposed to vibration they may get worse and become a permanent disability. It has been known to occur over as little as a few months, but is more typically over a period of years. Some people seem more susceptible than others.
The number one thing you can do is know your tools - what are the vibration values? Which ones vibrate the most? Which ones vibrate the least? You can use tools that vibrate less for considerably longer periods of time. On the other hand, you might be able to get the job done more quickly with a higher vibration tool, therefore reducing your overall exposure.
Employers legally require vibration values to calculate HAVS (Hand Arm Vibration Syndrome) risk for their employees if they use vibrating tools, (in the UK, USA, EU at least), but they can be just as useful to the home preparator.
In the UK we have an ‘action value’ and a ‘limit value’ (these will vary from country to country), where by an employee’s maximum exposure over a working day can be equated to a number of 'points’. The action value defines where an employer must start taking action to reduce exposure, and the limit value is the maximum allowable in the workplace. This does not mean aim for the limit value, because this can still cause HAVS, but to do everything reasonably you can to keep under that.
Vibration is measured in m/s2.By using the vibration ready reckoner chart below, you can have a look at the value of the tool, and then how long you intend on using it. For instance, over a six hour period, the Trilobite is well below the exposure action value, but the ZOIC Chicago is a lot closer to the limit value.
How you use your tools and what you’re using them on can also make a big difference.
· Hold the tool loosely and try to vary your position.
· Ensure that tools are well maintained and oiled.
· Take regular breaks of at least 10 minutes away from the tool at a time (perfect for a drink and a snack!).
· Short bursts of work are better than long periods of work without a break.
· The harder the rock, typically the lower the vibration (i.e. pyritic rocks).
· Rounded chisels often impart less vibration than points.
· Pusher-plate tools (Microraptor, Velociraptor, Trilobite) - If you keep your nibs sharp, you will also experience less vibration.
· Impact-driven tools (anything with a piston inside – T-Rex, ZOIC Chicago, Bronto) – don’t keep your nibs too sharp as this will increase vibration. You want the end of the stylus to be ever so slightly rounded.
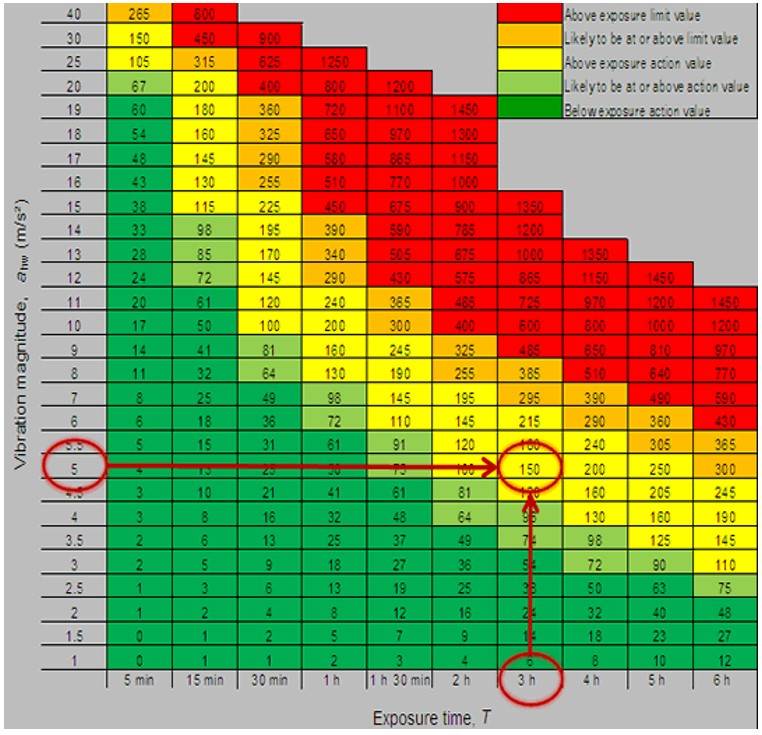
The vibration ‘ready reckoner’. You can use this chart to estimate your exposure risk if you know the vibration value of the tool and approximately how long you will be using it. Values can be added together to come up with a total number of points. In the example given, a tool that vibrates at 5m/s2 in use for 3 hours gives you 150 points, above the action value but below the limit value. For a full explanation of the points and way the chart works, click here to go to the HSE website. https://www.hse.gov.uk/vibration/hav/readyreckoner.htm. There are a number of vibration calculators online which will also tell you how long you can use a tool for before you reach the exposure action value and limit values. Source: HSE
When prepping fossils, use a sandbag to absorb some of the vibration. Some people find it tempting to hold the fossil in one hand and prep it with the other, but if you use a sandbag or a supportive surface you will find that this is much easier on your body, and easier to prep well too!
Keep yourself warm - and keep your tools warm before you use them! This will improve circulation. This is more difficult with pneumatic tools than electric tools, as compressed air quickly flows through them and cools them down. This is why we use thermal insulation on some of our tools, and it is another great advantage of our tools low air consumption (less air flowing through = less rapid cooling). Wearing thin, fleecy gloves allow you enough dexterity to use your tools properly, but provide just that little extra thermal insulation in the winters.
Vibration absorbing gloves receive mixed reports on their effectiveness, but being so bulky they would be a cumbersome addition to the fossil prep workshop. Some gloves might even increase vibration exposure. We have been experimenting with foam sleeves to see if they reduce vibration exposure.
Vibration values usually vary between manufacturer’s declarations and real-world scenarios. This is because testing has to be standardised worldwide and replicable (otherwise manufacturers would just find ways to produce favourable results rather than comparable, repeatable scientific ones). There is a set procedure for vibration testing which isn’t entirely in line with how we, as fossil preparators, use our tools. We have tested our air scribes in real world settings, too, and we find that they are generally within the error limits.
If you find you are experiencing symptoms of HAVS, don’t just power through. Stop prepping and give yourself a break. Consult a doctor. It’s a common condition in many industries that impacts many people’s livelihoods, so it will most definitely be something they’ve heard before.
EYES
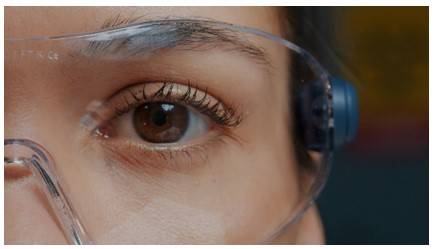
Eyesight is arguably the most precious sense to the fossil collector and the fossil preparator. Eyes are amazing things - they are self-flushing, quick to repair, and surprisingly resilient. But, they are also easily damaged. It goes without saying that goggles or safety glasses should be worn when handling chemicals in fossil preparation as listed in the Safety Data Sheet, but it's just as important to wear safety glasses when doing mechanical prep.
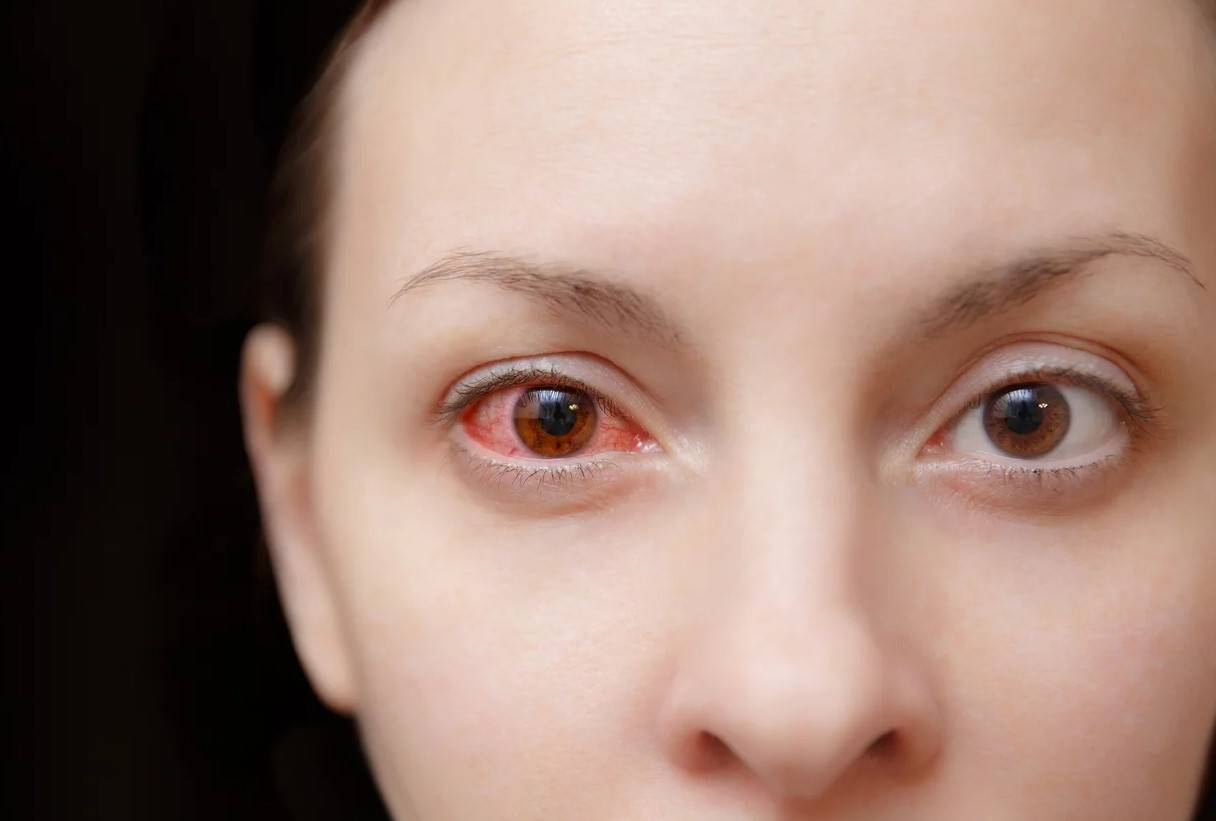
Eye protection is a really easy essential safety measure to take in fossil prep - you should either be using a self-contained cabinet with a protective lid, or wearing safety glasses or goggles when prepping. When using air scribes you should protect yourself from flying rock chips. Most of the time these chips work their own way out of the eye, but occasionally a trip to see a doctor is necessary to dislodge a particularly stubborn piece. Corneal scratches and temporary visual impairment are quite commonplace if safety glasses aren't worn, and it only takes one unlucky moment to cause permanent blindness.
Safety glasses are designed not to shatter in the same way as normal glasses if a flying projectile hits them. Indeed, most are made of polycarbonate which is an impact-resistant plastic. It can be difficult to wear normal glasses as well as safety glasses, but it is worth finding some that are reasonable comfortable to wear over the top of your ordinary spectacles. There are many occasions, though, where you will need to wear goggles not glasses. If you’re using a bulk removal air scribe, and going at it enthusiastically, a piece of rock could easily dislodge your safety glasses – so on some occasions it would be much safer to wear goggles.
Tasks like grinding really need to be performed inside blast cabinets with extraction- the amount of dust generated will be able to bypass safety glasses with ease and seriously irritate your eyes. Even if your respiratory protection is sufficient, your eyes are also at risk. You can wear goggles for this sort of task to protect against nuisance dust.
Now, many of you will know that it is not easy to wear masks and goggles or even masks and safety glasses at the same time. Throw some actual glasses into the mix and it’s hard to get the balance right. Experiment with combinations of masks/glasses/goggles that work for you. Some people favour full face respirators which have inbuilt goggles. The breathing part of the mask is separate, so if the mask fits you, your goggles won’t steam up. It is also possible to purchase prescription lens holding inserts (and ask an optician to create the lenses) that fit some brands of goggle.
Some rock types might actually pose a risk to your eye-chemistry. Pyritic dust for instance is often a low pH (more acidic) and therefore could be harmful. You wouldn't knowingly put sulphuric acid into your eyes even in small quantities, but this is exactly what is happening with pyrite dust. Some rocks like limestones, dolomite and chalks are known to contain a number of alkaline minerals, and so can be considered mildly caustic if they are able to enter the eye. Crushed limestone and dolomite are used in gardens to increase the pH of acidic soils.
We also must be careful using things like iron powder in air abrasives. If a rock chip that has iron powder on it enters your eye, this can cause a dark stain as the iron powder rusts.
We always have an eye-wash station in our prep lab alongside a first aid kit that is kept well topped up. Some rocks still manage to get around many layers of eye protection! An eyewash is the first step to attempt to remove a foreign body. You might have a scratchy feeling, a watery or red eye, a sharp pain followed by burning or irritation, blurred vision, sensitivity to bright light or bleeding into the white or your eye. If you experience any of these symptoms, do not attempt to remove the foreign body yourself and instead seek help from a medical professional.
Most injuries heal really quickly with no long-term problems, but there is a risk of infection and scarring, eye ulcers and corneal scarring that may lead to some degree of permanent visual impairment.
These are two images of two fossil preparators. Now you’ve read through the article, which do you think is better kitted out for a day in the prep workshop? What would you do differently?
Above: Despite the dust extraction this gentleman isn’t wearing a mask or respirator, no eye protection, and is holding the fossil in his hands which will be increasing his exposure to vibration. He's also working quite far away from the captor hood, reducing its effectiveness quite dramatically. Thank you Chris for selflessly demonstrating some what not to do’s!
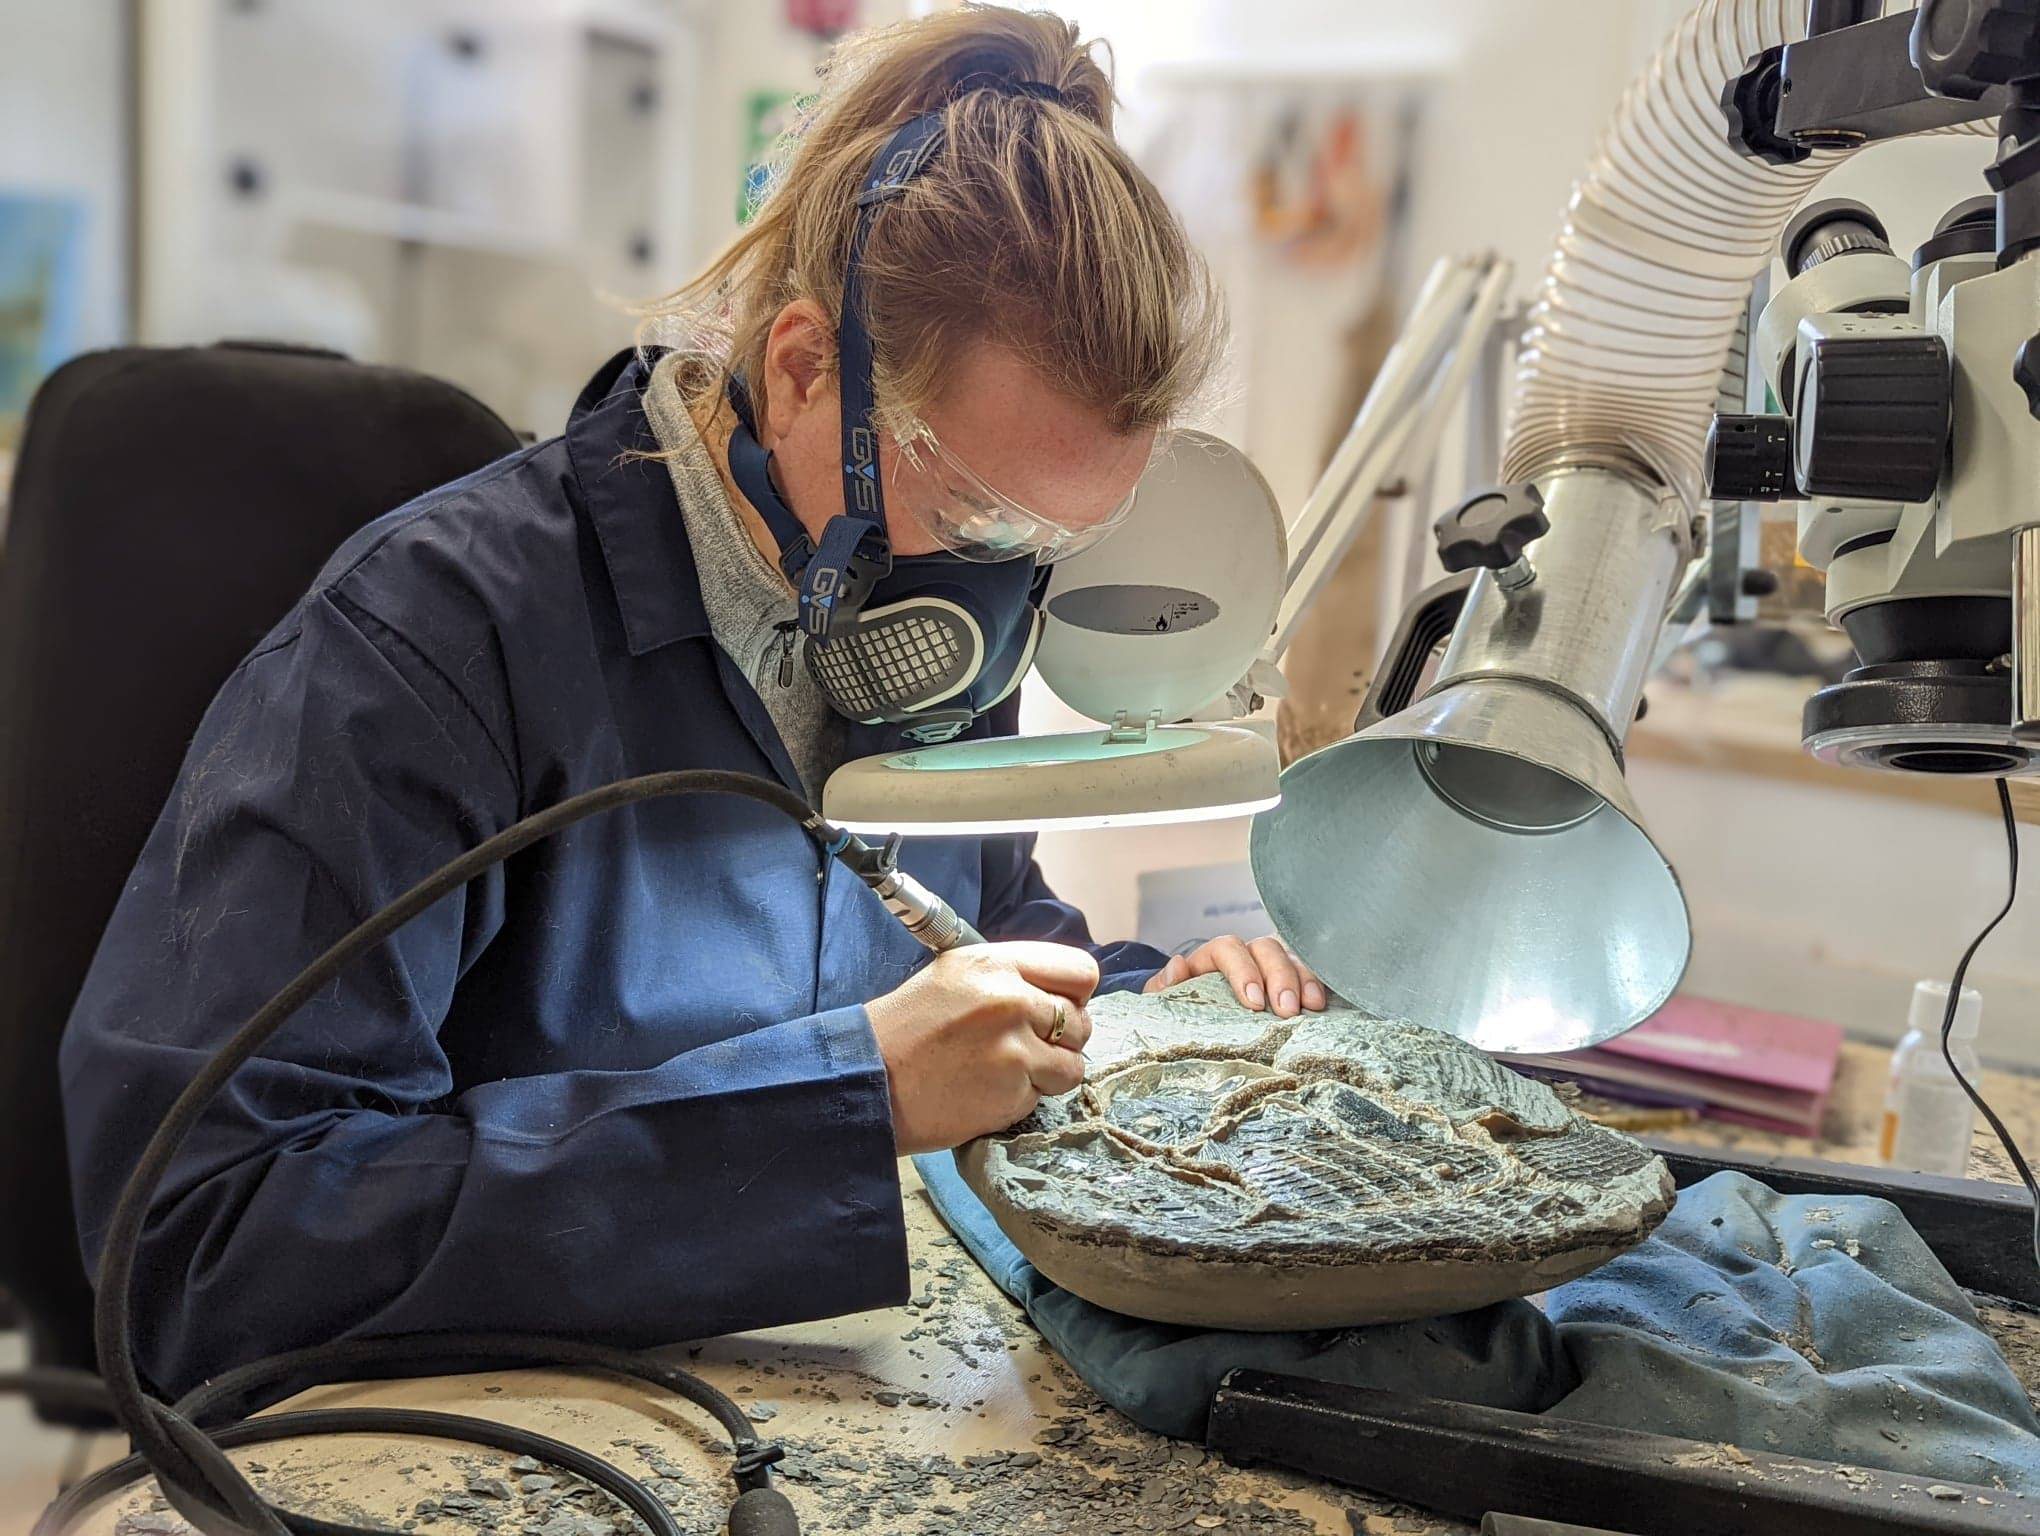
Below: Kate is working wearing a P3 respirator and safety glasses. She's fortunate that her beard is underdeveloped, therefore her mask fits her! The captor hood is right up close to the workpiece, and the fossil is sitting on a sandbag to help support it and reduce vibration. The lab is quiet, with air compressor and dust extractors located in a separate building. The tools are not excessively noisy and so any ear protection would be a personal choice.
Unfortunately, when we see images of fossil preparators online working in the big labs or fishbowl laboratories, or in documentaries, they are rarely wearing the PPE. It makes for a much better picture when it's all gone, even if they are people who normally wear it day in day out. We need to normalise wearing appropriate PPE for the job in our community. That goes for amateurs, scientists and photographers!
EARS
This section is probably most relevant to those of you who are working with or next to very noisy air compressors. You want to aim to keep your workspace quieter than 80-85dB, but any noise below that that you find uncomfortable, just pop on some ear defenders. If you are an employer, most countries have Noise Regulations.
You’ve got two methods of controlling noise:
1. Choosing quiet(er) equipment. Quiet air compressors, quiet dust extraction and quiet tools not only keep the neighbours happy, but you are less likely to damage your hearing.
2. Wear ear defenders or ear plugs that cancel out some of the noise. Pick whichever is most comfortable for you. Some people like to have headphones, others prefer to wear earplugs and a woolly hat. Do whatever works for you and effectively protects you hearing.
Exposure to loud noises(particularly sudden and extremely loud ones – ahem – air compressors) can cause permanent hearing damage and other symptoms like tinnitus.
Quieter compressors and dust extractors normally come with a higher price tag which is a downside. You can also choose noisier dust extractors or compressors and keep them separate from your workspace, e.g. running air hoses and ducting through a wall. Avoid boxing your air compressor up in so much acoustic insulation that it has no ventilation. Air compressors overheat quite easily, so boxing them up is not recommended.
CHEMICALS IN THE PREP WORKSHOP
We won’t go into the safety of too many of the chemicals used in the prep lab, as they will have their own safety data sheets and the advice is so varied from chemical to chemical. Follow advice for PPE, emergency situations (eye contact, skin contact, ingestion, inhalation), storage, fire extinguishing etc.
However, there are a number of chemicals that go hand in hand with mechanical preparation and surface finishing, so these are worth mentioning in an article on mechanical preparation. Most preparators will tell you that they have had experiences with acetone and acetone-based chemicals where they got a bit lightheaded! Paraloid is widely used in the workshop, but as the acetone evaporates it is easily inhaled. Make sure you’re working in a well-ventilated space with plenty of airflow. Also remember that acetone is highly flammable, so please don’t smoke or randomly decide to work by candlelight!
The same advice applies for a number of substances like varnishes, glues, activators, and many more.
ERGONOMICS
It goes without saying that you should try to assume a comfortable position when prepping. Neck pain and back pain are no fun! Sitting up straight and using a comfortable chair area good idea. It’s not always possible to prevent yourself from stooping over a larger specimen, but with the smaller ones do your best.
AIR ABRASIVES
Did you know that sandblasting, using actual silica sand, is banned in many countries due to the high risk of silicosis?
Never attempt air abrasion without a blast cabinet and suitable dust extraction. It is important to remember, that regardless of the powder use, air abrasion of rocks also releases respirable silica. Respiratory protection is therefore essential even if the powder you use is considered more of a nuisance dust than a dangerous one.
If for whatever reason you have to prep outside a cabinet, even just for a short time because a specimen is too big, make sure you are wearing a respirator hood fed by a separate air supply. Wherever possible do this outdoors.
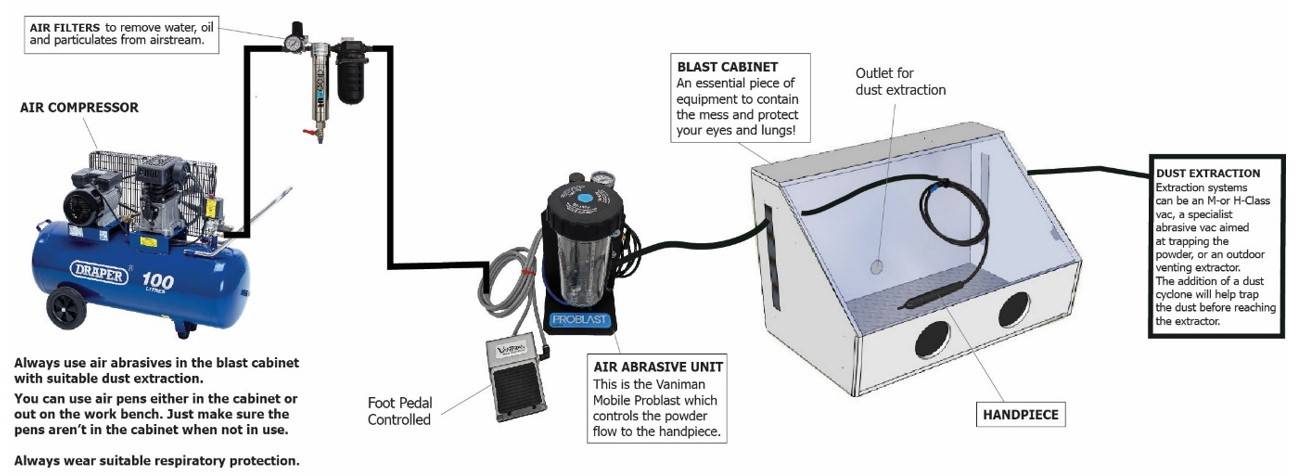
A typical air abrasive set up. Air abrasives incur a much greater investment in equipment and space than air scribes. They require a very large air compressor, air filters, blast cabinets and suitable dust extraction. This is why many beginners don’t start out with air abrasives, but rather progress on to using them.
To date there have been no comprehensive studies to evaluate the impacts to health on aluminium oxide, glass beads, walnut shells, pumice and other blast medias (CDC, 2014). We’ll discuss briefly a couple of commonly used blast medias and what we do know about them:
Aluminium Oxide:
Chronic Inhalation of Aluminium Oxide can cause Aluminosis (a type of pneumoconiosis). It is therefore essential to wear respiratory protection. Fine dust can cause acute inflammation, wheezing and coughing. There are limits to aluminium oxide exposure which are <4mg/m3 over 8 hours (respirable dust) and<10mg/m3 over 8 hours (total dust). Aluminium oxide has also been known to cause conjunctivitis and chronic exposure can even cause neurocognitive dysfunction (source: National Poisons Information Centre).
Iron Powder
Iron powder presents a respiratory risk. It can irritate the respiratory tract, and there is evidence to say that prolonged exposure to respirable dust can cause respiratory issues.
It also presents a potential explosion risk as it is combustible. In its finely powdered form, it is flammable. It falls into Class 1 (slow explosion - scaled from 0-3). It is important to reduce the potential for sparks within your extraction system or around the iron powder. Do not be tempted to smoke in your workshop for instance! Make sure your extraction systems are grounded (we use galvanised metal ducting as it is easy to ground). Always have a fire extinguisher in your workshop (dry powder or dry chemical – do not use a full jet of water as this may spread the fire). Avoid creating large clouds of dust and remove fine dust where you can. This is normally extracted away after the first use, and only the coarser dust collected in the base of the cabinet is recycled.
Some sources of ignition are obvious – sparks, smoking - but static electricity and poor maintenance of extractors are less obvious. Never get out your angle grinder or rotary tool to cut rock at the same time as working with iron powder. Best to take this outside! External lighting is best when working with iron powder – don’t use any old fashioned lights. LEDs are best for not creating a spark. Try to prevent static electricity where possible.
You could also use a dust cyclone to separate the iron powder and other particulates from entering the dust extractor. A stone chip circling around the extractor could potentially create a spark.
You will be pleased to hear though, that aluminium oxide and iron powder together do not make thermite.
Dolomite
The dolomite that we sell may contain a maximum silica content of 0.05-0.5%. This is important information to gather before using it as a blasting media if sourcing elsewhere. If a substance contains 1% or more of free silica, it is subject to the prohibition of using crystalline silica for sandblasting (in the UK and EU). Even if your country does not operate a ban on silica for sandblasting or any limitations, there is a large body of evidence to suggest it is dangerous.
Skin Protection
This probably goes without saying, but wear gloves when you are using air abrasives. What can abrade the rock can very easily abrade your skin!
TOP TIPS FOR A SAFER WORKSPACE
Find a separate space to prep. We recommend having a dedicated space for fossil prepping that is separate from your normal living space. For many, this is a basement, a shed, a garage or even outside on a dry day. As much as it is fun and enjoyable, fossil prep is not a ‘kitchen table’ hobby. If you use your prep space for other things like carpentry or other hobbies, make sure to cover your fossils and your tools to keep both them safe, and reduce the risk of kicking up dust.
Cleaning: we can't stress the importance of keeping your workshop clean enough. You can't prep 'wet', but when it comes to cleaning up your workshop afterwards damp dusting is the best way of keeping the stone dust down. Simply spritzing your piles of rock chips with a spray bottle before sweeping them up will help keep the dust out of the air. It’s just as important to wear a mask when cleaning as it is when prepping as you’re likely to disturb more dust.
Visitors in the workshop? If someone wants to watch you do some prep work, or even come in to see how you’re doing, encourage them to wear a mask too!
HEPA Filters running in the workshop: We have a HEPA filter with activated carbon running 24 hours a day in our workshop. It’s just an air purifier, but it helps keep our space clean and free of airborne dusts. Most run very quietly and don’t use any more power than a lightbulb.
Organise your workspace: It's undeniably easier to work in a space that is clear and uncluttered. It's also safer. You're less likely to have spills, trips and falls.
Routine: Keep your workspace organised and make the PPE a part of your routine. Try to leave it where it’s easy to remember (e.g. on top of your tools) and establish good habits. It’s easy to fall into the trap of “I’ll just be 5 minutes”. If you know that you put your PPE on at the beginning of those 5 minutes you won’t regret it, but having it as a well-established part of your routine is a good idea. Wear overalls or an apron to prevent bringing the rock dust back into the house with you.
Keep your air compressor and equipment well maintained. Air compressors can become ‘bomb-like’ if the tank is allowed to rust through. Drain after each use and make sure that you depressurise it at the end of your shift. Follow all maintenance instructions in your manual.
FOSSIL PREPPING AND CHILDREN
A natural question that people often ask us is - can my children use your tools? We recommend against young children using electric or pneumatic fossil preparation techniques. This is not because they can't do it, or do a good job, but because of their health and future health. If you child is desperate to start prepping, you will need to take into account a few special considerations and be willing to invest in equipment that will be safer for them to use.
1. The bones in children's wrists and hands aren't fully developed and so we would strongly advise against the use of vibrating tools. Consider that pneumatic tools vibrate a lot less than the Dremel 290. The Trilobite is a good starting point as our lowest vibration option of air scribe and is worth the extra investment to keep your child safe. Keep work periods short, with long rest breaks.
2. It’s hard to find respiratory protection to fit children; and we haven’t found any disposable masks to date that could fit them. But, there are some respirators on the market that will fit many older children (the S/M size of the GVS brand respirators will fit most 10+ year olds). To fully protect you, a respirator must fit extremely well, and the reality is that the majority will be far too big for children and therefore provide little to no protection against respirable silica and therefore silicosis. You can get FFP2 and N95 dust masks for children, but these aren't considered sufficient protection in fossil prep.
3. As a parent, if your child is using pneumatic tools, please be very conscious to handle all the pneumatic side of things yourself such as draining the compressor, making sure the fittings are safe and secure, and turning things on/off for the day.
4. The good news is that there is plenty of eye protection out there for children.
If your children are desperate to give fossil prep a go, and you’re not looking to invest in a full pneumatic set up, you might want to get them started on using small hammers and chisels and small prepping picks. This will allow them to explore fossil preparation without putting themselves at too much risk. Work outside in a well-ventilated place for short periods of time. Fossil polishing with wet and dry paper is another brilliant activity you can do with children!
Once they are older and their faces are big enough to fit a respirator correctly, and if they are really desperate to do some serious fossil prep,
As a parent or guardian, any fossil preparation for under 18s will be at your discretion.
Acknowledgements
This article would not have been possible without the contribution from the fossiling community. We are lucky to have a number of experts in various aspects of health and safety relevant to this article who are active fossil collectors and preparators. We would like to thank the following people for their contributions:
Patrick Llamas, BSc (Hons), CoC (Asb)
Bernard Robinson MBE, B.Sc (Hons in Geology). A.R.S.M. H.M Factories Inspectorate and Health & Safety Executive 1971 - 2011
Richard Forrest
Clint Boyd, Ph.D. Senior Palaeontologist, Geological Survey
Mark Kemp
Everyone who has provided useful comments, insights and recommendations. If you have helpful additions, please do get in contact with us.
We chose to make this article reader-friendly for wide accessibility and not full of academic references. We have done our best to identify accurate information, and have listed below further reading if you would like more information.
Useful links for further reading
Please find below a series of links for further reading. Most of the literature out there is aimed at either employees or employers, but texts are carefully written to make them easy to understand and follow.
Many of these links are from HSE (the Health and Safety Executive) here in Great Britain, because that's where we are based. If you're not from the UK, they will provide good guidelines for hobbyists. If you are an employer or employee and want to check the laws in your country (if you're not based in the UK), you're sure to have your own national health and safety body (e.g. NIOSH in the USA). If you have questions as an employee or employer, health and safety bodies are normally very happy to answer. The goal is to keep people safe.
Silica Dust:
Control of exposure to silica dust: A guide for employees (Free PDF book), HSE, 2013
Respiratory protective equipment at work: A practical guide (Free PDF book), HSE, 2013
Health surveillance for those exposed to respirable crystalline silica (RCS), HSE (PDF)
Vibration:
Stoneworkers: Vibration and Noise (HSE, webpage)
Hand-arm vibration at work (HSE, webpage)
Hand-arm vibration at work: A brief guide (Free PDF book), HSE, 2012
Hand-arm vibration: The Control of Vibration at Work Regulations 2005, (Free PDF book), HSE, 2019
Vibration solutions: Practical ways to reduce the risk of hand-arm vibration injury
Vibration ready reckoner (HSE, webpage)
Vibration HAVS Calculator (HASpod, webpage)
Questions about Vibration Exposure Monitoring (HSE, PDF)
Dust Extraction - officially known as Local Exhaust Ventilation (LEV)
Local exhaust ventilation (LEV): workplace fume and dust extraction. Popular guidance and tools, (HSE, webpage)
Noise
Noise at work: Advice and guidance (HSE, webpage)
Personal Protective Equipment (PPE)
Personal protective equipment (PPE) at work (HSE, webpage)
Respiratory protective equipment at work: A practical guide (HSE, 2013)
Fit testing basics for RPE (HSE, webpage)
Radioactive Fossils
Fossil Vertebrates As Radon Sources: Health Update, (National Park Service, 1993, PDF)
Disclaimer: THIS WEBSITE DOES NOT PROVIDE MEDICAL OR PROFESSIONAL ADVICE
This article, whilst compiled from a number of reputable sources, does not substitute for professional medical or industrial advice. This information, including but not limited to text, graphics, images and other material contained on this page are for informational purposes only. No material on this site is intended to be a substitute for professional medical advice, diagnosis or treatment, nor does it substitute for industrial/legal advice. Always seek the advice of your physician or other qualified health care provider with any questions you may have regarding a medical condition or treatment, and never disregard professional medical advice or delay in seeking it because of something you have read on this website. We are not liable for any risks or issues associated with using or acting upon information on our site. Quoted medical advice, statistics and legal limits may be subject to change and may not be updated on this website. Please consult your national health and safety body if you require up-to-date advice.