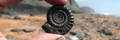
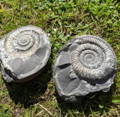
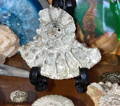
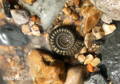
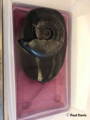
A pyritic ammonite collected on the beach at Charmouth, UK. Photograph kindly shared with us by Martin Curtis of Jurassic Coast Guides.
Pyrite Decay (Pyrite Oxidation)
Treating and Storing Pyritic Fossils in the Amateur Fossil Collection
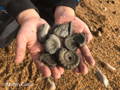
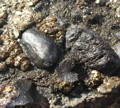
Pyrite ammonites as found on the beach at Charmouth. You'll notice that they aren't a super bright, glossy gold. This is normal for this type of preservation from this locality. Many of these ammonites can be found just by sitting down on the beach and sifting through the pebbles. The tide sorts fossils by density, and so you'll often see little patches of pyritic lumps. Some of these will be ammonites! Photo Credit: Martin Curtis, Jurassic Coast Guides.
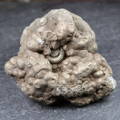
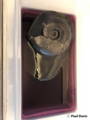
A pyritic ammonite, hiding away in a larger lump of amorphous pyrite. Photograph from John Burrows of Albion Fire and Ice.
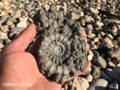
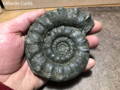
Dactylioceras ammonite found on the Holderness Coast. This split was achieved using just a hammer, likely down to the high pyrite content making a plane of weakness between fossil and rock. Photo from Scott Taylor.
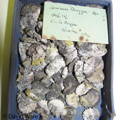
A series of ammonites collected from Charmouth beach. These were varnished by the owner to seal them from the elements (left), they started to go (middle) with the varnish lifting off, and then before long he was left with just a few piles of dust (right). Looks like he needs to go out collecting again! Photo Credit: Chris Andrew
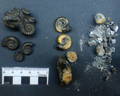
These Creniceras renggeri ammonites were collected over 100 years ago. See the white and yellow powder? The label has been attacked by the sulphuric acid released in the process of pyrite decay. This means that any important information stored with the fossil could also be lost. Photo credit: David Ware.
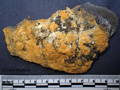
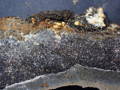
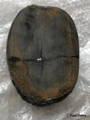
This is the back of a nodule where the whole nodule is decaying due to its high unstable pyrite content. This rock has an acrid smell due the sulphuric acid released during the reaction. Photo Credit: Chris Andrew
This cut and polished ammonite would have been beautiful when purchased, with the pyrite showing up as golden glinting areas. Sadly, it too has succumbed. Most reputable dealers won't sell fossils that are known to decay quickly, but there are always some that slip through the net unbeknownst to the seller. Photo Credit: Angie Lester
So what is Pyrite Decay?
Pyrite disease or pyrite decay can completely destroy specimens. In the presence of oxygen, pyrite (FeS2) breaks down to ferrous sulphate (FeSO4) and sulphur dioxide (SO2). Where water or atmospheric moisture is present, sulphuric acid (H2SO4) is also produced as a biproduct. If you're interested in the chemistry, a quick Google search of 'Pyrite Oxidation' will give you the in-depth process.
Marcasite is a dimorph of pyrite found in sedimentary rocks, which is less common but is also unstable. Moisture levels as low as 60% and upwards can trigger an accelerated rate of decay. Unfortunately for us, this is not an abnormal British summer day. This yellow/white dust, the hydrated sulphates and sulphuric acid are potentially a health hazard, as well as being destructive to your fossils.
But I have lots of pyritic fossils, and they're all fine? Pyrite can occur in two forms – compact, well crystallised and stable or porous, microcrystalline and impure and very unstable. The latter of the two can decay extremely quickly. The reason it is largely stable when in the rock is because contact with oxygen is extremely if not totally limited.
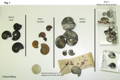
Photograph kindly shared with us by David Ware. These ammonites are from the Creniceras renggeri marls of the Jura Mountains, visually separated into 4 stages of decay. You can even see that the label has been damaged by the sulphuric acid released.
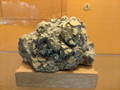
Pyrite in its cubic form mixed with quartz. These cubes are typically very stable. Photograph taken in the National Museum of Geology in Bucharest.
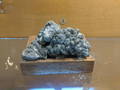
Pyrite in its less stable form. You can see that this example is much more porous looking, and that it is decaying. You can see the dust surrounding the specimen in the cabinet. Photograph taken in the National Museum of Geology in Bucharest.
This is one reason why fossils from the Yorkshire and Holderness Coast, whilst heavily pyritic, can and have lasted centuries in fossil collections without treatment, but others are much more susceptible to fast decay. However, there are still many specimens that start to 'bloom' with slower deterioration.
The pyrite cubes from South America seem almost impervious to decay. Pyritic Echioceras ammonites from Charmouth are notorious for it. This is nothing to do with the species of ammonite, it’s just the crystal structure of the pyrite in that particular layer of clay. The ammonites from other layers (Eoderoceras, Oxynoticeras etc) are far more stable, although even they can decay.
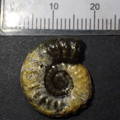
Echioceras ammonite from Charmouth, notorious for decaying rapidly due to the crystalline structure of the pyrite. Photo: Martin Curtis.
Pyrite oxidation products can expand within and crumble or crack rocks and fossils. This can happen within individual specimens, or even within pyrite rich rocks. The birchi beds at Lyme Regis have a tendency to do this. The darker and more pyrite rich the matrix, the more this is a problem. It is said that the birchi beds at Charmouth are more stable than those on Monmouth beach to the west of Lyme Regis. The outer layers of the nodule seem most susceptible to cracking so removing excess matrix is often useful. Also the thicker the rock the more stress builds up due to any expansion or contraction of the matrix. Another lithology prone to cracking is “goldstone”, a pyrite rich layer full of specimens of Arnioceras. Remove whatever rock you can to prevent this.
Sometimes difficult decisions must be made when it comes to removing rock or even parts of a fossil. Below is an ichthyosaur fossil from Lyme Regis, comprising much of the skeleton (collected over many years by different people), with skin and soft tissue preservation. Whilst not entirely uncommon for the locality, this is undeniably a very special fossil. Unfortunately, the skin and soft tissue is particularly pyritic and has rapidly started to decay, and so most people would say to remove the unstable material to save the rest (the bones). There is no technique that can be used that doesn't destroy the skin and soft tissue to separate it, and as it is it is in 'self destruct mode'. These are challenges faced by amateur collectors, and the largest museums. In some cases, a photographic record is all that is left.
The sulphuric acid and spread of it (it eats through paper, card, wood and lifts paint) is why it is sometimes referred to as a disease - it looks like it is creeping and spreading. Unlike a disease, it doesn't actually spread. It is more likely that similarly susceptible specimens (same locality, same composition, or parts of the same overall specimen) are being stored in the same environment. Indeed, it was for this reason that many people in the past believed that it was a bacterial problem, which is now known not to be true. However, you may still be told to apply antibacterial cream to your fossils - don't. It won't achieve anything other than depleting your first aid kit.
How can I prevent pyrite decay from happening?
To reduce the chance of pyrite decay there are steps you can take. For pyrite decay to occur you need moisture and oxygen. You are best storing your specimens in low humidity environments. On a large scale you can achieve this with careful choice of storage area, pick drier rooms. On a smaller scale you can use silica gel to create a dry environment (this is often found in little white bags in packing material for camera parts and similar sensitive items - we have larger sachets available in our shop). At home, it’s not an easy feat to control the relative humidity of the atmosphere. Therefore, creating miniature microclimates by using silica gel and oxygen absorbers in enclosed containers is the most practical solution for most home collections. In museums and institutions, you will likely see humidity meters and dessicants in the cabinets with the specimens. Some museums use inert nitrogen atmospheres (i.e. zero oxygen) to store some of their most precious specimens.
It stands to reason that if you can create a barrier between fossil and atmosphere, that pyrite decay can be prevented. Sadly, no barrier is impermeable to the transfer of air and humidity. Some resins, like Paraloid B-72 will fill pores which will provide a buffering effect, but will not entirely prevent oxidation, it will just slow it down. Some people try varnishing fossils to protect them from pyrite decay, this method does not have a good success rate generally. Indeed the additives in nail varnishes and yacht varnishes might do more harm than good. Generally, this method will slow down the rate of decay before it begins, but is not a long term solution and if irreversible might contribute greatly to the demise of a specimen when it cannot be accessed for treatment.
Another method you can use is to improve the likelihood of specimens surviving is to remove any salt they have picked up from sea water. Use running water to remove as much as possible, but do not leave to soak in water as this may speed up pyrite decay reactions. Salt is an accessory to decomposition, and so it is best to free the specimen from salt. You can use anyhdrous isopropyl alcohol or another anhydrous substance to wash a pyritic fossil, preventing exposure to water. However, washing a specimen that has already started to disintegrate will sometimes result in complete collapse.
We would recommend taking a sealed tupperware container out collecting with you, with some silica gel sachets in it. By popping your finds in there you are instantly lowering the humidity the fossil is exposed to, providing a suitable environment until such a time that you can treat the fossils (although we would recommend dealing with them fairly quickly after collecting). If you've got some oxygen scavenger sachets, even better. Some people store their pyritic fossils in mineral oils, which has an excellent success rate, but they are much harder to view this way.
There are two known CURES to pyrite oxidation.
Pyrite Stop and Ammonium Gas treatment
There are two known 'cures' to the problem. Whilst they cannot reverse damage already done, they can remove the biproducts of decay and neutralise the specimen from the sulphuric acid generated. In essence, they can halt it in its tracks. If the fossils are then stored in an appropriate environment, no further decay should occur. It is always best to tackle any potential problem before it begins, but that is not always an option.
These two methods are treatment with ammonium gas, or with our Pyrite Stop (ethanolamine thioglycolate). In the home workshop, treatment with Pyrite Stop is preferable as ammonium gas (although effective) is both toxic and flammable, and any inhalation even in low volumes can cause extreme respiratory distress.
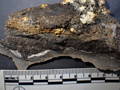
Pyrite preserved bone material from the Garden Cliff (Westbury-on-Severn) collected and conserved by Tom Carr. You can see the high pyrite content, with masses of pyritic cubes. This preservation is notoriously unstable. Tom treated the specimen with ammonium gas, and it is two years strong and still going. Ammonium gas is used to neutralise the sulphuric acid, with specimens suspended above a solution of ammonium hydroxide in Polyethelene Glycol in an enclosed environment. Photo: Tom Carr
Using Pyrite Stop - A Guide
Cornish & Doyle (1984) experimented with the use of ethanolamine thioglycolate to prevent this oxidation and therefore pyrite decay. Although a well known treatment for pyrite decay, this substance has been near impossible for the average preparator to get hold of in Britain for many many years, so we are finally able to bring you the solution to your pyrite problems. So, why Pyrite Stop? How does it work? Pyrite Stop is a pyrite stabiliser.
It is alkaline and therefore neutralises and washes out sulphuric acid (a product of pyrite decay)
Thioglycolates react with soluble and insoluble iron compounds, chelates and complex iron, but not stable pyrite. These are the oxidation by-products. This reaction generates a purpley solution of ferrothioglycollate.
It is soluble in ethanol or anhydrous isopropanol – as are the products of pyrite decay. Thus, contact with water (which may be damaging) can be avoided.
Once damage is done, there is no ‘undo’ - Pyrite Stop will halt the decay in its tracks, but it won't repair already damaged areas. It is best to tackle any potential pyrite oxidation preventatively. At home, it’s not an easy feat to control the relative humidity of the atmosphere. Therefore, it is often best to create miniature microclimates by using silica gel and oxygen scavengers in sealed cabinets or containers. Even when treated, pyrite is is still susceptible to further oxidation. Pyrite Stop deals with the unstable decaying pyrite, but does not affect stable pyrite. Stable pyrite has a horrible habit of becoming unstable over time. Proper storage and repeat treatments in the future may be necessary.
The specimen has to be robust enough to survive immersion in Pyrite Stop - if the decay has gone too far, Pyrite Stop will just destroy the specimen. If decay has not gone too far, but the specimen is quite fragile, a paste can be applied (we’ll cover this later). Where consolidants and adhesives have been used, such as Paraloid, these may redissolve in the ethanol/isopropanol and so will no longer hold. As always, take photos before you begin! Remove any coatings or fillers wherever possible as they can impede the treatment. Any labels or writing on the fossil may be lost in the process. Pyrite Stop may stain your fossils with a browny/purpley hue. This is partly down to how often you change the solution and how well you wash the specimens. Proceed with caution.
Pyrite Stop - Immersion
1. Before treatment, brush or air abrade off as much of the decay products as you can to expose the fossil surface.
2. Mix up a 2-5% solution immediately before use as exposure to air renders Pyrite Stop unusable after only a few hours. In this example, we used a 3% solution. A full litre of solution equates to 75ml of Pyrite Stop to every 925ml Isopropyl Alcohol. Heads up, it doesn't smell great.
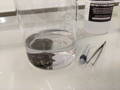
3. Use forceps or tweezers to lower the specimen into a glass beaker. You can use a grill, mesh or piece of Perspex at the bottom of the beaker to allow the specimen to rest above the surface of the sediment that accumulates at the bottom (and will then stick to your ammonite). Cover the specimen by about 5-6cm solution to allow for enough dilution of the reaction products. If you're too stingy, you'll exhaust the active ingredients very quickly and you might just end up staining your fossil purple.

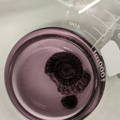
4. You will notice the colour starts changing from clear to pink to darker purple. Change the solution after maximum 4 hours (or earlier if the solution becomes opaque). If the ferrothioglycolate is left to oxidise a brown, insoluble coating will form over the fossil. This will cause staining so take care to remove the specimen when the solution turns a dark violet colour.
5. The specimen should be washed inbetween treatments in ethanol or anhydrous isopropanol. Leave them to soak for at least 3x as long as they were in the solution. This will help prevent discolouration.
6.Place back in ethanolamine thioglycolate, and when no violet ferrothioglycolate forms the treatment has finished.
7. Give the specimen a final bath in several clean batches of solvent and allow to air dry.
8. Anything that needs reassembly can be glued back together. Specimens can also be coated once completely dry to provide a protective barrier. It is well known that no substance we can use on fossils is impermeable to moisture and oxygen, but Paraloid B-67 (not to be confused with B-72) can delay the process considerably. It is known to have very low permeability to gas, and is hydrophobic, therefore repelling moisture. It is also completely removable if and when retreatment in Pyrite Stop is required. Thin coats are better than one thick coat and immersion may be necessary.
9. Once treatment is completed, you will still need to store your specimens in a very low humidity environment, ideally with dessicants (like silica gel) and oxygen scavengers or absorbers. A sealed cabinet or container where you can keep humidity below 45% is ideal. You may need to retreat them in the future, but these conditions are the most conducive to keeping your pyritic fossils stable.
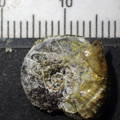
Photographs provided by Paul Davis. On the left, you can see that the nodule is starting to go with a rust surface and a slight white bloom. The ammonite has been held out of the solution, and the nodule that it is in, treated in ethanolamine thioglycollate. You can see that the solution is nearing opacity in the photograph on the far right.
A Pyrite Stop Paste - where immersion is not possible
For large specimens, or friable specimens an alternative technique can be used. It takes time, and is often not as successful as immersion. A solution of 3-5% ethanolamine thioglycolate is mixed with sepiolite (magnesium silicate – which in its impure form is used as cat litter) to form a paste. Apply liberally and wrap in foil or plastic sheeting to prevent evaporation of the isopropanol. After 2-3 hours, allow the paste to air dry. The sepiolite is then removed by gently brushing. Apply a paste of pure isopropanol and sepiolite to clean the specimen or thoroughly wash the area with alcohol. Gauze can be used to separate the sepiolite and the surface of the specimen so removing the dried sepiolite is easier. The trouble with this technique, especially with larger specimens, is that penetration into the specimen is limited.
What to do after treatment in Pyrite Stop?
It is essential that you store your specimens in a sealed container or cabinet, with measures in place to lower humidity and where possible, oxygen content of the atmosphere. For this, we have a variety of clear display boxes in all different sizes in our shop as well as Oxygen Absorbers and Silica Gel sachets.
You could also coat your specimen in Paraloid B-67 (which is not the same as the more commonly known Paraloid B-72). Paraloid B-67 is hydrophobic, meaning that it repels water. Where it is used effectively as a coating to fill pore spaces and create a barrier, it also has very low permeability to moisture and gases, all whilst being completely removable. If you are going to coat your pyrite fossils in anything, Paraloid B-67 is your best bet.
What NOT to use. A minefield of misinformation.
Don't
Not a 'disease' and not caused by bacteria
Do not apply nail varnish or any other varnish
- Do not apply any other kind of non-reversible varnish!
Don't soak or store specimens in water
Do
Store in a dry environment
Preferably store with oxygen scavengers and dessicants
Use Pyrite Stop
- Clean the fossil after finding it
Varnishes
DO NOT USE substances such as nail varnish or yacht varnish. These will be detrimental to the specimen and almost certainly impede conservation efforts in the future as they are not fully reversible and contain many impurities. In many cases, they are not moisture proof. They might delay the reaction for the time, but these efforts will likely not stop the problem and will eventually create future problems. Many varnishes yellow and crack over time (especially nail varnish which is designed for short term wear). Once this is combined with pyrite decay, you are unlikely to be able to recover the fossil. Our non-yellowing Fossil Varnish is brilliant for finishing calcite fossils, but we wouldn't recommend it for pyritic fossils.
If you are going to coat your fossil, use Paraloid B-67. That way you can remove it for a round of treatment in Pyrite Stop, and then reapply once it is finished. Paraloid B-67 is a suitable solution, as it is hydrophobic and therefore repels water. It also has very low permeability to gas.
These ammonites have had varnish applied to 'seal' them from the atmosphere (oxygen and moisture). The varnish is the yellowed, peeling stuff that you can see. In the middle of the ammonite on the left, it is not that yellowed, but still visibly slightly bulging. The idea is that varnish is not a suitable barrier between the ammonite and the atmosphere, and is virtually impossible to remove until the ammonite is so far gone that it cannot be salvaged; and in some cases with a number of additives may actually exascerbate the speed of pyrite decay. The addition of nitrocellulose to many nail varnishes will cause yellowing and cracking. The cracking will allow in the air and moisture, and is not easy to remove particularly on a fragile surface. Using a substance like Paraloid B72 at least allows you to remove it before treatment in Pyrite Stop. Photos: Chris Andrew.
Antibacterial Creams
At one point it was though that it was caused by a bacteria called Acidithiobacillus (previously Thiobaciullus), and so substances like arsenic and Savlon (an antibacterial cream typically applied to wounds) have been used to try and prevent it. Bacteria, where present, might catalyse pyrite decay, but this is highly unlikely in most circumstances to be the cause unless the relative humidity is above 95%. Therefore, using an antibacterial cream is no more than an old wives tale at this stage. This advice is still fairly prevalent online.
Embedding in Resin
Best avoided. A lot of collectors have come up with this idea independently of one another. It's a sure fire way to prevent reaction with the atmosphere and moisture? Right? Many collectors before you who have tried this will tell you that in the end it will probably just explode under pressure. The crystalline decay products are several times the volume of the original specimen, and the likelihood of you being able to eliminate all oxygen and moisture from within the fossil before embedding it in resin are next to nil (and the oxidation process itself generates water, as well as oxidised iron, which makes the process self-propogating). If it doesn't explode, you're stuck with some hideous lump of gnarled resin with a bubbly thing in the middle, which you then can't remove the resin to get at and treat. Most resins are not removable, and many are known for yellowing over time (e.g. epoxy resins).
Further reading (click the links below to read the articles):
Larkin, N. (2011). Pyrite Decay: cause and effect, prevention and cure. NatSCA News, Issue 21, 35 ‐ 43. This is an excellent easy-reading review of what we know now about Pyrite Oxidation from an extensively knowledgeable source in the field of conservation, Nigel Larkin of Natural History Conservation.
Cornish, L. & Doyle, A. (1984). Use of ethanolamine thioglycollate in the conservation of pyritized fossils. Palaeontology, Vol. 27, part 2, 421-424.
The photographs used in this article that are not our own have been reproduced with the permission of the photographer. Please do not use, print or reproduce these photographs without the express permission of the photographer, they are under copyright.