ACID PREPARATION
Vertebrate fossils contained in calcareous matrices are often candidates for acid preparation. Combined with mechanical preparation, exquisite detail can be revealed. Both acetic and formic acids are used widely in fossil preparation. These are weak organic acids, and both have a fairly pungent odour. They are favoured over mineral acids or strong acids which do not discriminate between dissolving the calcium carbonate and the calcium phosphate that the bone is comprised of. Acid preparation consists of placing the rock in a dilute acid 'bath', followed by a bath in water, followed by further acid-water-acid-water cycles until the fossil is prepared. Precautions must be taken to protect the bone, to prevent it from being damaged by the exposure to acid.

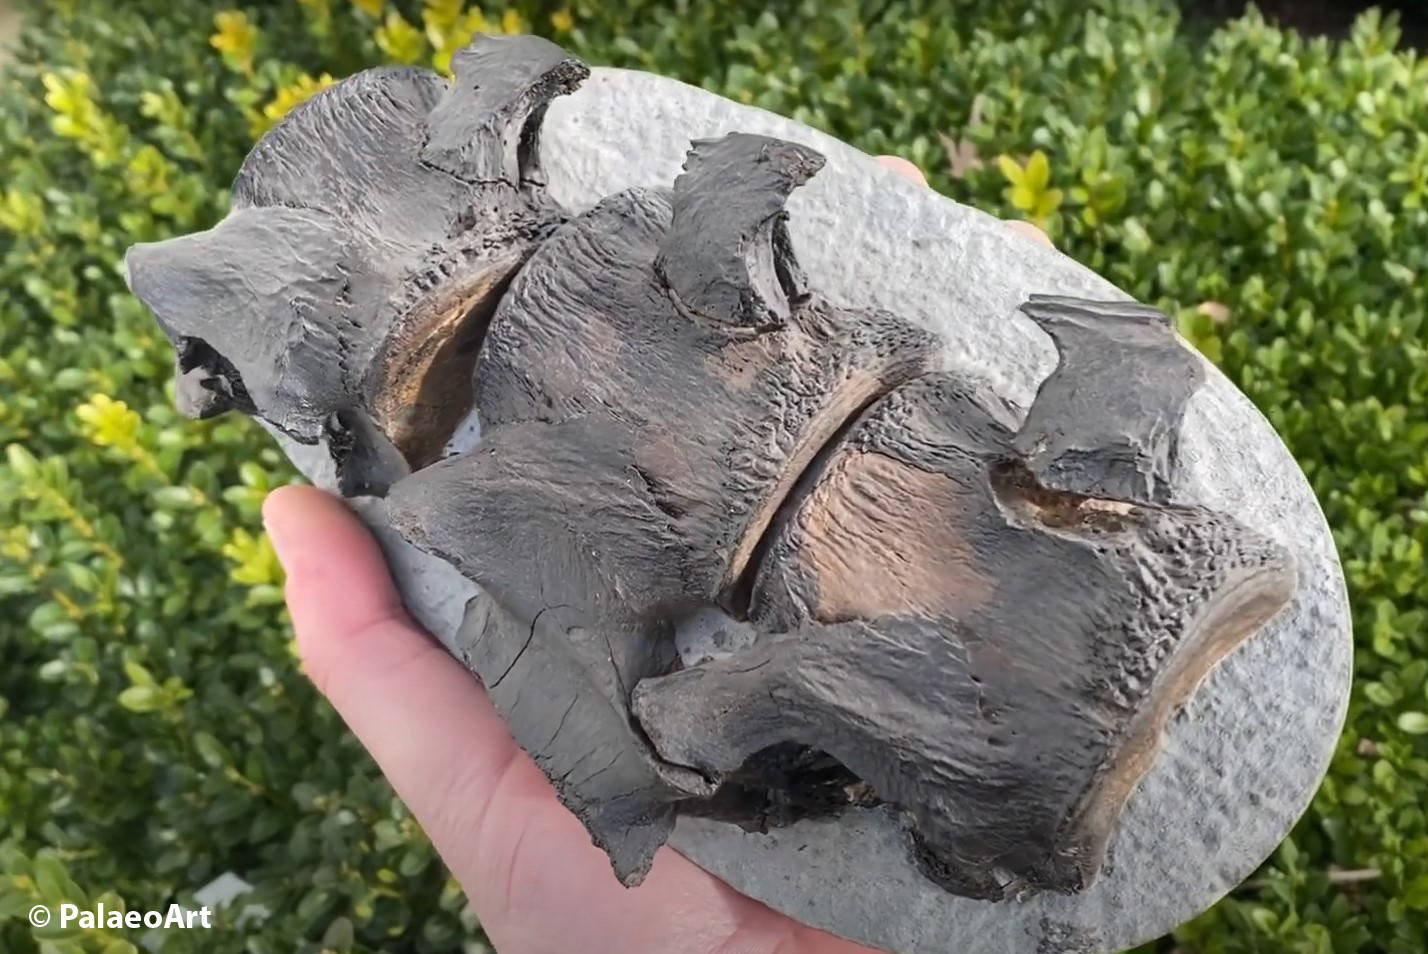
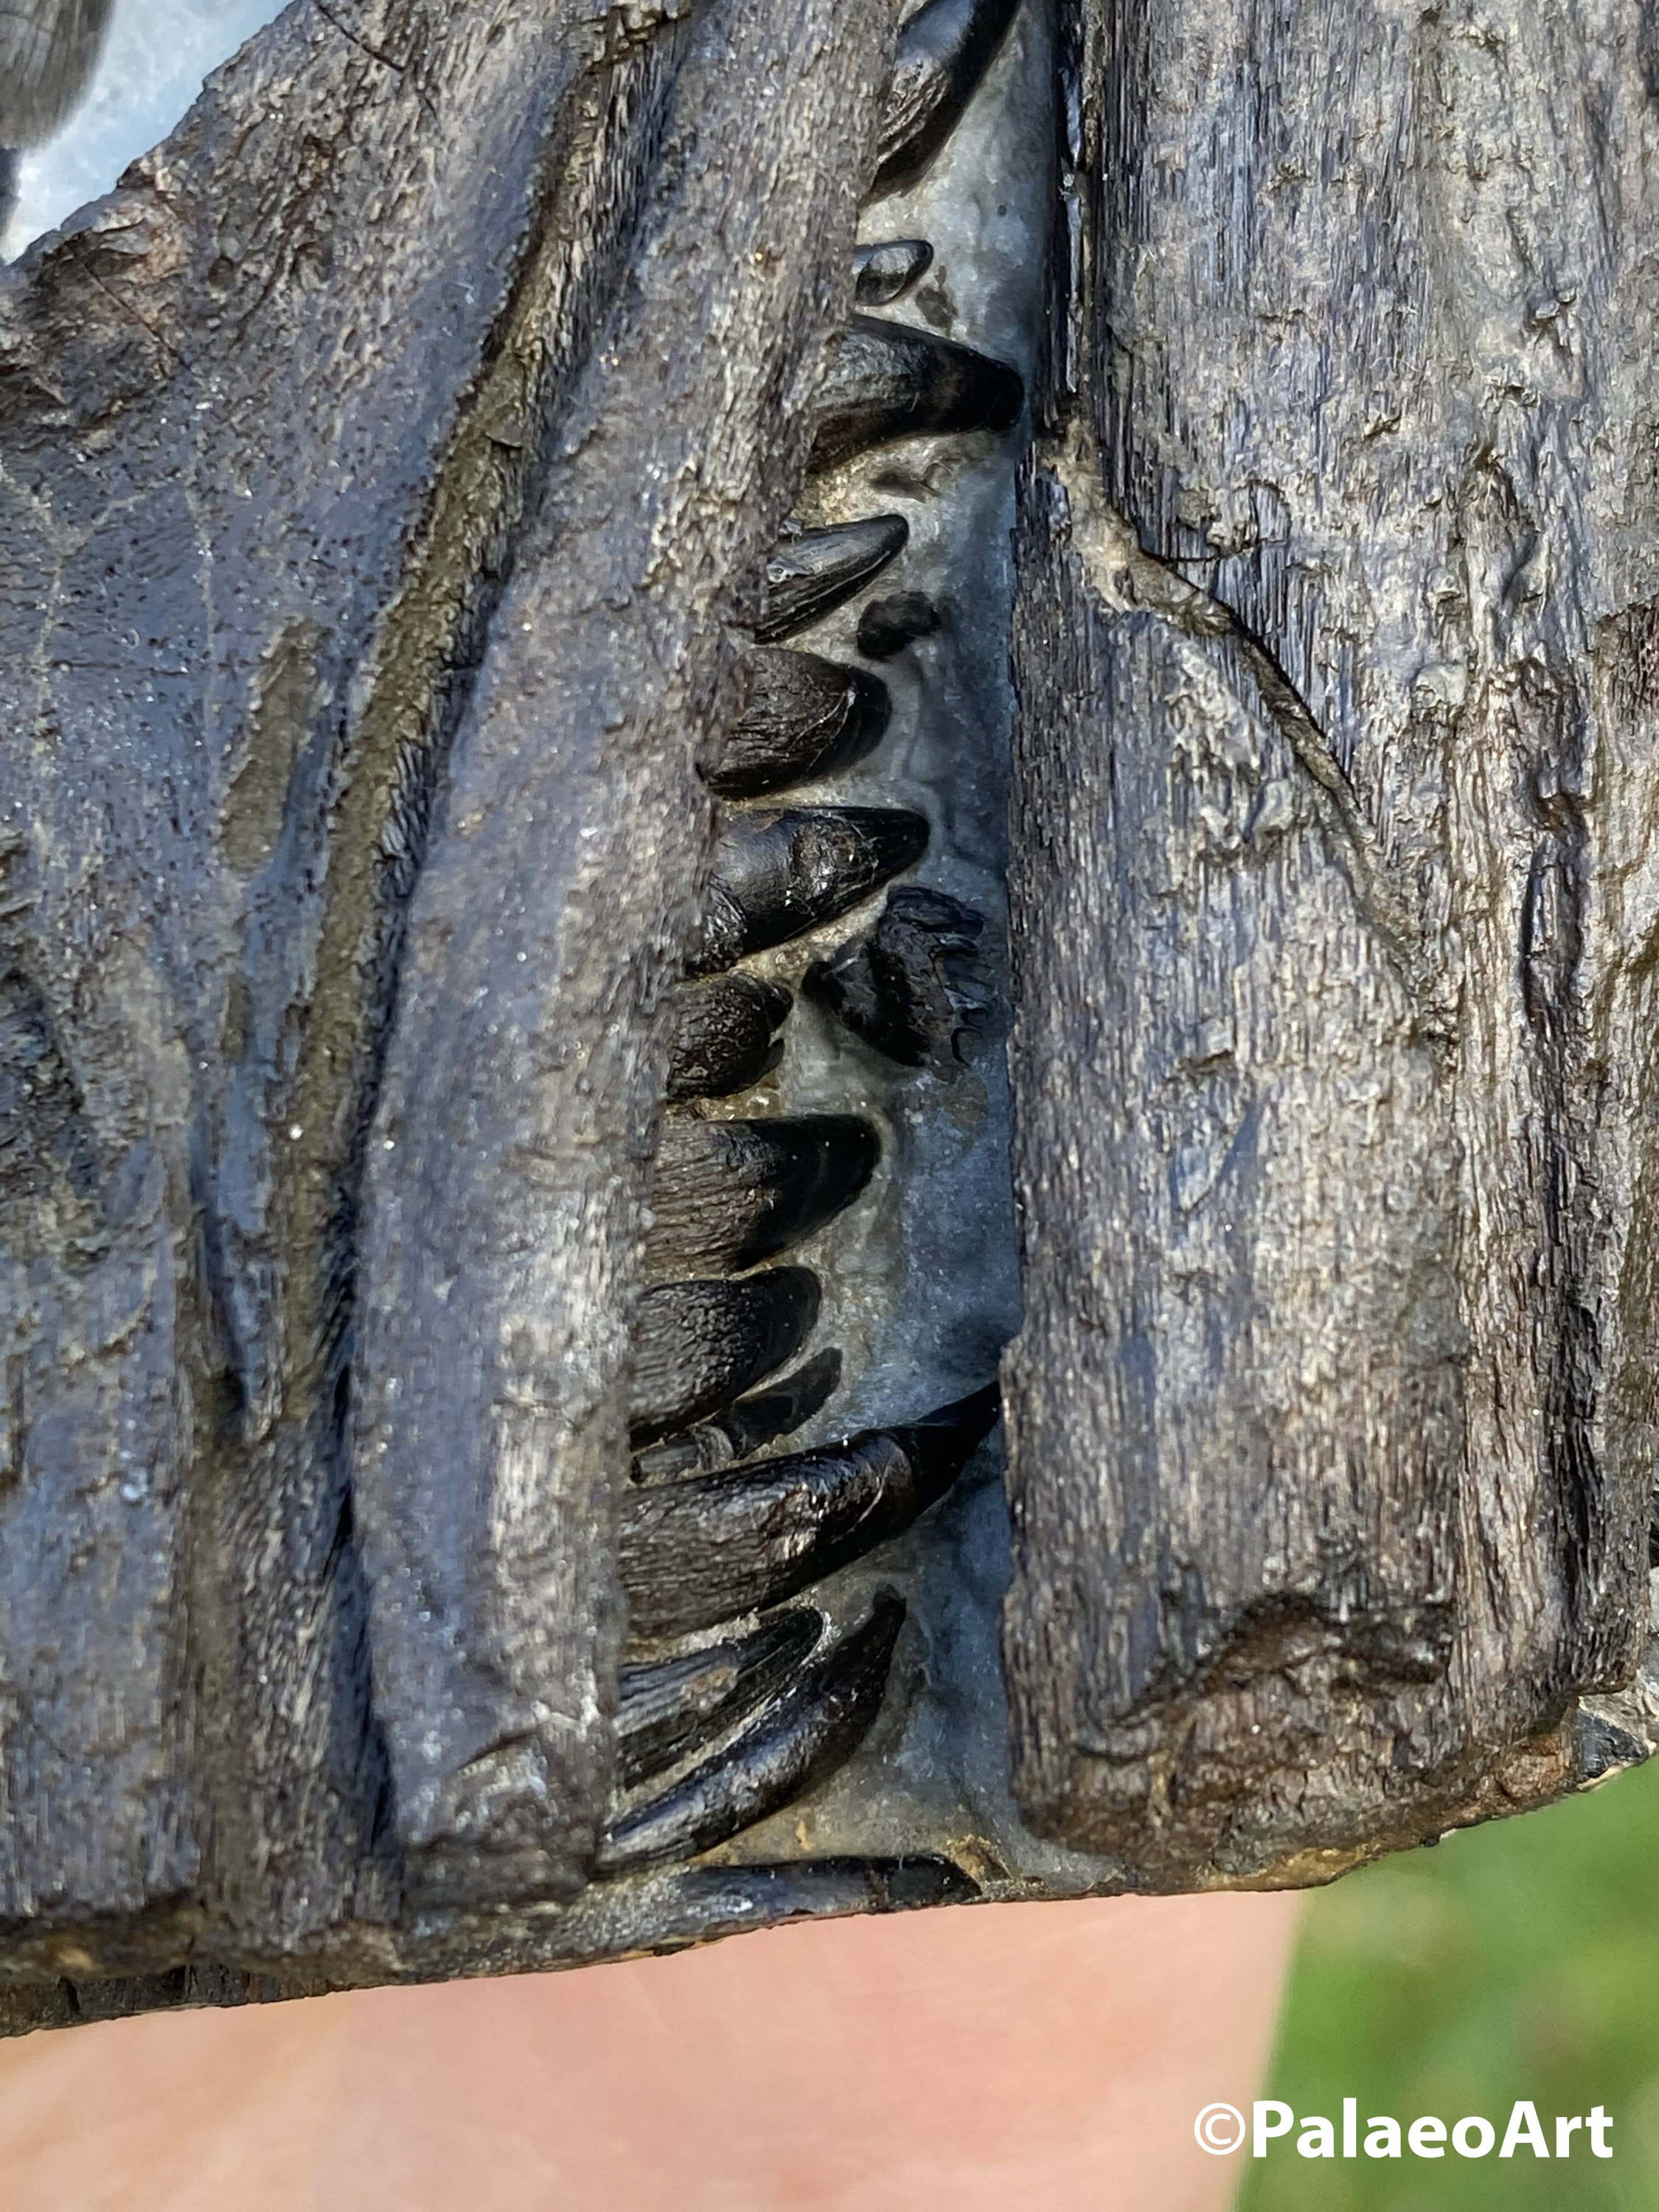
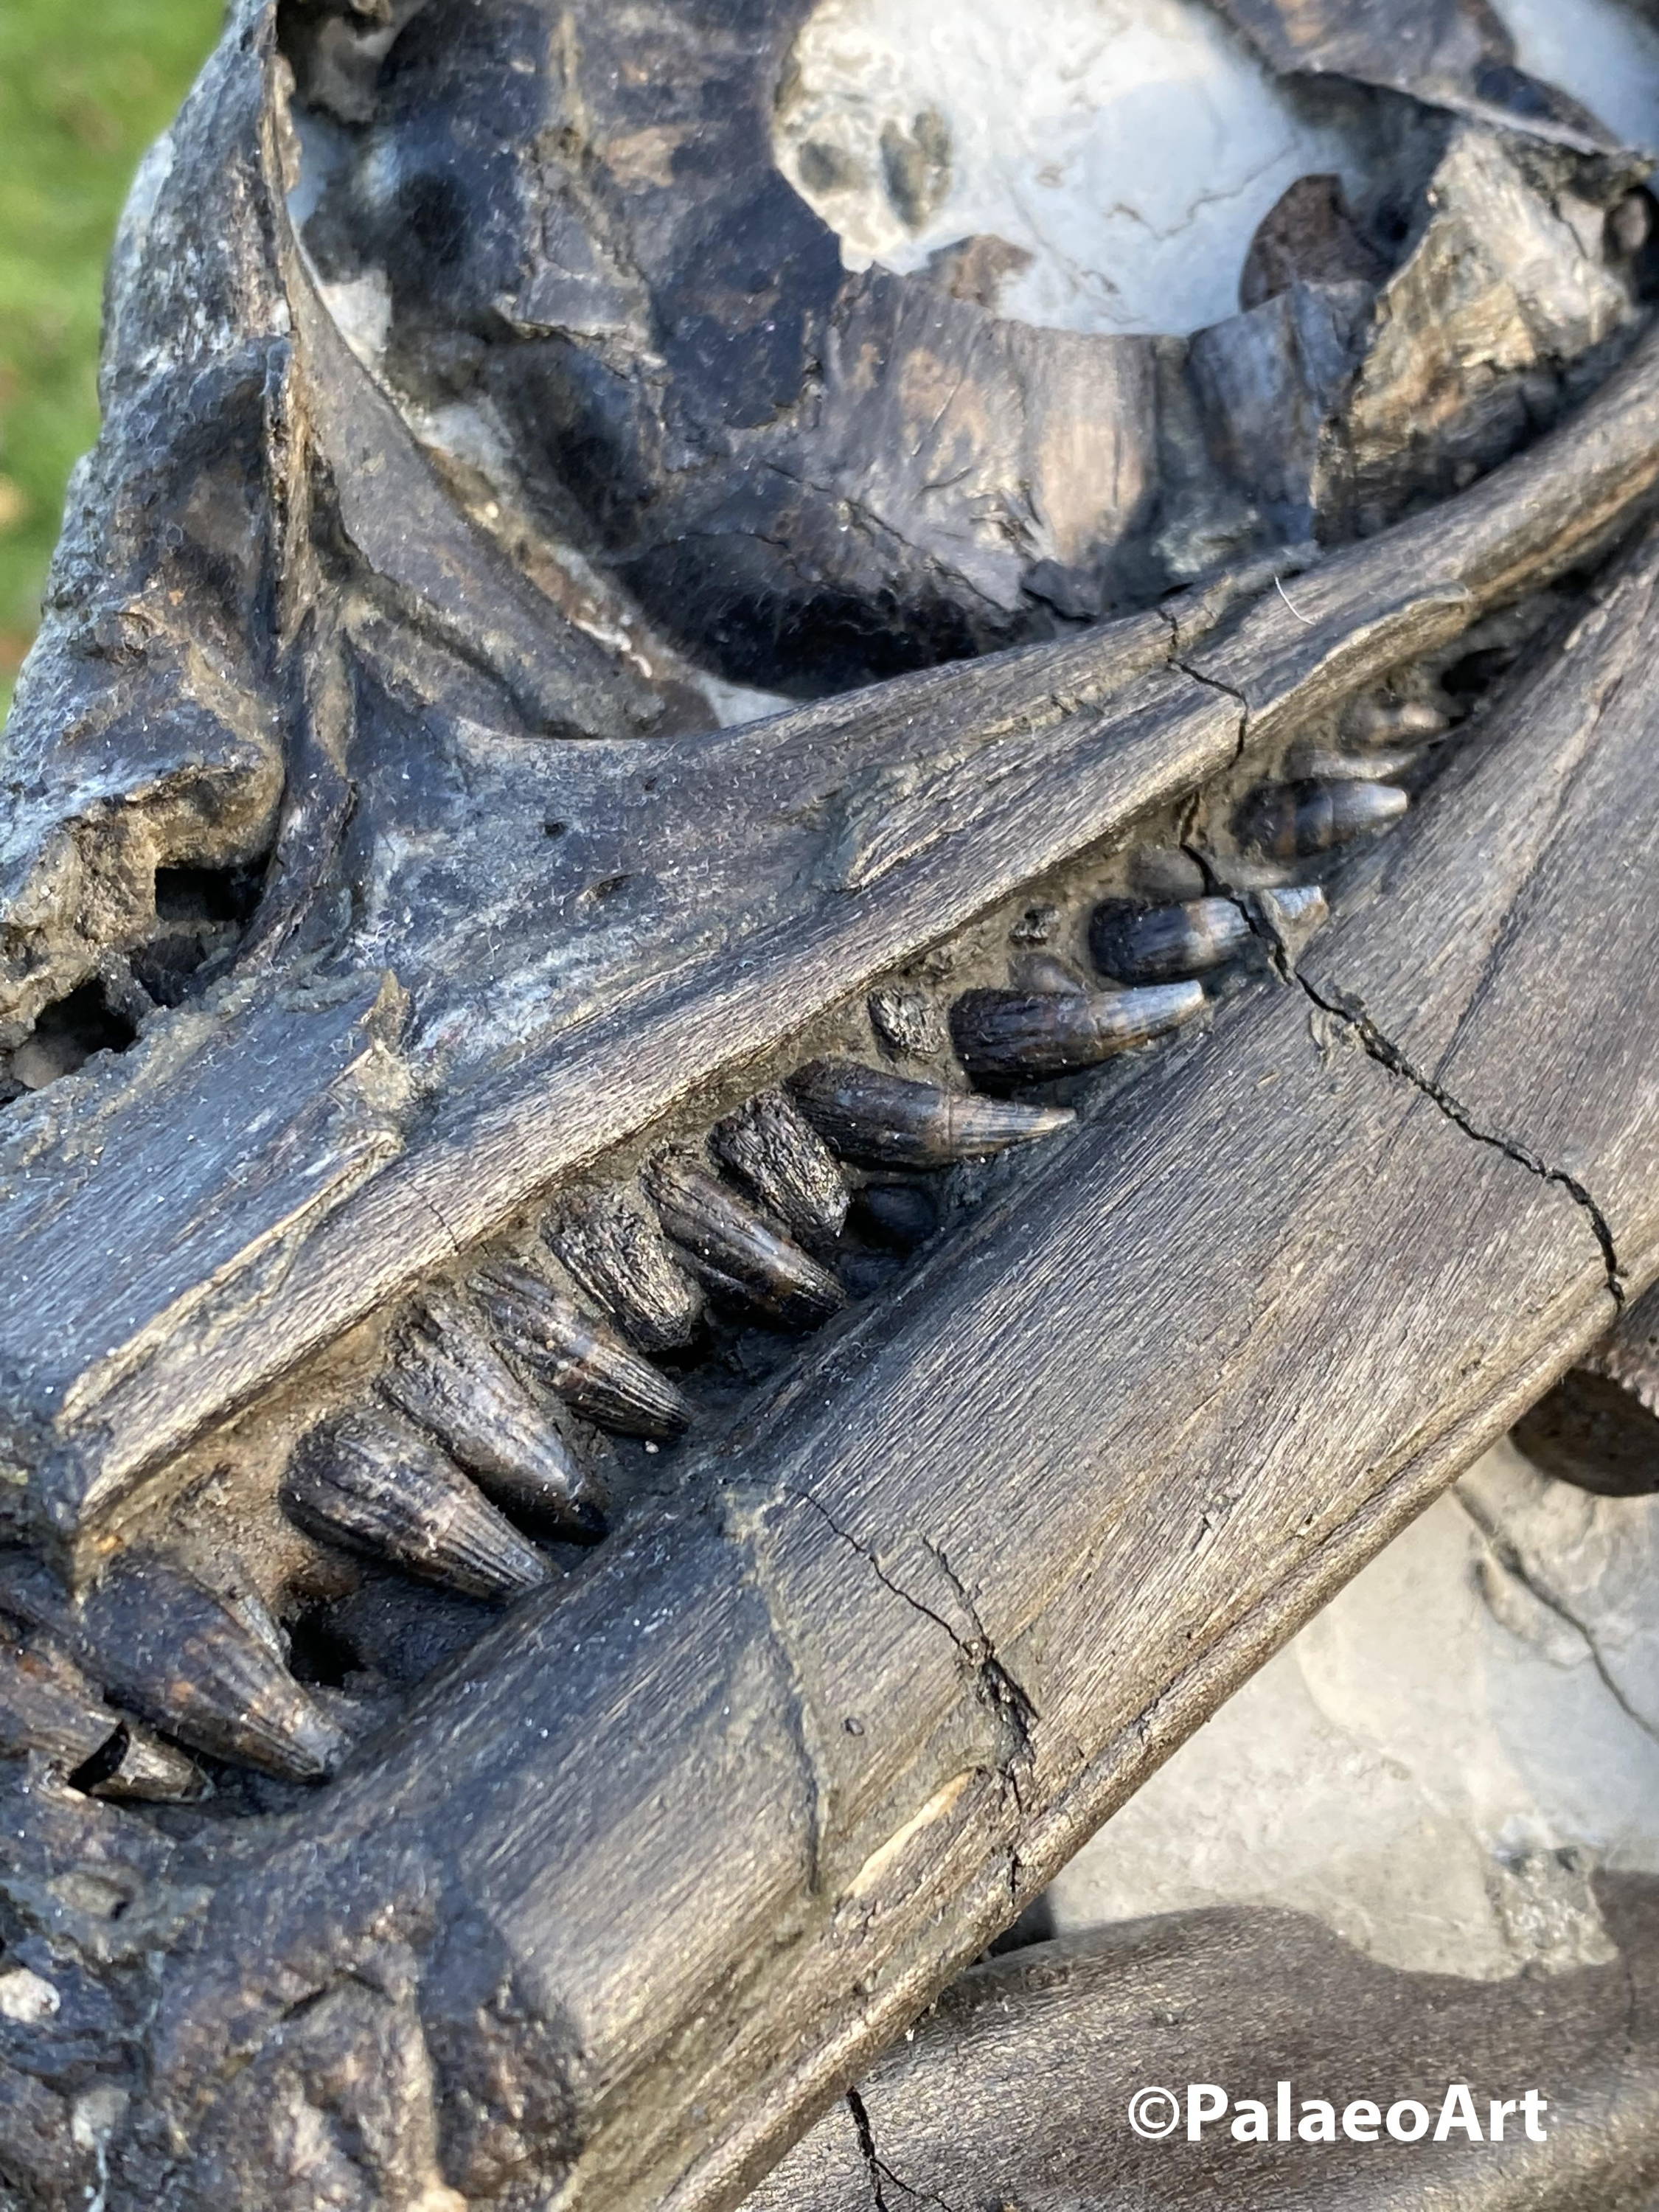
Photographs shared with us by Tom Sermon at PalaeoArt. Ichthyosaur rostrum (left) and plesiosaur vertebrae (right). These fossils were prepared by Dave Costain, who was an expert in acid preparation. Mechanical methods wouldn't be able to get between the teeth and preserve the detail in the way that acid preparation can. We must be aware however that this is the pinnacle of what is achievable with acid preparation, and it's certainly not as easy as it looks. PalaeoArt has an excellent introductory video to acid preparation on his YouTube channel which is well worth a watch if you're looking to get into acid prep - linked here.
There are advantages and disadvantages to using either acid, but some of the choice simply comes down to cultural differences. Acetic acid is more frequently used in Europe, and formic acid is used in the USA. Acetic is considered safer to use, and formic is stronger therefore requiring less acid bath cycles. The choice between the two depends on which will cause the least stress on the fossil. Some would argue that working more slowly with acetic is preferable, and some would argue that the decreased exposure in terms of time with formic would be favourable. The solid sulfamic acid has been used more recently as a stronger weak acid for bulk matrix removal.
Acetic acid is essentially vinegar, without the impurities and of a known strength/dilution. We use pure acetic acid in fossil preparation as not only does it often work out cheaper, but you don't risk introducing unknown additives, or the margins for error in dilution (most vinegar does not state the percentage of acid). Formic acid is sprayed by some species of ants as a defence mechanism, but it is also manufactured synthetically. They both smell pretty awful.
Acetic acid + Calcium Carbonate – Calcium Acetate + Carbon Dioxide + Water
CaCO3(s) + 2CH3COOH(aq) → Ca(CH3COO)2(aq) + H2O(l) + CO2(g)
Formic Acid + Calcium Carbonate – Calcium Formate + Carbon Dioxide + Water
CaCO3 + HCOOH = (HCOO)2Ca + CO2 + H2O
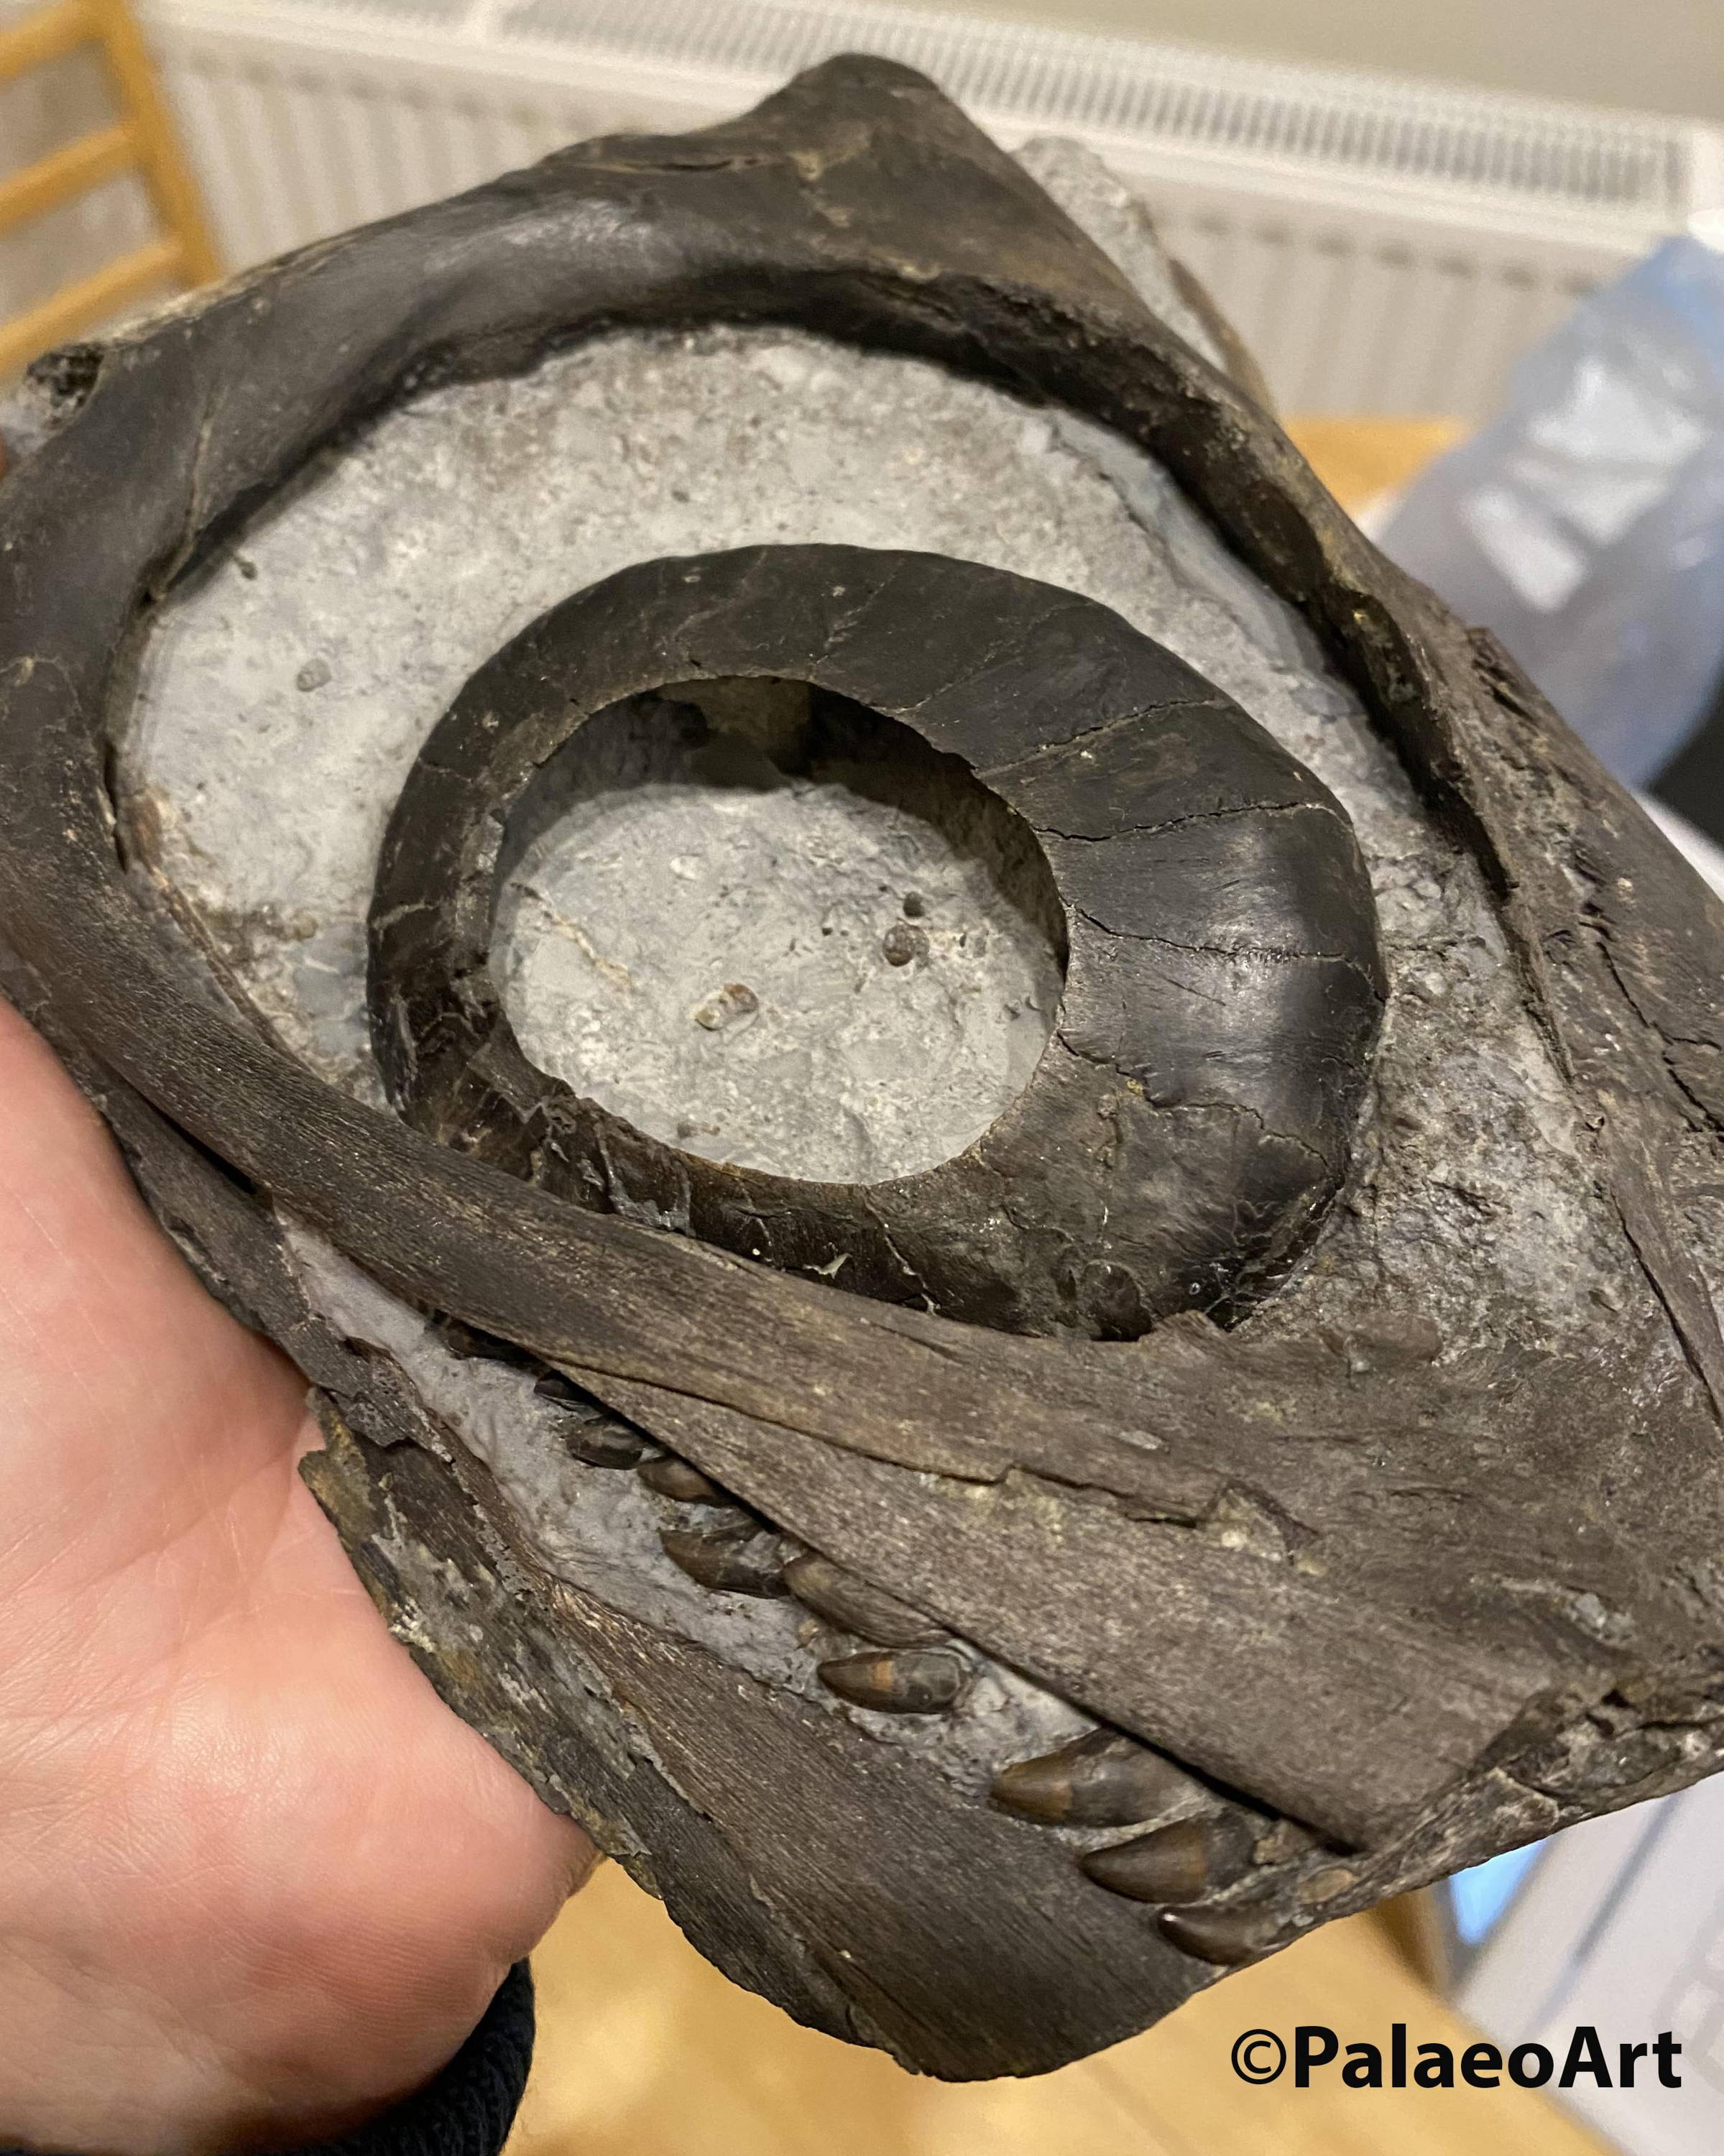
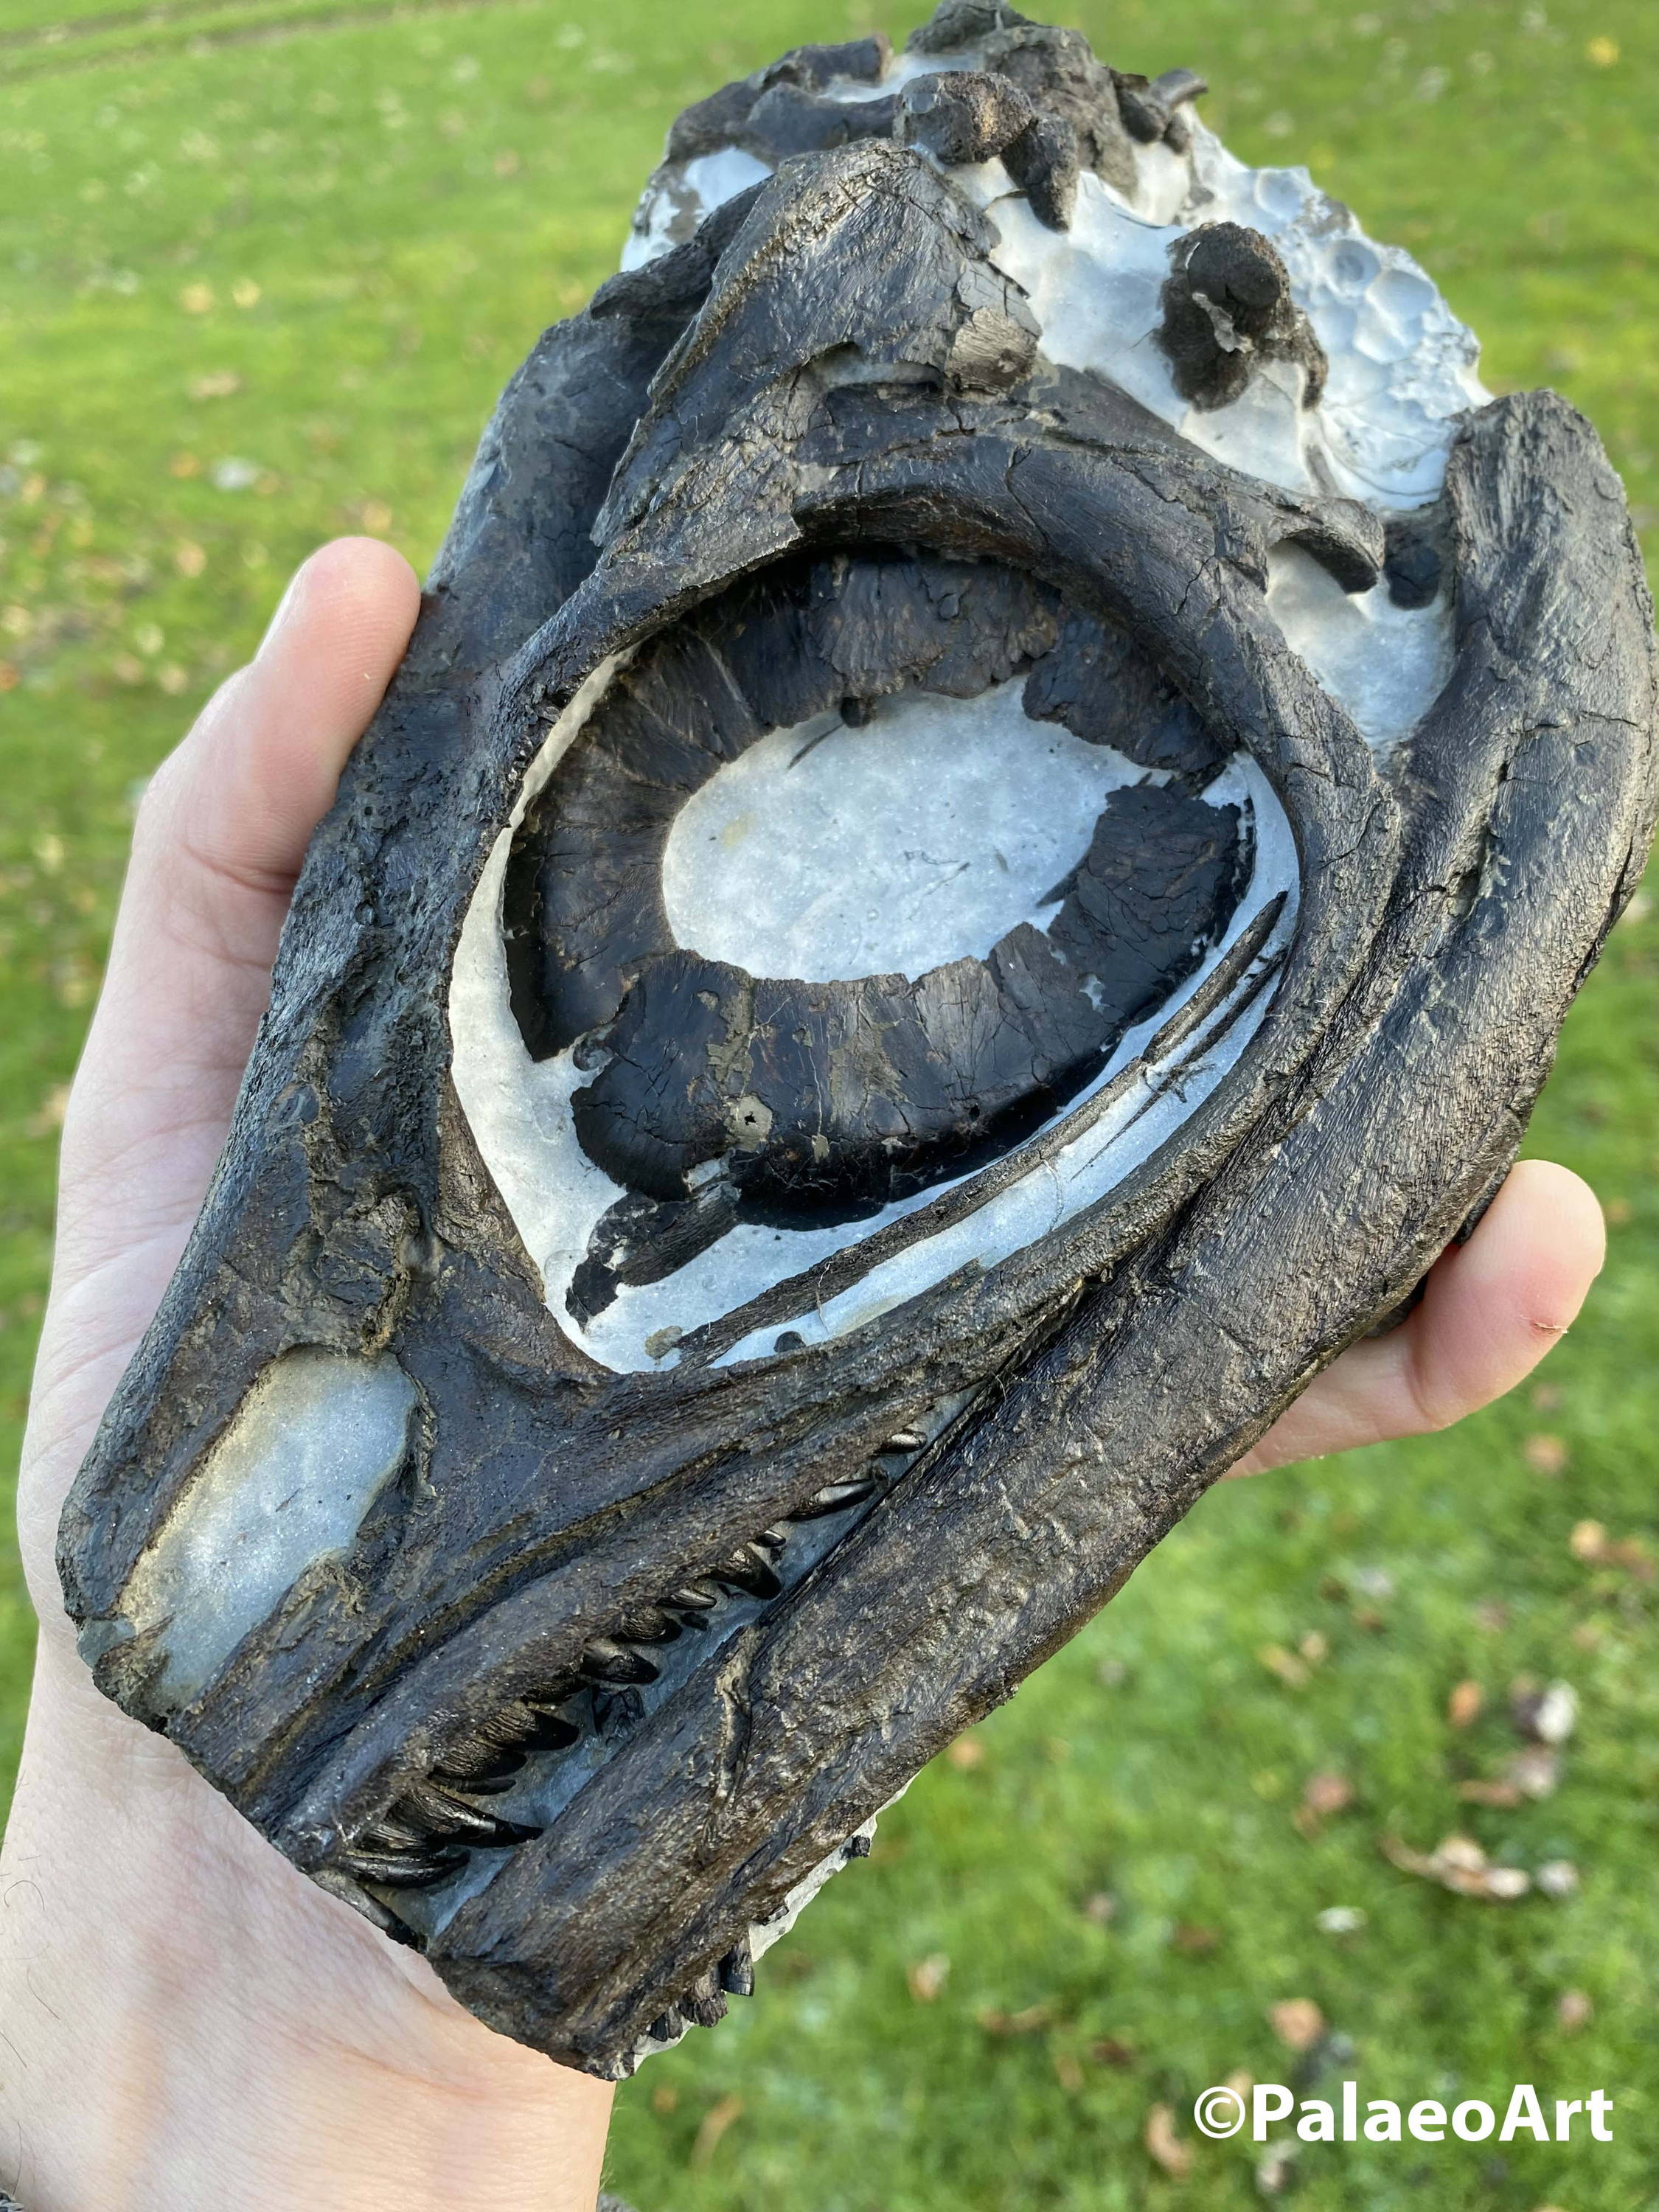
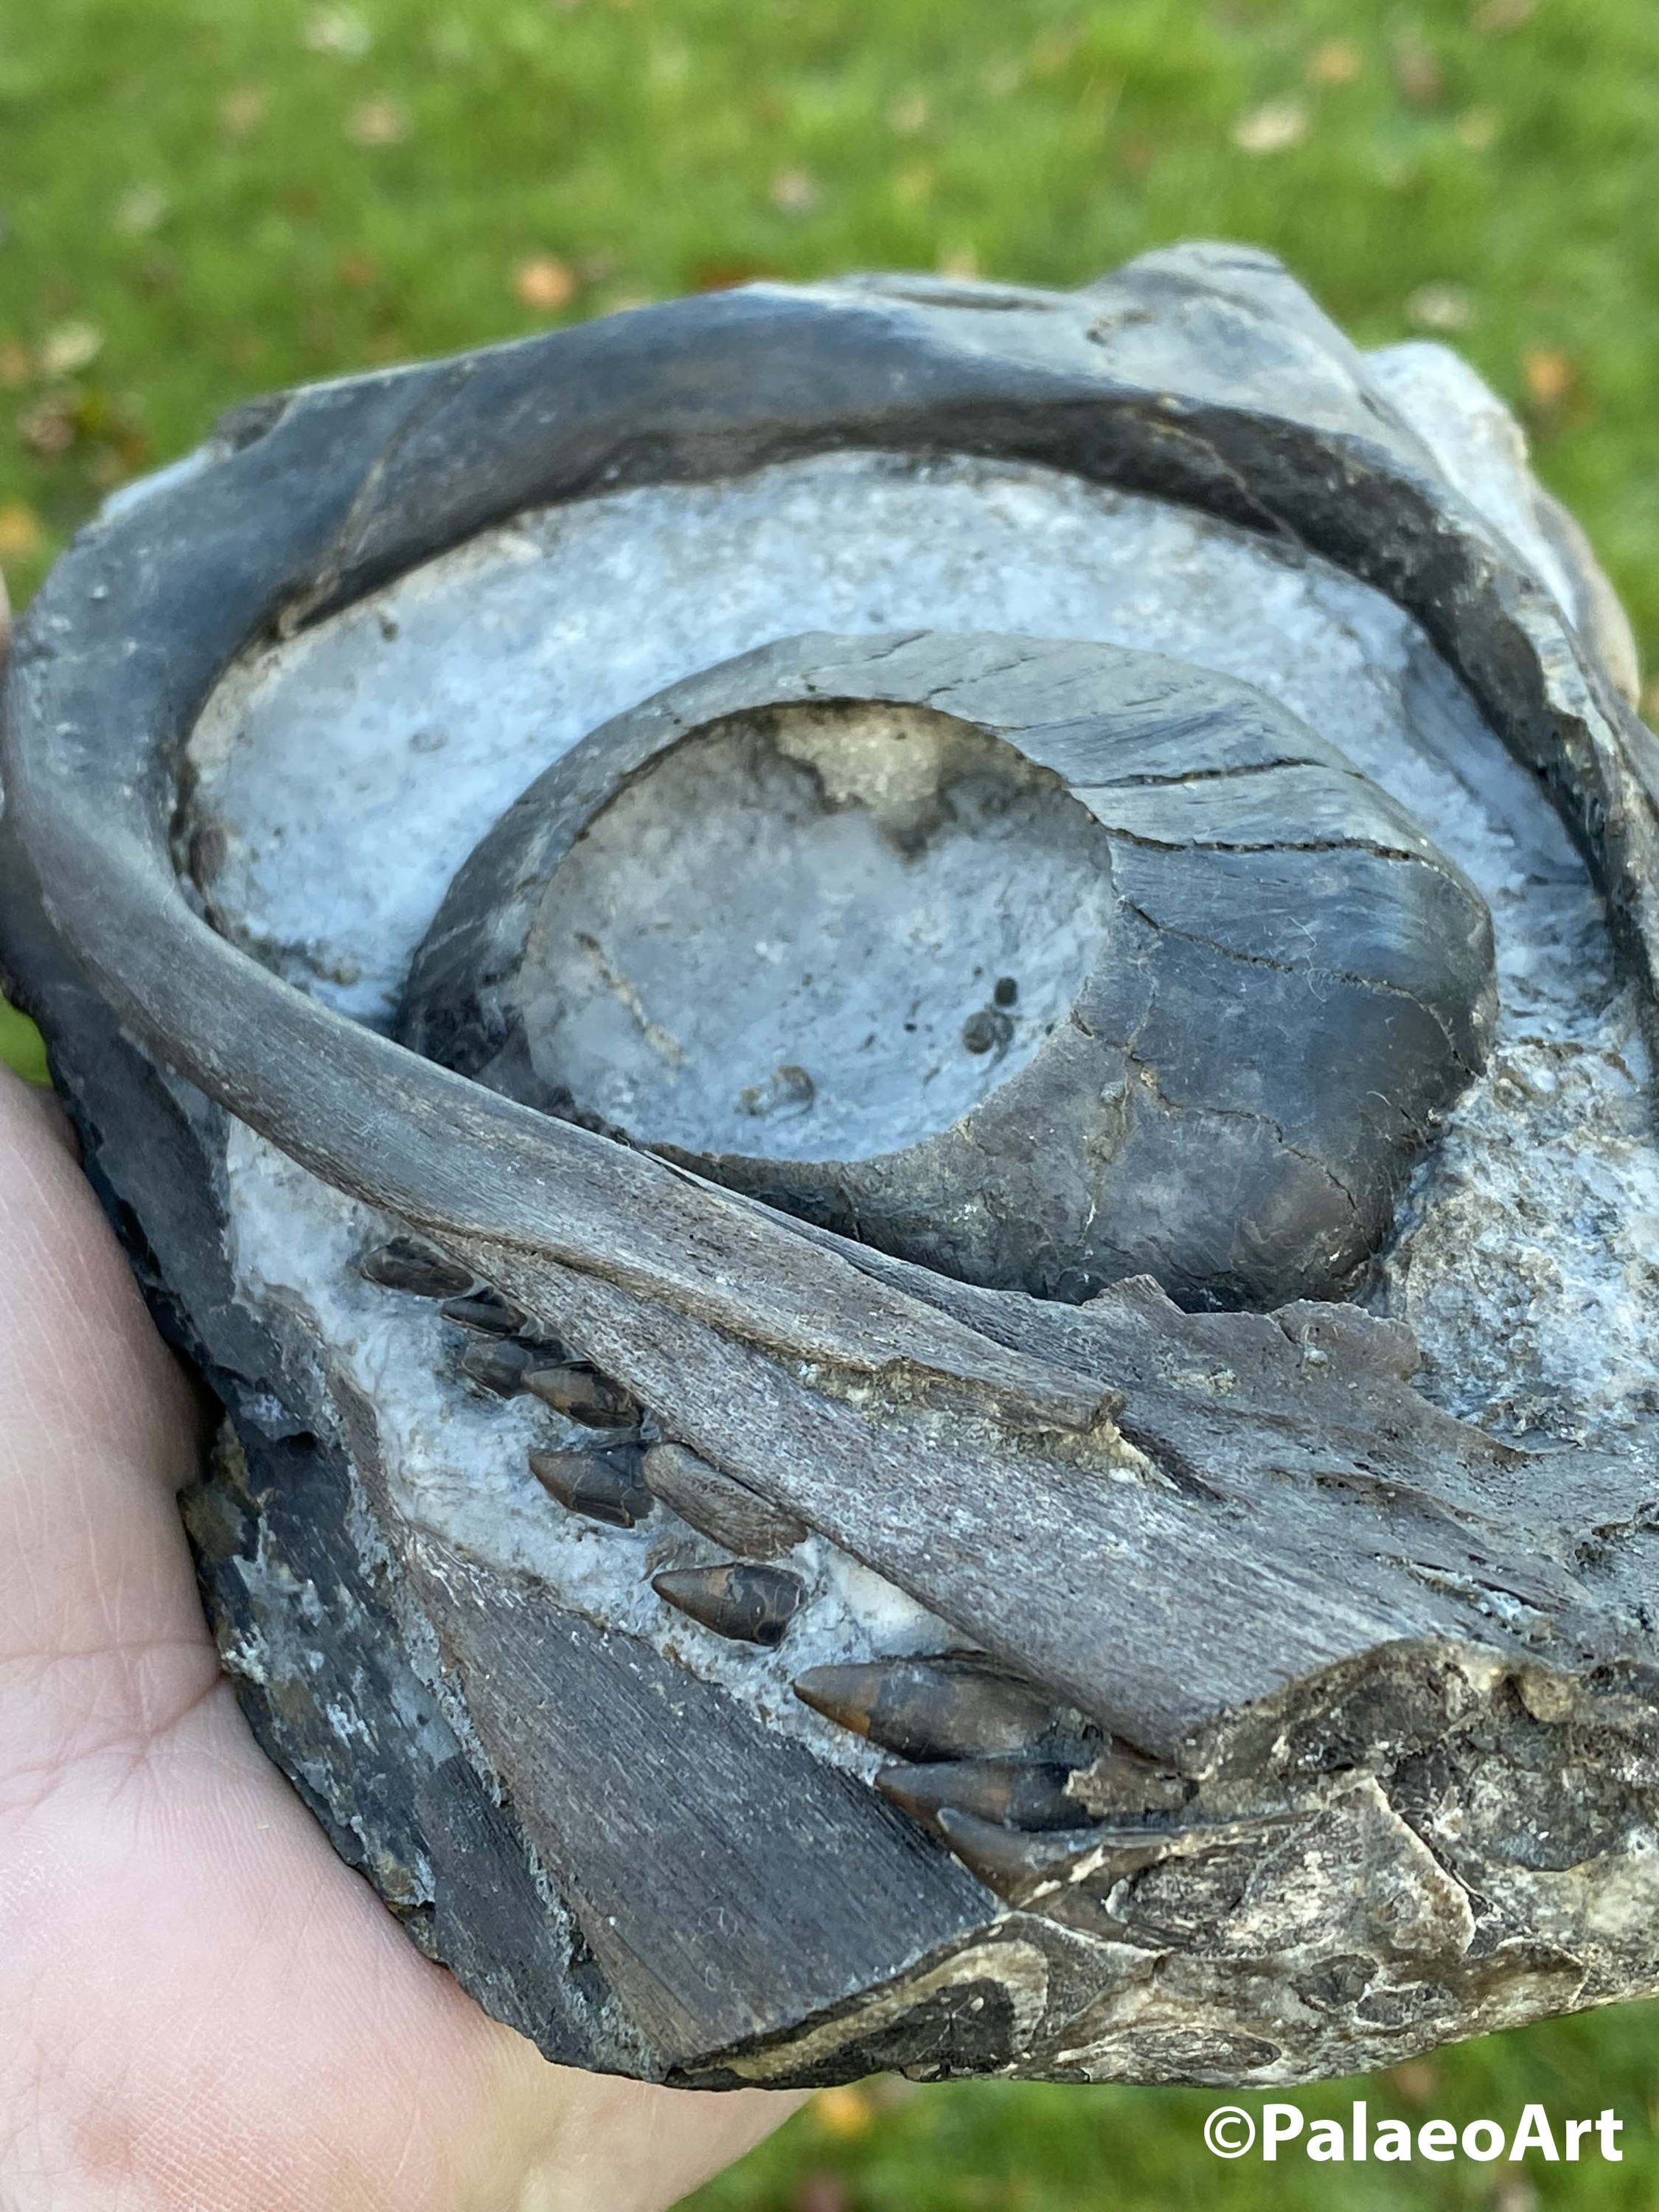
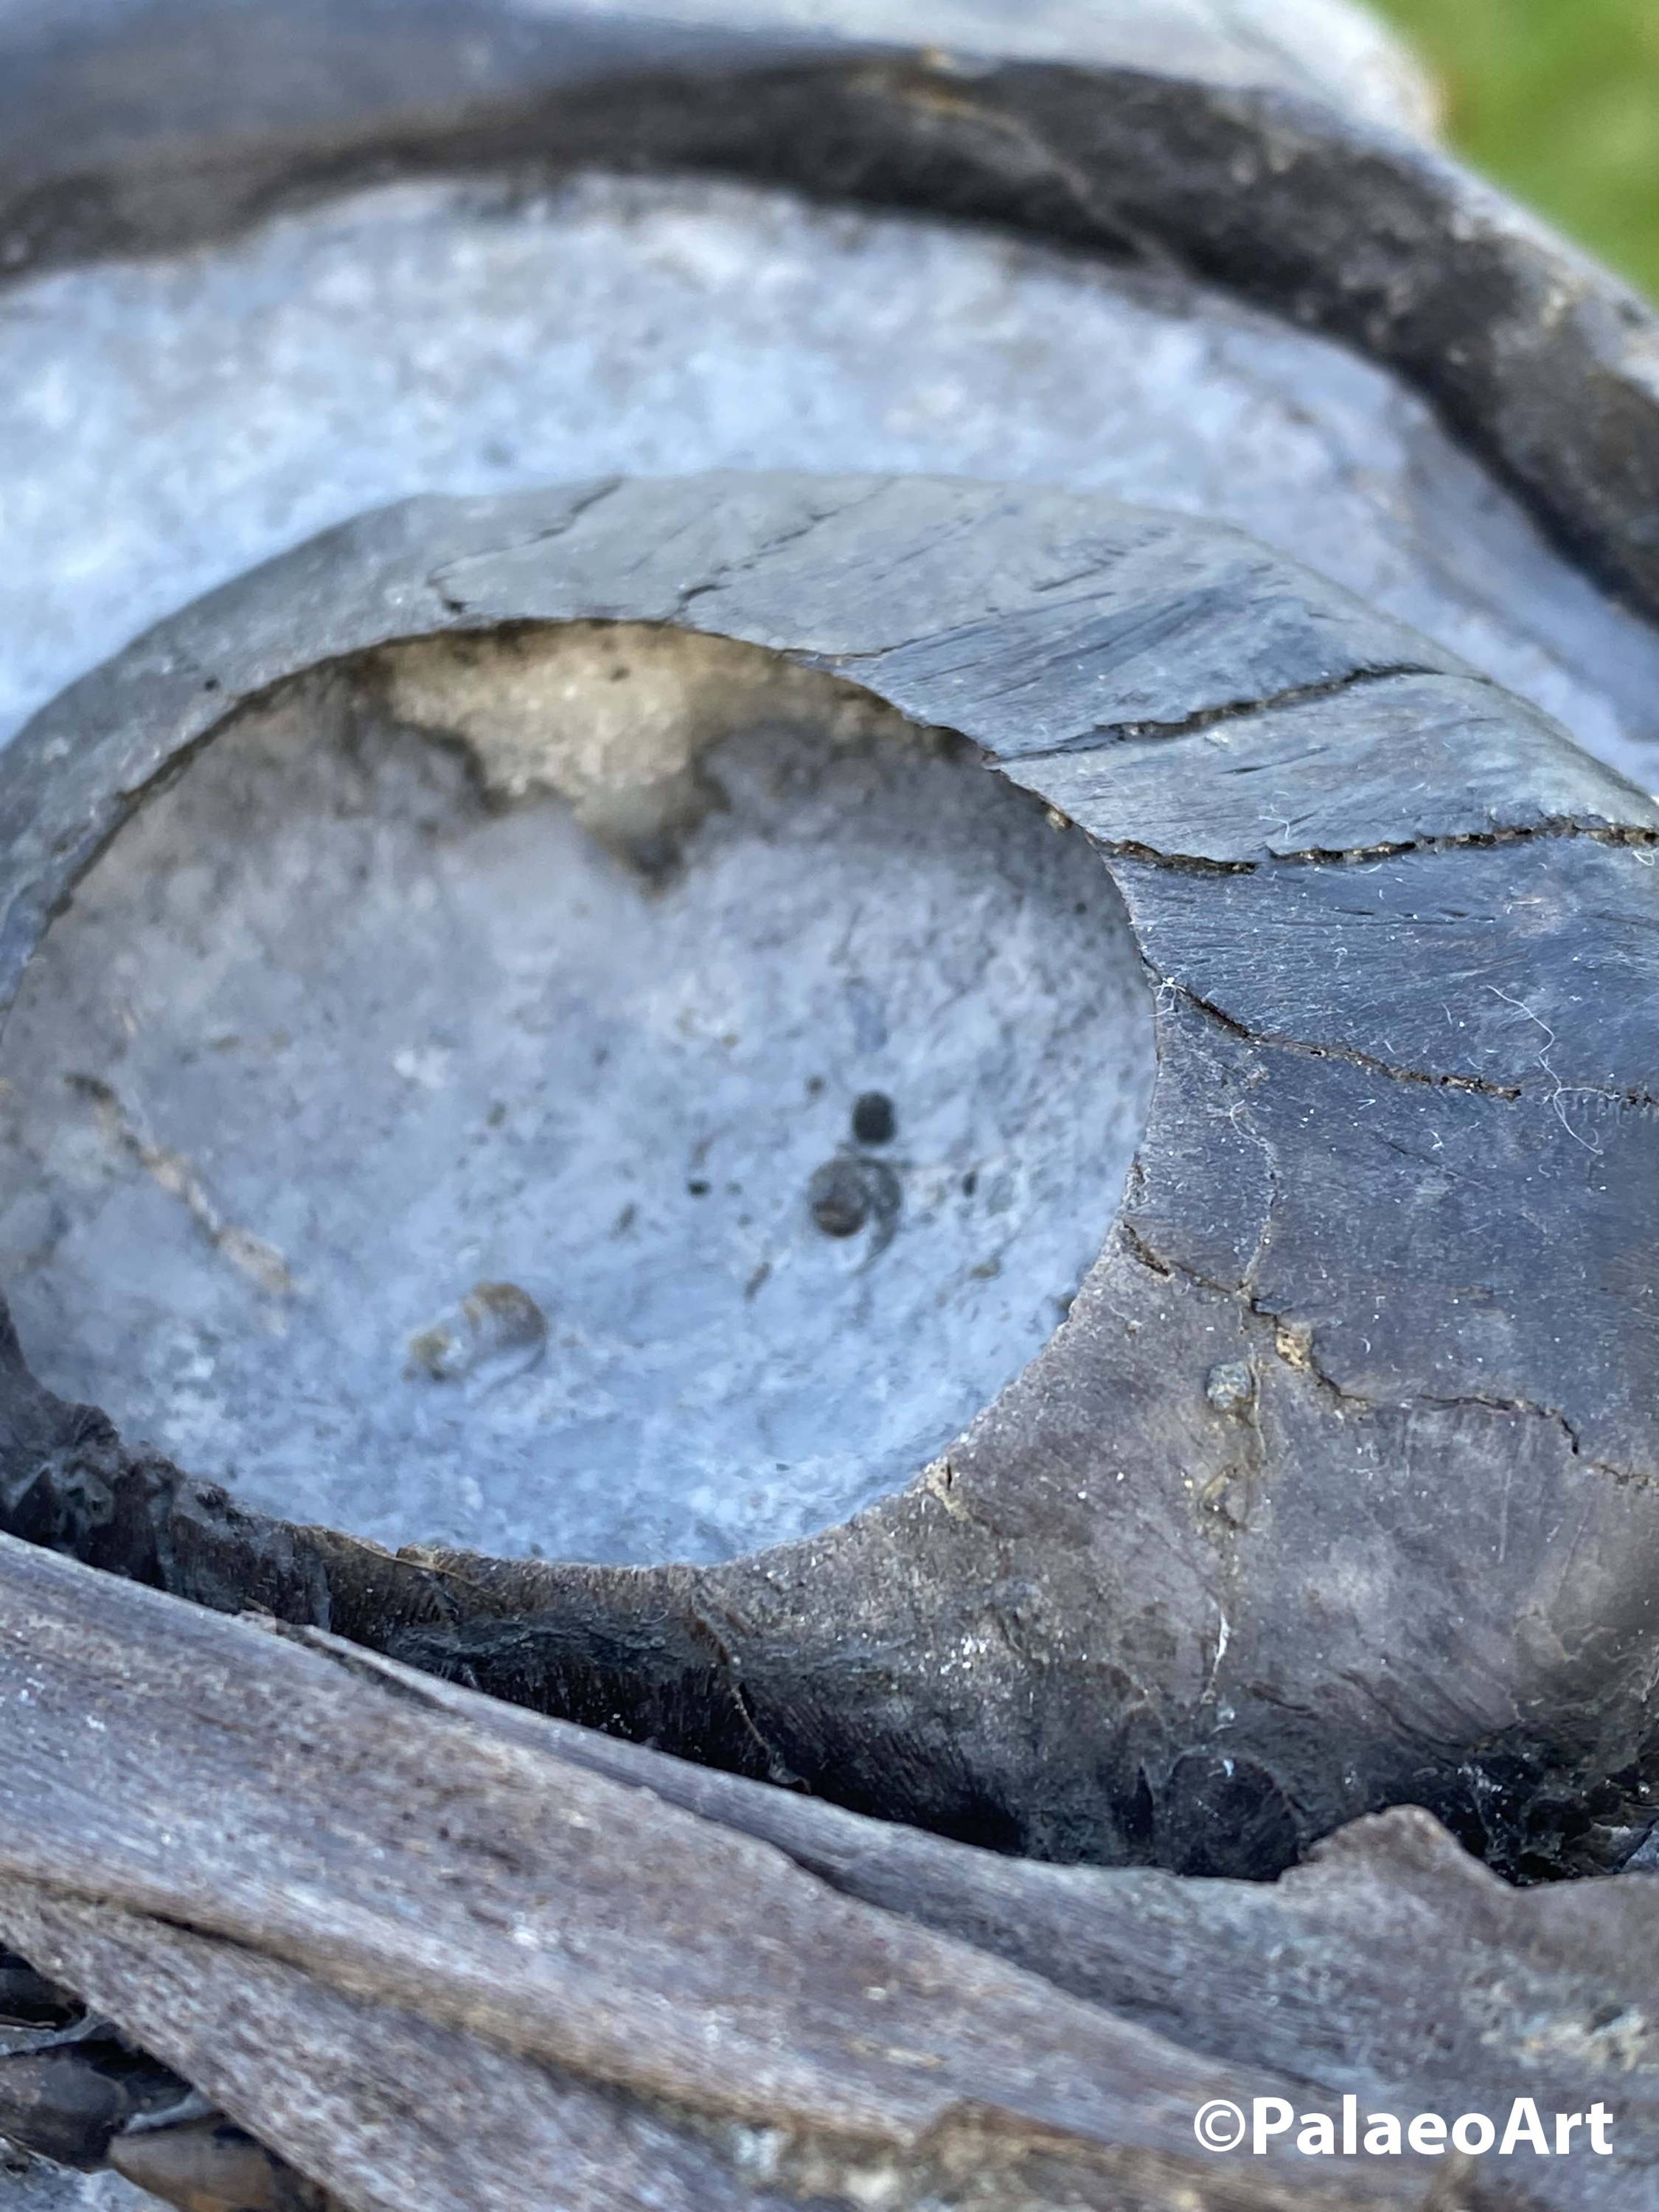
This ichthyosaur skull was prepared by Dave Costain. The sclerotic ring (bones in the eye socket) are incredibly thin and fragile, and prepped in full 3D glory. Thanks to Tom Sermon from PalaeoArt for sharing this part of his collection with us.
A solution of 3-10% acid in water is usually sufficient for most preparation (but for some specimens you might be looking at 0.5-2%). The exact concentration will depend on the fossil and the locality that it is from. This will entail a bit of trial and error, and asking preparators who are more experienced. In the past, 20% solutions were used, but more dilute solutions have been found to be effective and much gentler.
Diluting acetic and formic acids in the home workshop is more cost effective than purchasing pre-diluted. The number one rule is ALWAYS ADD ACID. If water is added to concentrated acid, so much heat can be released that the solution can boil over violently, splashing everywhere. We can avoid that by always adding acid to the water, and not the other way around.
Safety Essential: When diluting acid, always add the acid to the water!
Acid preparation is a really tricky skill to perfect, and we wouldn't claim to have all of the answers! But, we can give you a brief run down of roughly how it works, and a few do's and don'ts. Some preparators are extremely skilled in acid prep, and this has taken them countless years to master. Proceed with caution - and probably a few fossils that you aren't desperately attached to!
Not every vertebrate in limestone is going to be a suitable candidate for acid prep. If there are numerous calcite veins, these will dissolve in the same way as the rock and often faster as they are purer calcium carbonate than most limestone. Any calcite veins either have to be protected extremely well, or alternatively (and more likely) acid preparation should not be considered at all. Limestone nodules from Lyme Regis tend to acid prep well, but fossils from the North Somerset coast become extremely fragile when exposed to acid. They must be prepared by other means. Particularly pyritic rocks or fossils are also not usually considered good candidates either, as the prolonged exposure to water can catalyse pyrite decay. Experiment on scraps, ask around, consult the oracle that is the internet and find out what you can about how chemical preparation works on fossils from your locality. Treat every fossil on a case by case basis.
When doing acid prep, we try to limit the exposure of the fossil to the acid as much as possible. This can be helped by removing as much matrix as possible before-hand (or mid-way through) acid prep to give the acid less 'work' to do. You want as thin a layer of matrix as possible before starting and so this is where air scribes come in.

Above: This Dapedium from Black Ven, Lyme Regis, is nearing completion in many cycles of acid. You can see that it has been part-prepped with an air scribe as far as the preparator dared before being placed in acid. This is understandably a difficult balancing act and decisions have to be made when deciding how far to go with mechanical prep. The more you do before placing the fossil in acid, the less exposure to the acid the fossil has to endure. But, there is also the chance of damaging the fossil especially as you don't necessarily know where it will be in the rock. There is still more to do before this fossil is finished! © Chris Andrew
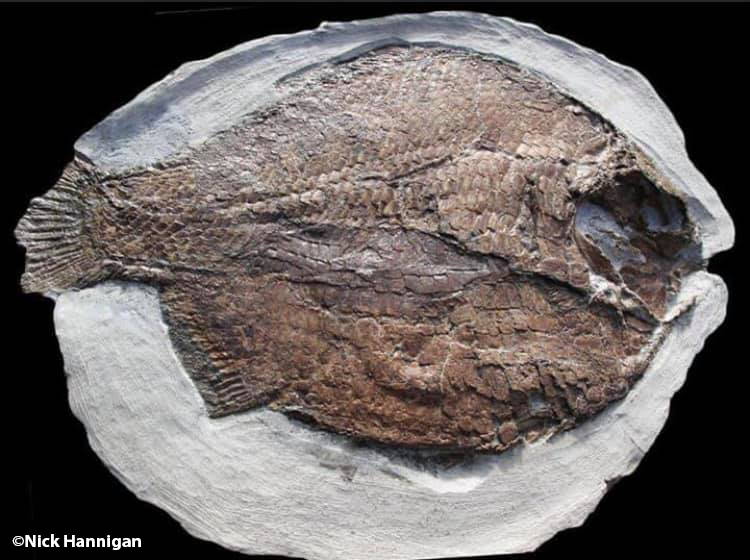
Left: This fully prepared Dapedium fish from Barrow-on-Soar shows how well fish can come out. This took a combination of mechanical and acid preparation. This fish was prepped by a professional fossil preparator. Approximately 30cm long. Thank you Nick Hannigan for sharing.
Safety when working with acids
Acids are corrosives, and so a lot of care must be taken when handling, storing and using them. Always read the safety data sheet before every use and refresh your knowledge even if you think you can remember. Be aware of what to do in case of ingestion, inhalation, spillage, skin contact, eye contact, etc.
Always wear full PPE when handling and using acids - safety goggles, dust mask or respirator, apron, chemical-resistant gloves, etc. Check the safety data sheet for specific instructions. Work in a well ventilated environment.
Have on hand a first aid kit, eye wash station, a supply of fresh, running water and a mobile phone or other means of contacting somebody in an emergency. Chemical spill rags are really helpful in case of spillage, and make sure you have any additional supplies suggested in the safety data sheet.
The most dangerous bit of working with acids is diluting them. When the acid is already diluted, it is no stronger than vinegar and so isn't enormously dangerous, but first you have to get them to that level. By far the most cost effective way to purchase acid is concentrated, which can then be diluted in water to the desired concentration. When diluting, ALWAYS ADD ACID to the water. This is because if you add water to the acid, it can trigger an exothermic reaction which may cause the liquid (of highly concentrated acid) to 'boil' over, violently spilling everywhere.
Working in Cycles
Acid is used to remove calcium carbonate. This is done in cycles, acid baths or immersion periods. The fossil and matrix are placed in acid for a period, then washed thoroughly with water, dried, protected, dried and then placed back in acid. This can occur over a period of months (in some cases even years) but actual human involvement is limited to likely a matter of hours. It may feel very ‘long-haul’, but the acid is doing much of the work – you’re just controlling it!
After typically a few hours, acid is ‘used up’. Essentially, an equilibrium is reached where the solution is charged with calcium and acetate ions, preventing further calcium carbonate from being dissolved. The pH gradually increases (this means that the solution is getting closer to a neutral pH), at which point the specimen needs to be taken out and washed. The acid won’t do any more work, and it’s time for the next step. Washing helps remove excess acid and salts. Where this is not properly done, the specimen may develop salt crystals on the surface but more threatening for stability, on the inside as well. Calcium acetate salts also attract moisture, which will cause havoc especially if there is a level of pyrite content in the bones – pyrite decay being significantly exacerbated by moderate-high moisture levels.
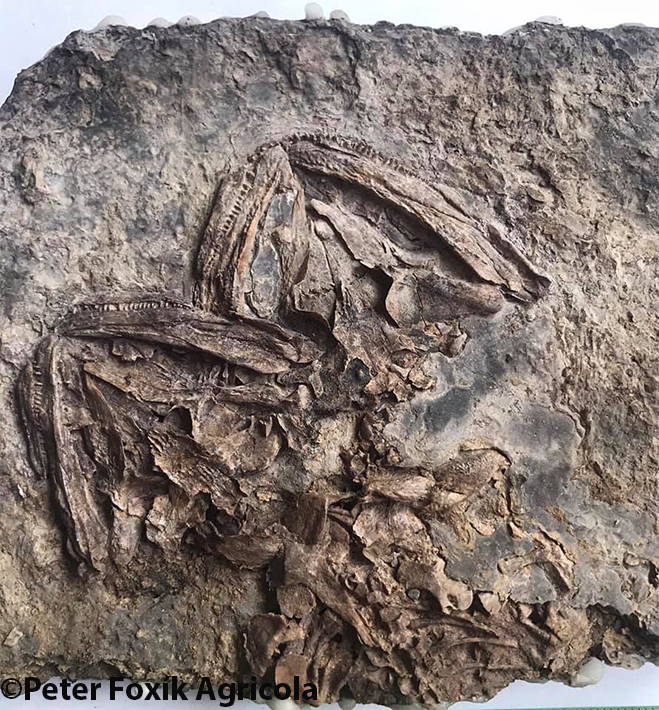
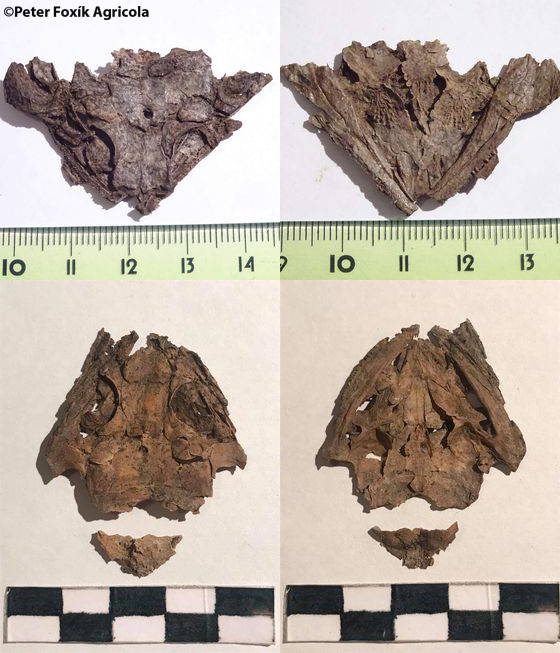
These Permian stegocephalians have been chemically prepared and shared with us by Peter Foxík Agricola. The bones are so small and delicate, preparation by mechanical means would be extremely difficult, if not near impossible when looking at the 3D preserved examples free of matrix. The preparation of these fossils shows well how acid can be used to control how something appears on the matrix, or whether to remove the matrix entirely. These stegocephalians have been prepared in 8% vinegar (vinegar is dilute acetic acid). The whole process can take anything from a week to six weeks with these fossils.
Buffering the solution
Bones and teeth are composed of calcium phosphate. At a pH of 7 (neutral – like water) it is almost completely insoluble. However, calcium phosphate can dissolve in acidic conditions (i.e. in acetic and formic acids), albeit much more slowly than calcium carbonate. This can be prevented by supersaturating the solution with a buffer, in this case, calcium phosphate! By adding calcium phosphate to your diluted acid before placing the bones in, you can ‘use up’ the ability of the acid to dissolve any further calcium phosphate; thus affording your specimen some protection.
A supersaturated solution is one whereby you can no longer dissolve any more calcium phosphate. Add calcium phosphate to the solution 24 hours before adding the fossil, stirring frequently. Calcium phosphate is more soluble in formic acid than acetic. Better put in too much than too little, as any excess will just sink to the bottom rather than be dissolved. It is inexpensive, so it won't break the bank to err on the side of caution.
An alternative method is that the solution can also be buffered with ‘acetate soup’ and a combination of both this and calcium phosphate is often used and a pH of approximately 3.5 is maintained. Acetate soup is a used (spent) solution of 80% water and 20% used acetic acid. The higher concentration of Ca2+ ions helps prevent the destruction of calcium phosphate.
Buffering the solution doesn't guarantee that the bones won't get damaged. As we go on to discuss, there are other factors at play that will influence your success, or lack thereof.
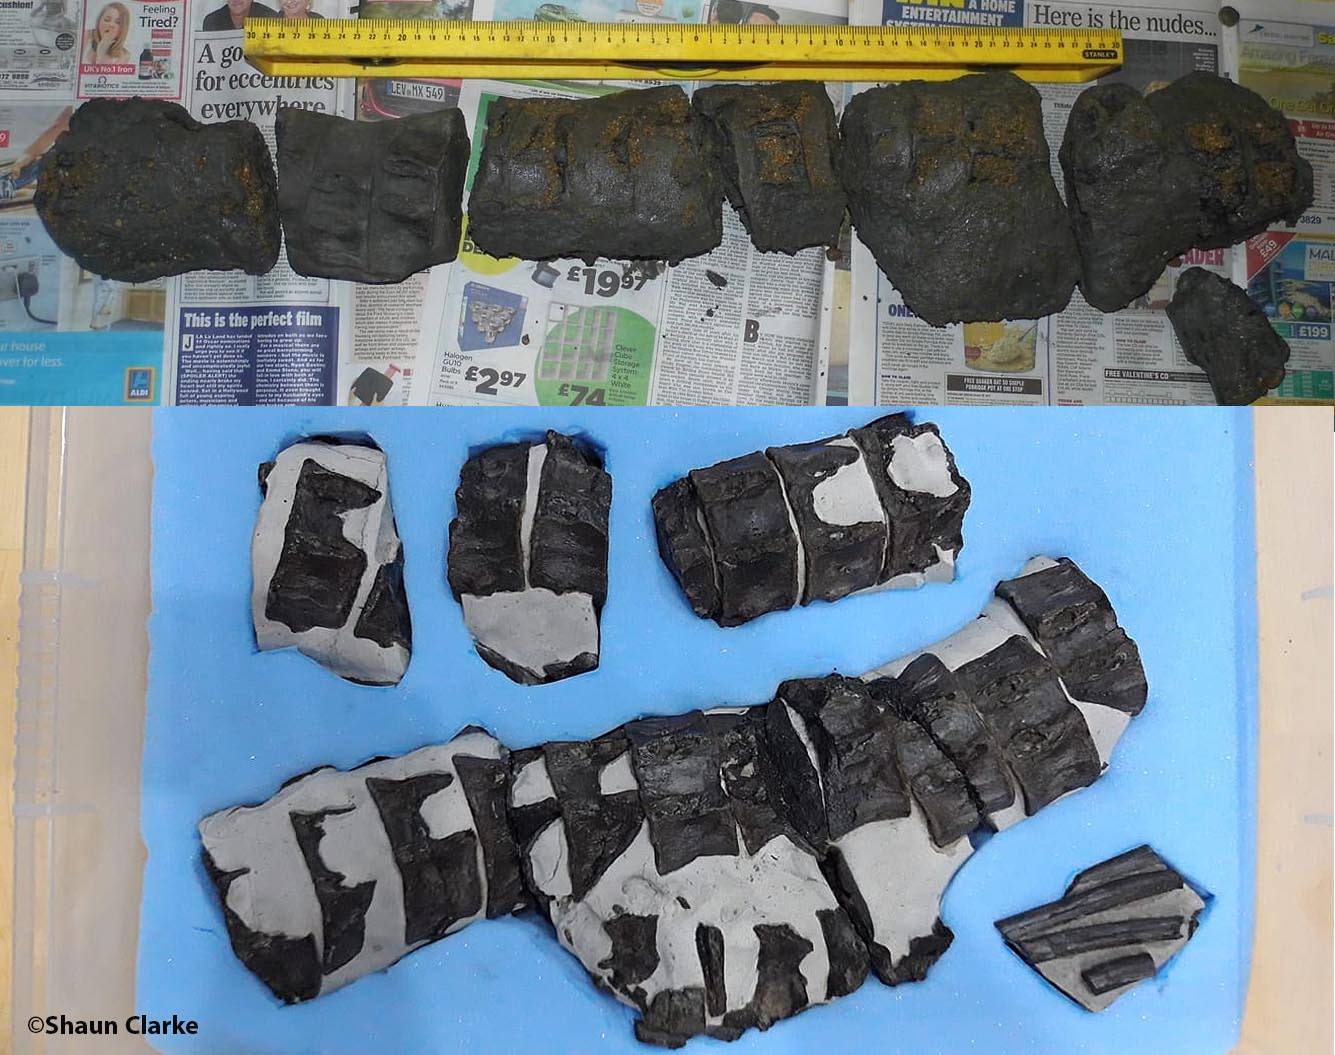
Before (above) and After (below). Temnodontosaurus vertebrae found at Seatown, Dorset, UK. First time preparation in an Acetic Acid bath, coated with Paraloid B-72 between each treatment. Thanks to Shaun Clarke for sharing these photographs with us.
Protecting the bones; protective layers and crevice filling
Damage will occur to bones and teeth even in a buffered solution. Bones and teeth can become extremely brittle and fragile, and even completely disintegrate. This is partly because bones and teeth are porous and therefore not entirely composed of one mineral – they will often have calcite (calcium carbonate) infill where blood vessels, pores and marrow once were. This is most prevalent in cancellous (spongy) bone. Acid can also damage surface detail and cause a huge loss of strength. The solubility of calcium phosphate is much higher in formic acid than acetic. To prevent this damage, we use coatings to protect and shield exposed bone from the acid.
The other reason to protect bones that have already been exposed is to prevent penetration by the acid. If acid does find its way in and dissolves the calcite content within the bone, calcium acetate crystals will precipitate in these spaces when the bone dries – this is a normal by-product of acid prep. These will enlarge cavities and cracks creating further planes of weakness.
In many cases, it is also necessary to prevent whichever parts of the matrix you want to keep from also dissolving in the acid. For instance, to keep the arrangement of the bones as they were found, i.e. in a nodule.
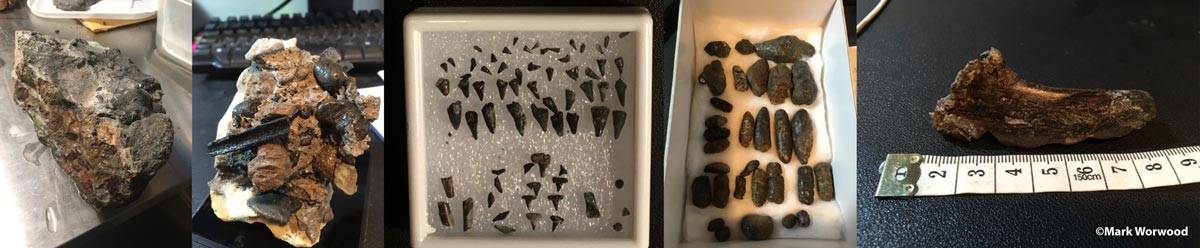
Bone bed from the famous Aust Cliff (near Bristol) is a good candidate for acid prep. Bursting with fossils, it's an interesting project to acid prep one of these blocks to reveal (usually) fragmentary bones, teeth and coprolites. These bones came out quite fragile, and the whole process of exposing this particularly large block took two and a half years. Thanks to Mark for sharing.
What do I use to protect the bones?
Synocryl 9122x is the best material to use to protect bones during acid prep, as it does not require constant reapplication and provides an excellent resistive barrier. Whilst we can ship it within Mainland UK, it is unfortunately quite difficult to get hold of worldwide. This means that other, more widely available products (and used traditionally to great levels of success, we should add) might have to be employed. More traditional methods include Paraloid B-72 application and wax. Some preparators also use plasticine.
- Synocryl9122x is the best protective barrier available as tested by numerous scientists. It is only necessary to coat the most recently exposedareas of bone (repeat applications on the same areas not necessary), and it can be removed with solvent. It is much more resistant toboth temperature and acid than Paraloid B -72. Gaps can also be filled with Synocryl mixedwith glass microbubbles.
- Wax: Paraffin wax is widely used because of its low melting point (i.e. the fossil doesn’t have to be subjected to high temperatures to remove the wax). However it is quite soft, and isn’t as adhesive as more expensive waxes like beeswax. It’s a toss up between expense and effectiveness. The two can be combined. When applying wax, heat the fossil gently either with a heatgun or at a low temperature in the oven. This will help with the adhesion of the wax to the bone, especially if there is a layer of Paraloid. If the fossil is a poor candidate for being heated, it’s probably a poor candidate for acid preparation too. Using waxes with a lower melting point is preferable though. Microcrystalline wax is great in terms of hardness but has too high of a melting point to be considered useful. To remove the wax, use hot water to allow the wax to melt and float to the top.
- Paraloid B-72:If using Paraloid B-72, it is recommended to at least consolidate using Paraloid B-72 as you go along. This will penetrate and coat the surface, and can also be applied underneath the wax to provide a surface between wax and fossil – however this can also generate a weak point and acid could get under the wax. Using Paraloid B72 as a protective layer can get quite frustrating with the repeat applications. It can be applied in thin layers at 5%, 10%, 10% and then 15-30%, with drying time between each. The final layer should be allowed to dry for at least 24 hours. Paraloid B-72 is better suited for use in formic acid, losing adhesion and discolouring in acetic acid during trials. However, it has been used on many occasions to great success.
You might see a ‘bathtub ring’ of consolidants on the fossil as you work along and more bone is exposed. Try to remove this as best as possible with solvents before proceeding with another coat. This will only get harder to remove as you build on top of it – and removal of a significant build up may end up damaging fragile bones. Patience is a virtue with acid preparation.
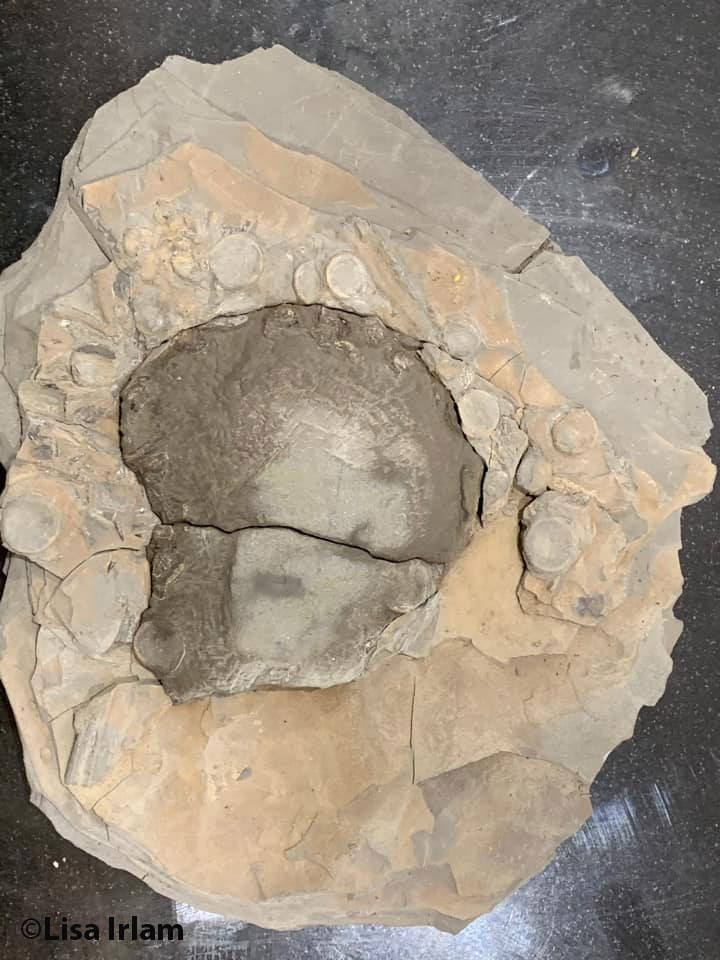

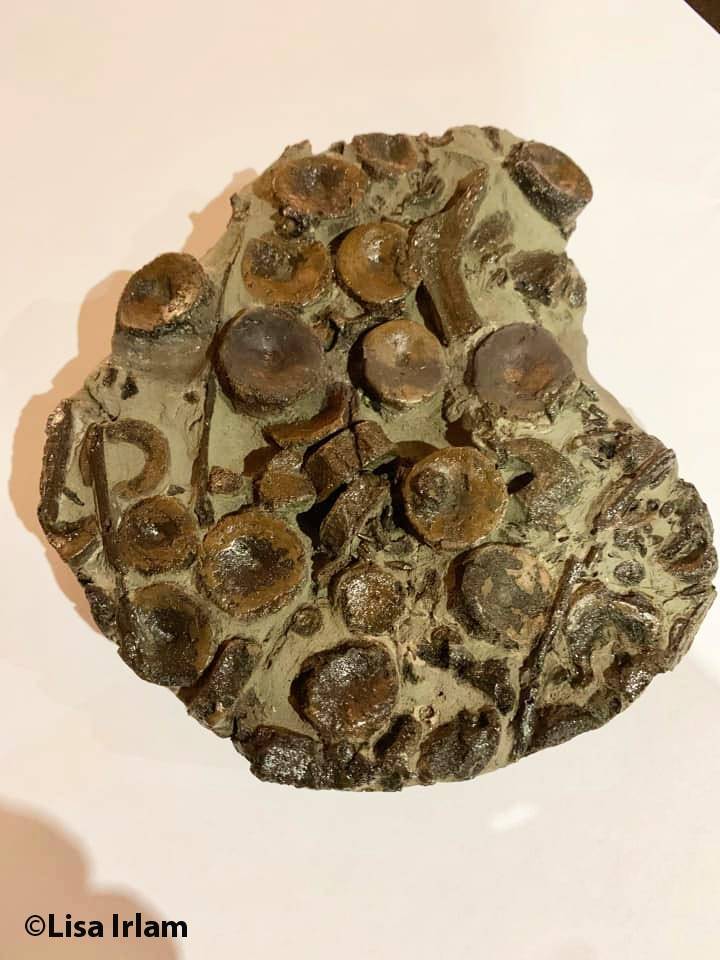
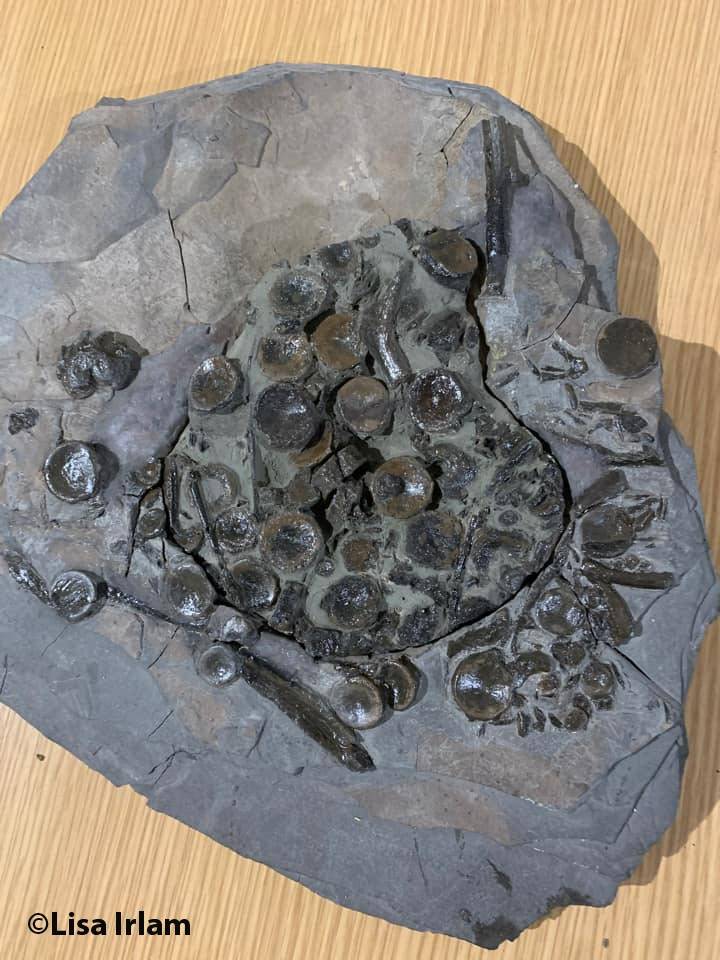
A sequence of acetic acid preparation pictures of this disarticulated juvenile ichthyosaur section. You can see that there is a hard limestone nodule in the middle of the first picture. Whilst the rest of the rock is not acid preppable, the limestone very much is. This has been taken out and carefully prepared, before reassembly. Thank you to Lisa Irlam for sharing these pictures with us - a challenging prep executed beautifully!
Placing the specimen in an acid bath
If you place the specimen upside down in an acid bath, you will find that pockets of carbon dioxide form as a result of the dissolution of calcium carbonate. You might be tempted to do this to protect the back of a nodule or some of the matrix by leaving it sticking out of the solution, but try to avoid this. Especially if you’re only preparing one side of a stone, it is recommended to have the stone facing right side up to allow the gases to escape and the acid to continue working. You can always coat whichever parts of the matrix you want to keep with one of the above substances.
Raising the specimen off the ‘floor’ of the bath is also a good idea. You can use something as simple as a grill rack, or colander or even plastazote or polystyrene foam. Plastazote is ideal because it is firm and spongy and will support the fossil well, but it is expensive. You want to support the specimen as much as possible, and keep it raised above any sludgy sediment that sinks to the bottom. Most rocks aren’t pure calcium carbonate, and have a reasonable clay content which will not dissolve and will just disaggregate and sink.

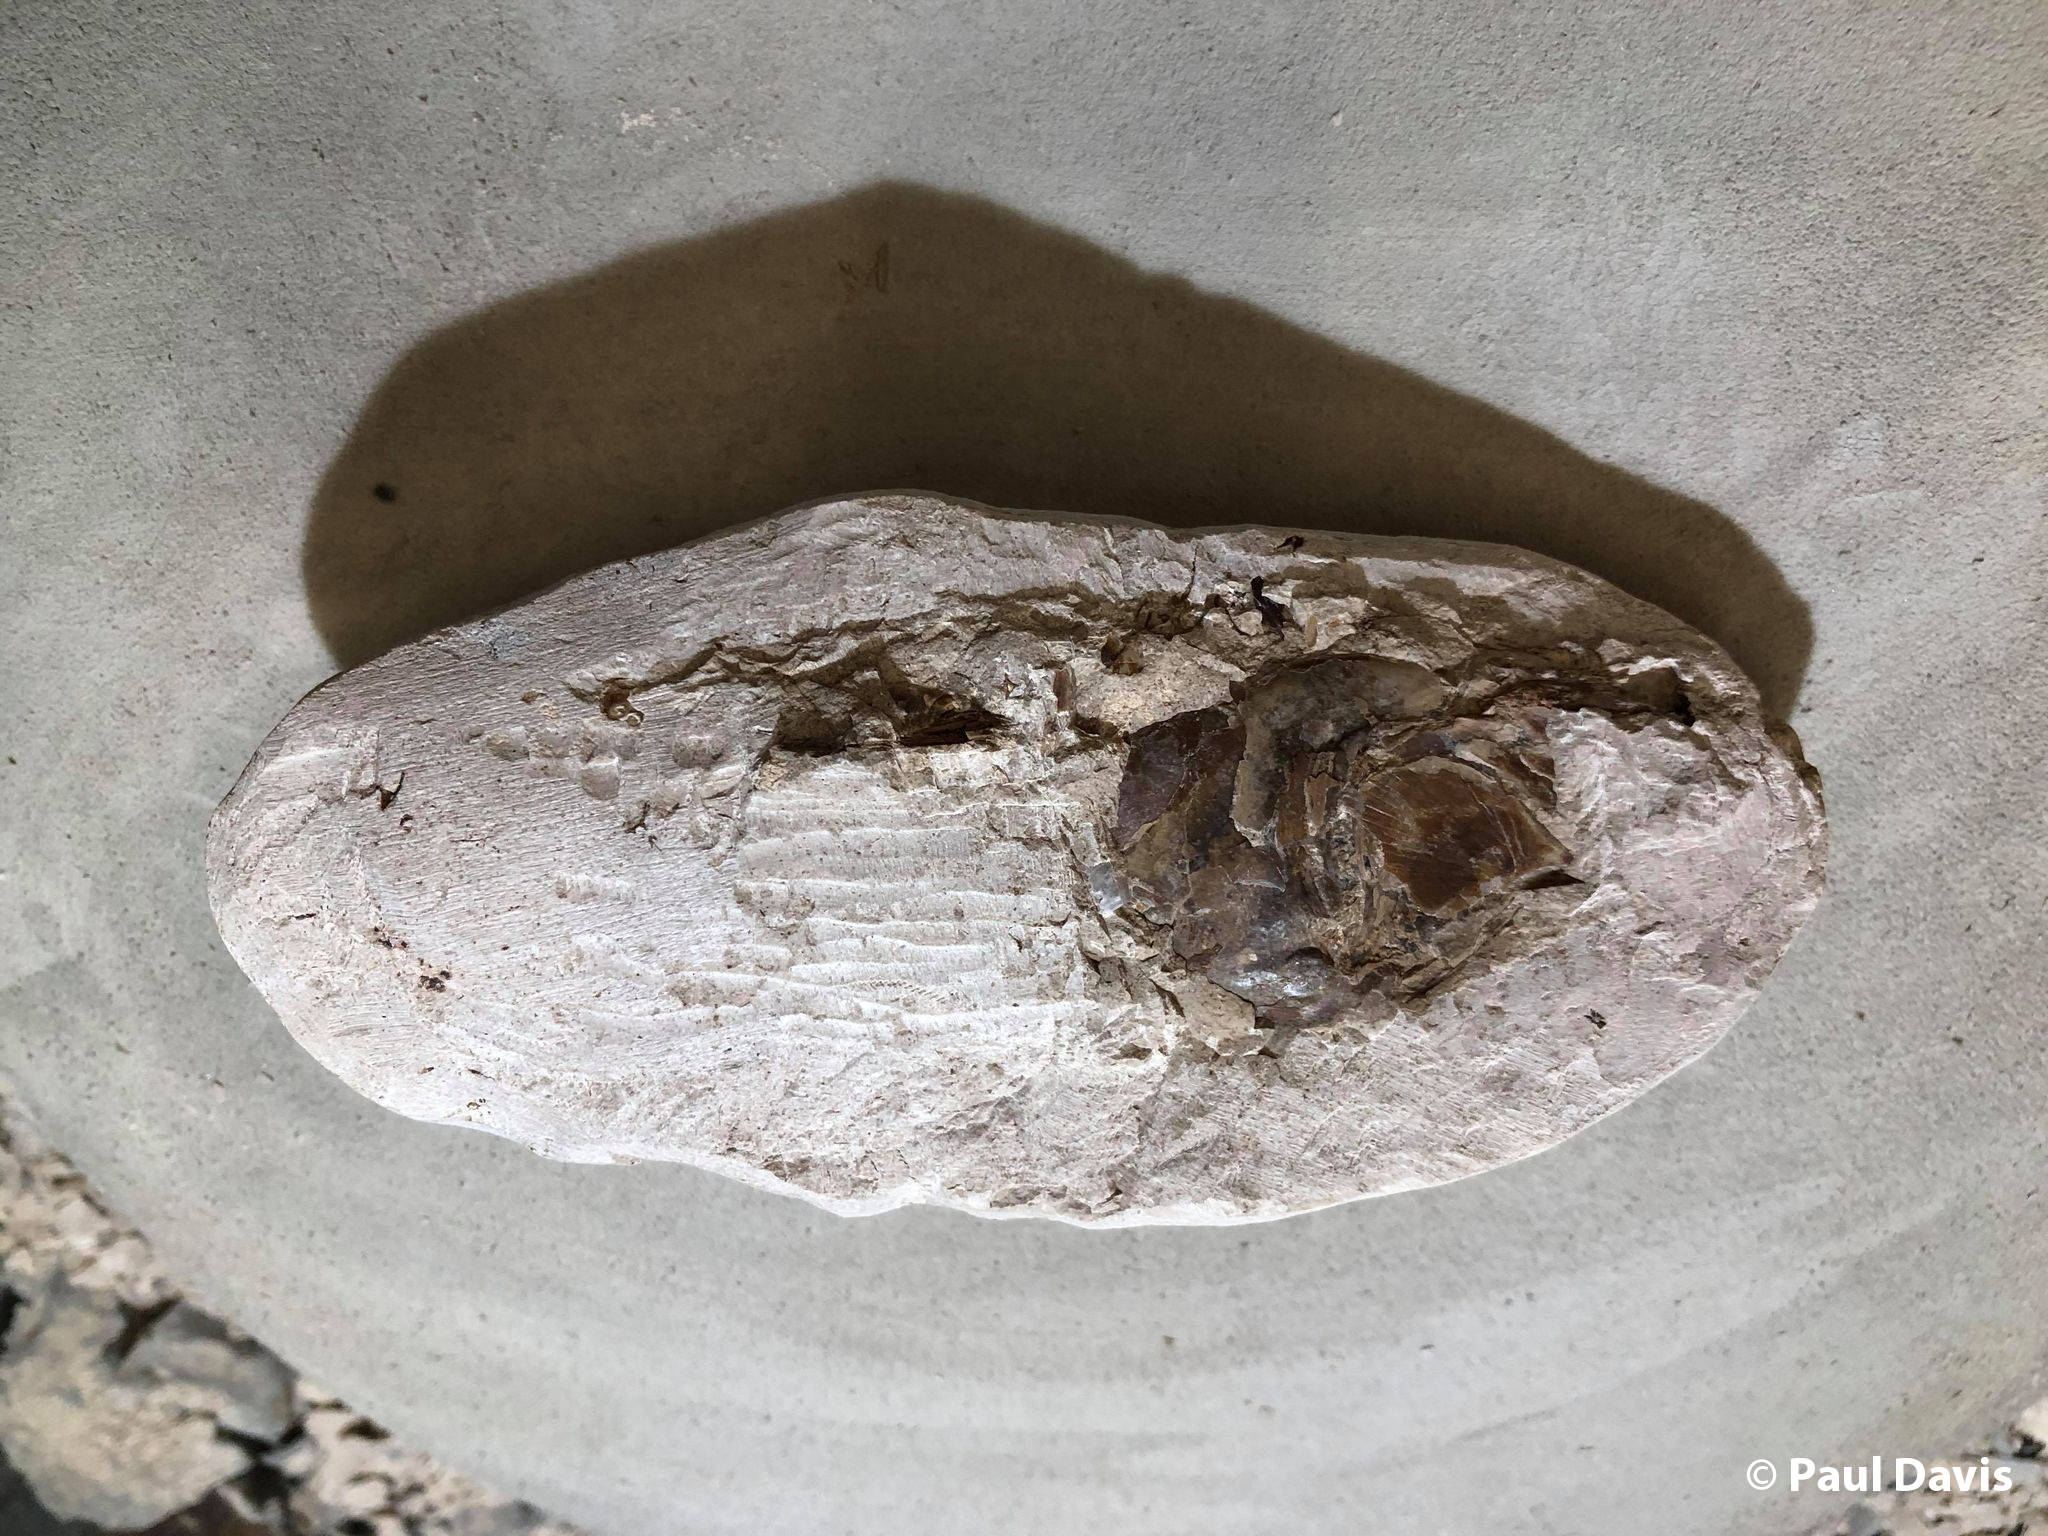
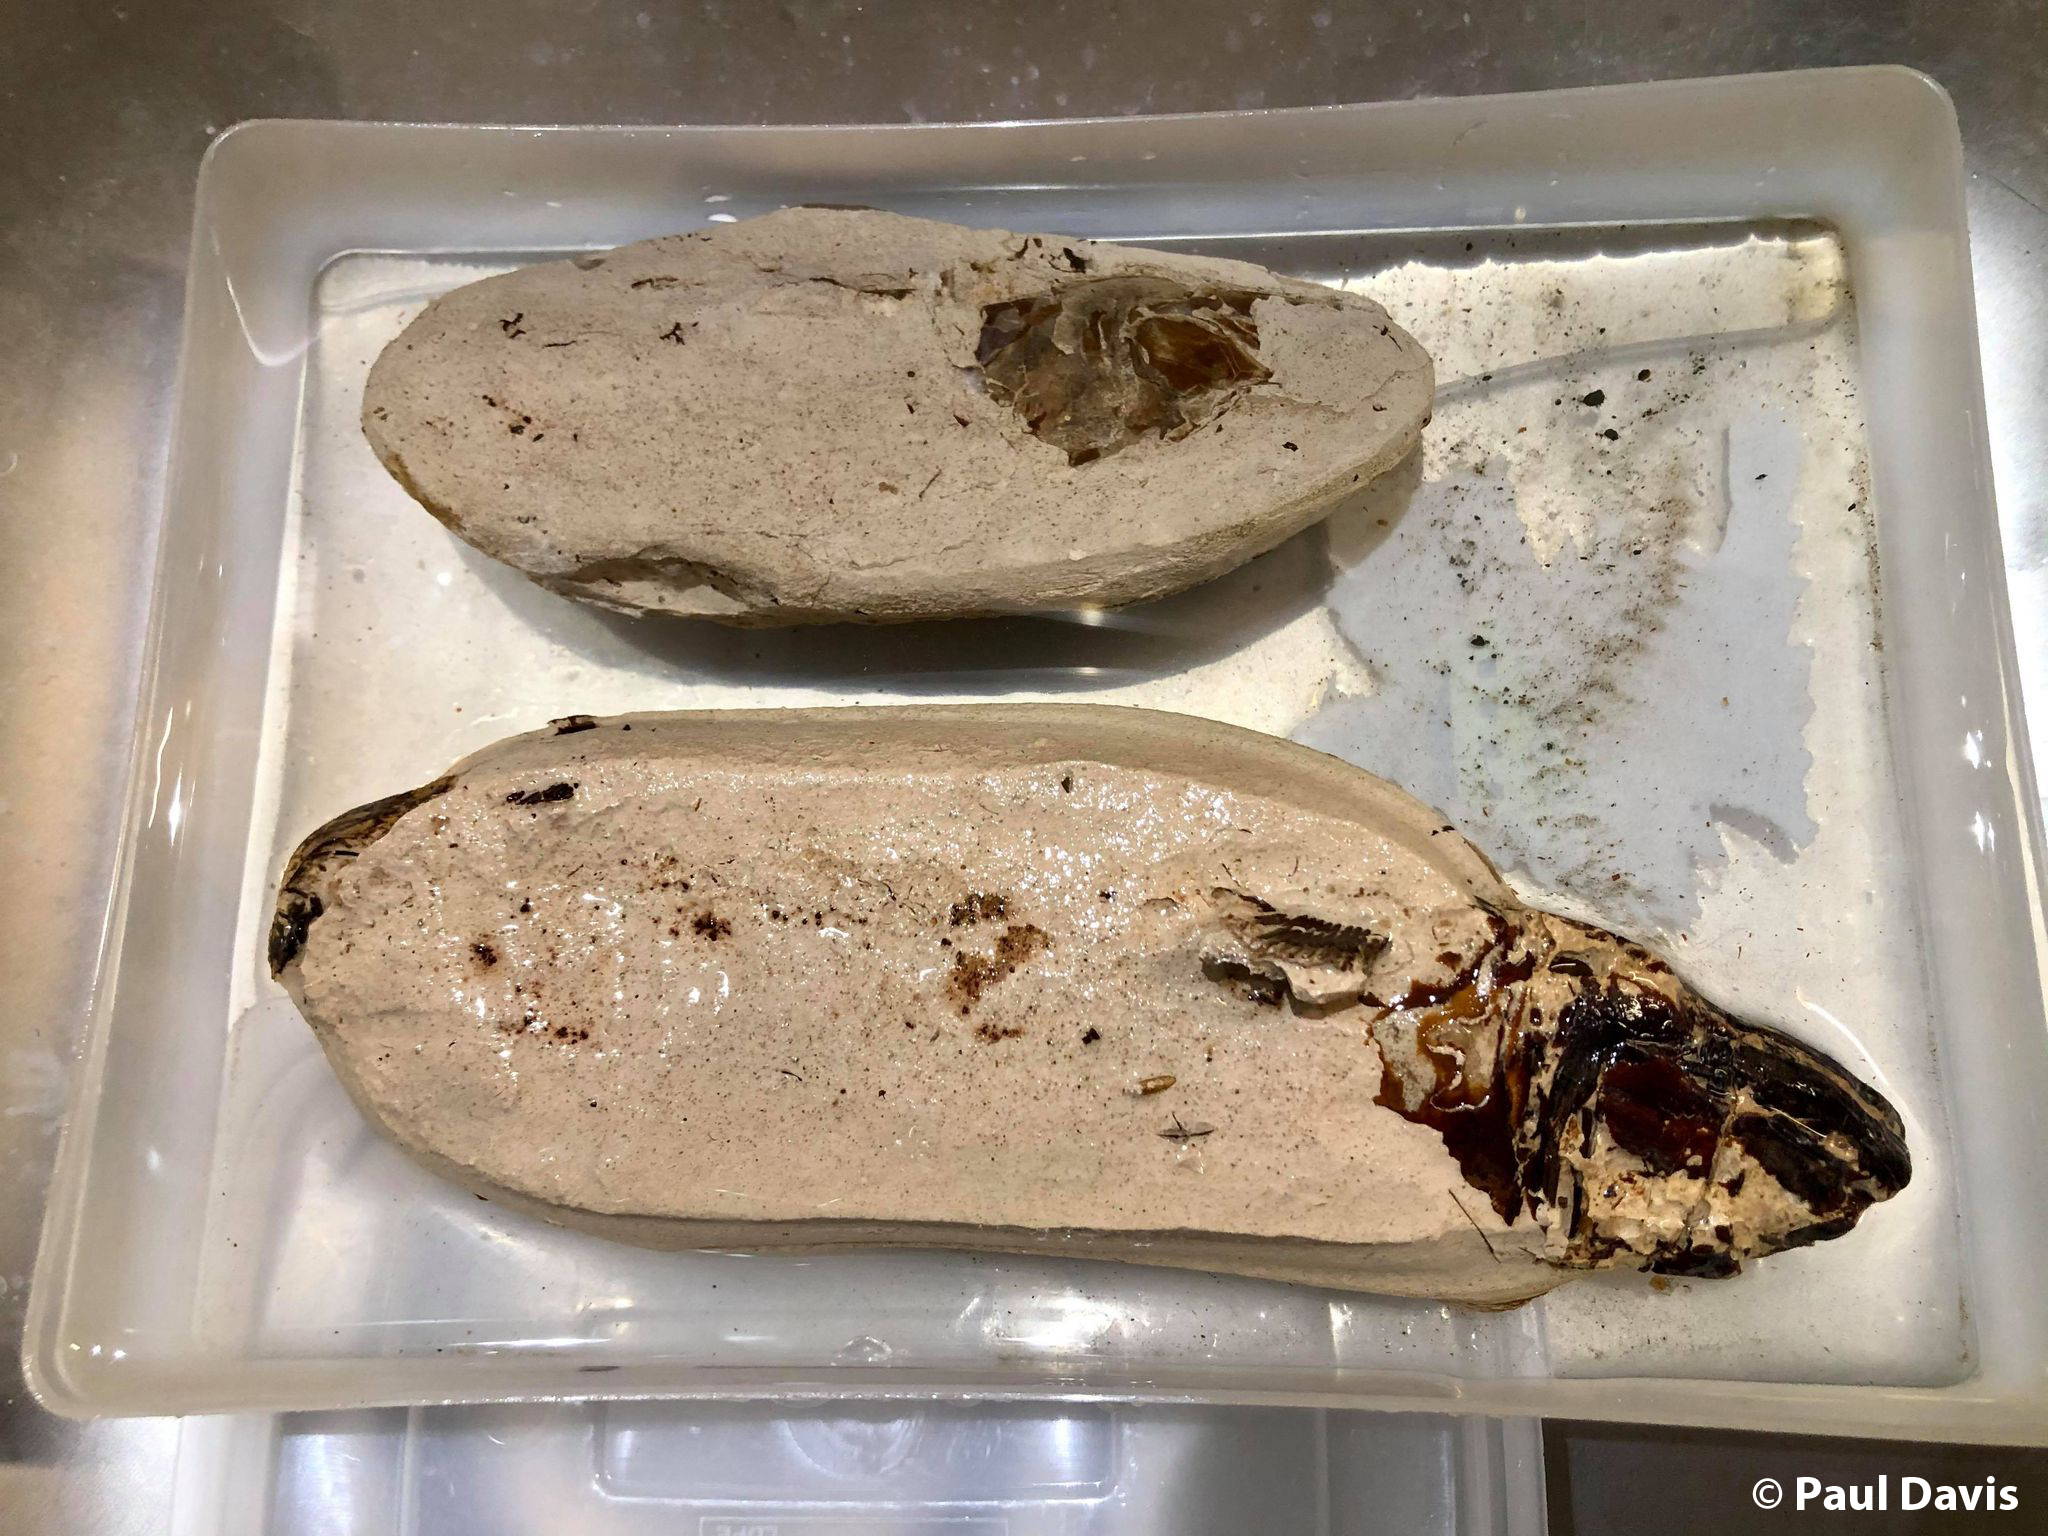
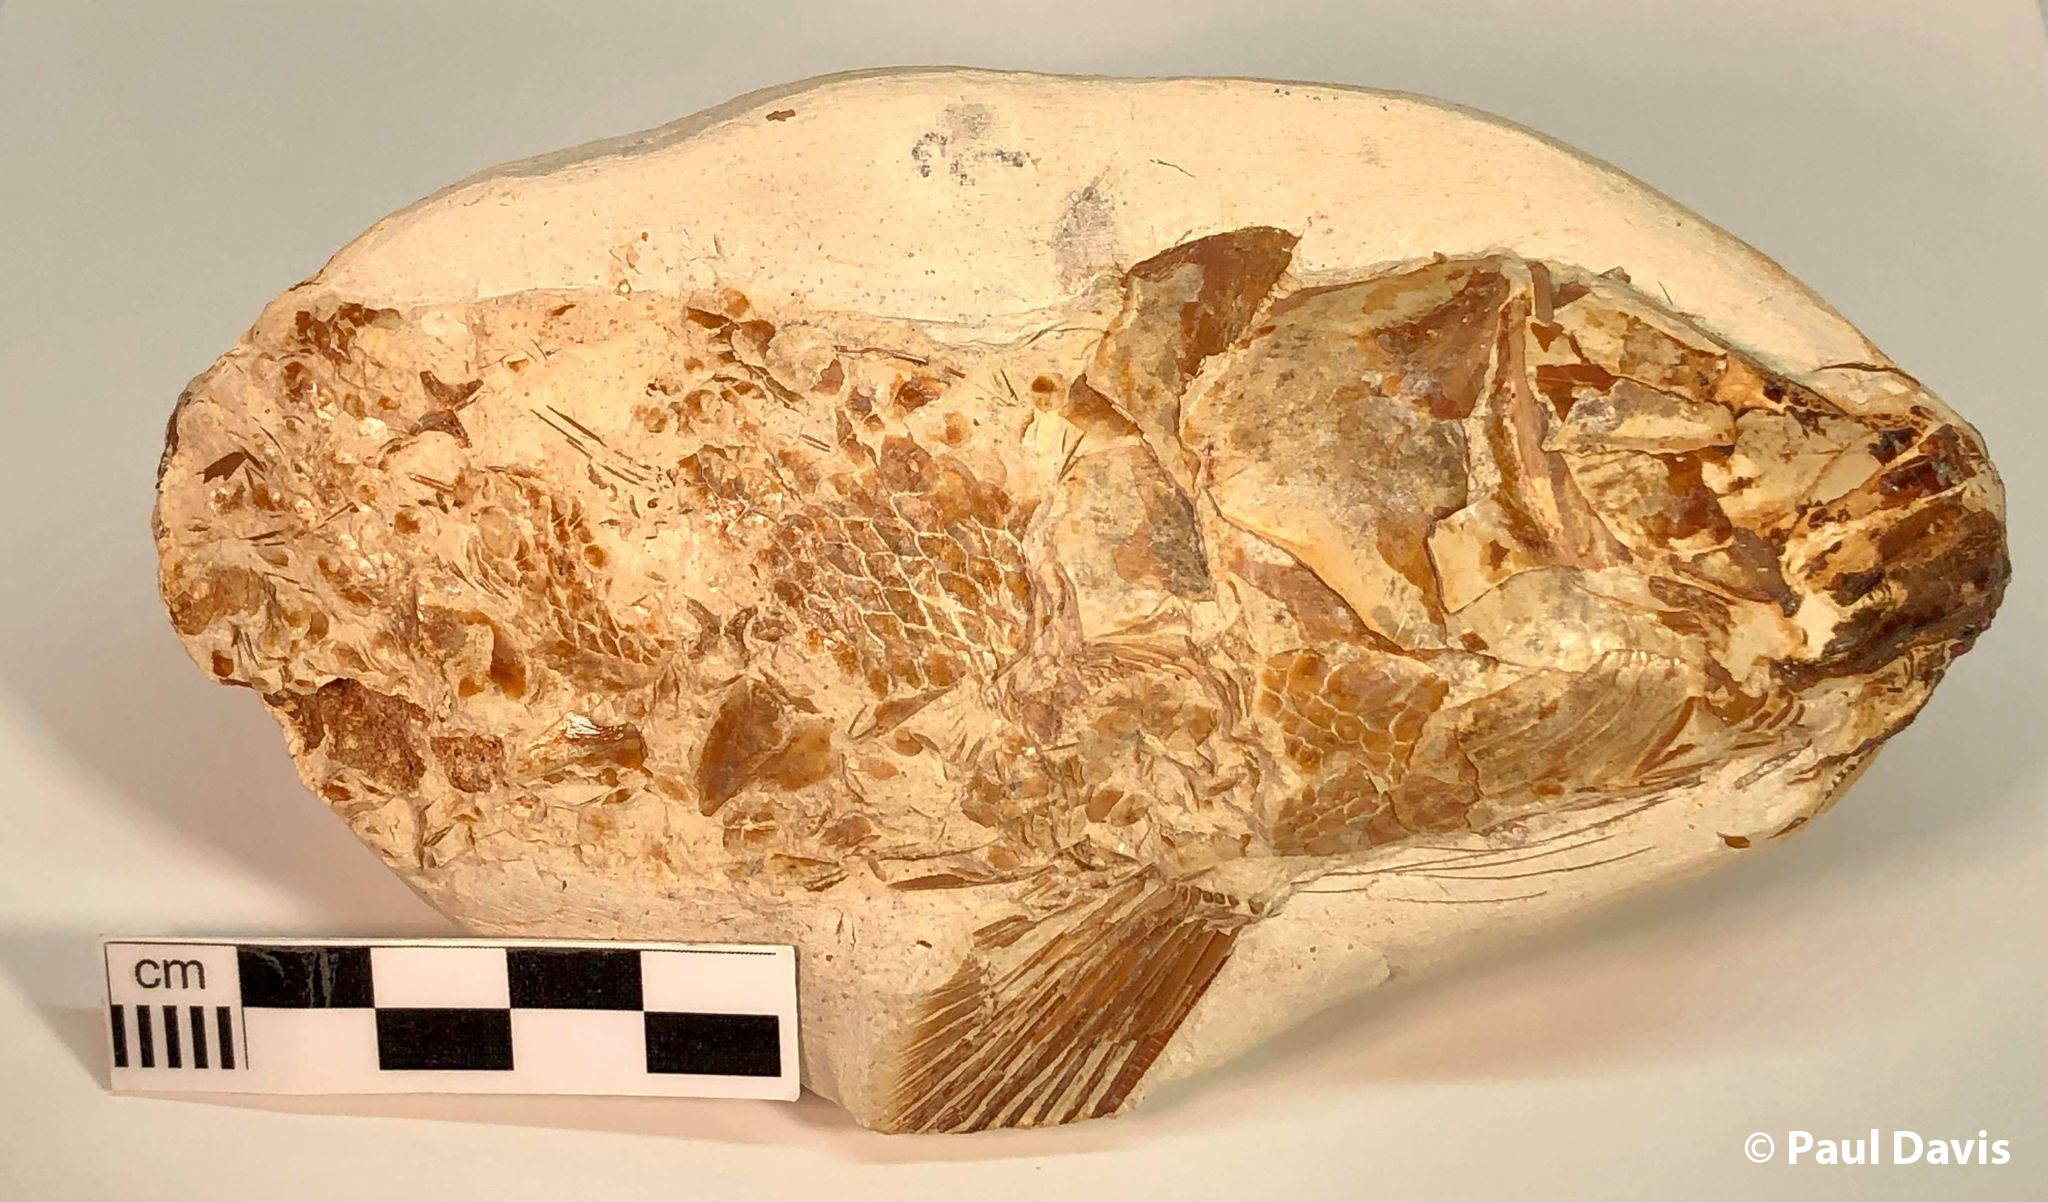
Fossil fish from Morocco prepared with acetic acid. The bulk removal was performed with an air scribe, taking paritcular care around the pectoral fin which is preserved in 3D. 3% acetic acid was used, and progress was very slow as the mud content in the limestone nodules is very high. Thank you to Paul Davis for sharing this sequence of photographs, and the stunning end result.
Glues
Polyester based and epoxy-acrylate glues resist acid etching more effectively than standard epoxies. Cyanoacryates have a poor moisture resistance over time, and considering the extended acid baths and water baths should therefore be avoided prior to acid prep. Paraloid should be avoided as an adhesive prior to acid preparation as it does not stand up as well to it.
Epoxies are more durable in acetic acid than formic acid, and will have a reasonable level of resistance but not complete. Many epoxies will advertise that they are chemical resistant but they probably weren’t thinking about prolonged periods immersed in corrosive liquids! The AKEMI polyester and epoxy-acrylate based glues are designed for stone and are resistant in both acid and alkali preparation. The AKEMI Platinum P+ is probably your best bet if you are going to be doing chemical prep and need strong adhesion. But, be aware, this is not removable or reversible.
It is often recommended, especially with loose bones that individual bones are prepared separately. However, it is very important to protect joining surfaces in this instance. They should be checked after each cycle to ensure a close fitting contact is still present at the joins.
Temperature
Hotter weather will produce faster matrix dissolution, but also more fumes, and potentially more damage to the specimen. More dilute solutions might need to be used in the summer as compared to the winter, and ventilation requirements should be considered for your safety. Freezing conditions should be avoided, as should temperature fluctuations between day and night. Although often unavoidable for the home preparator, doing acid prep in a shed without a reasonable degree of temperature control should be carefully considered.
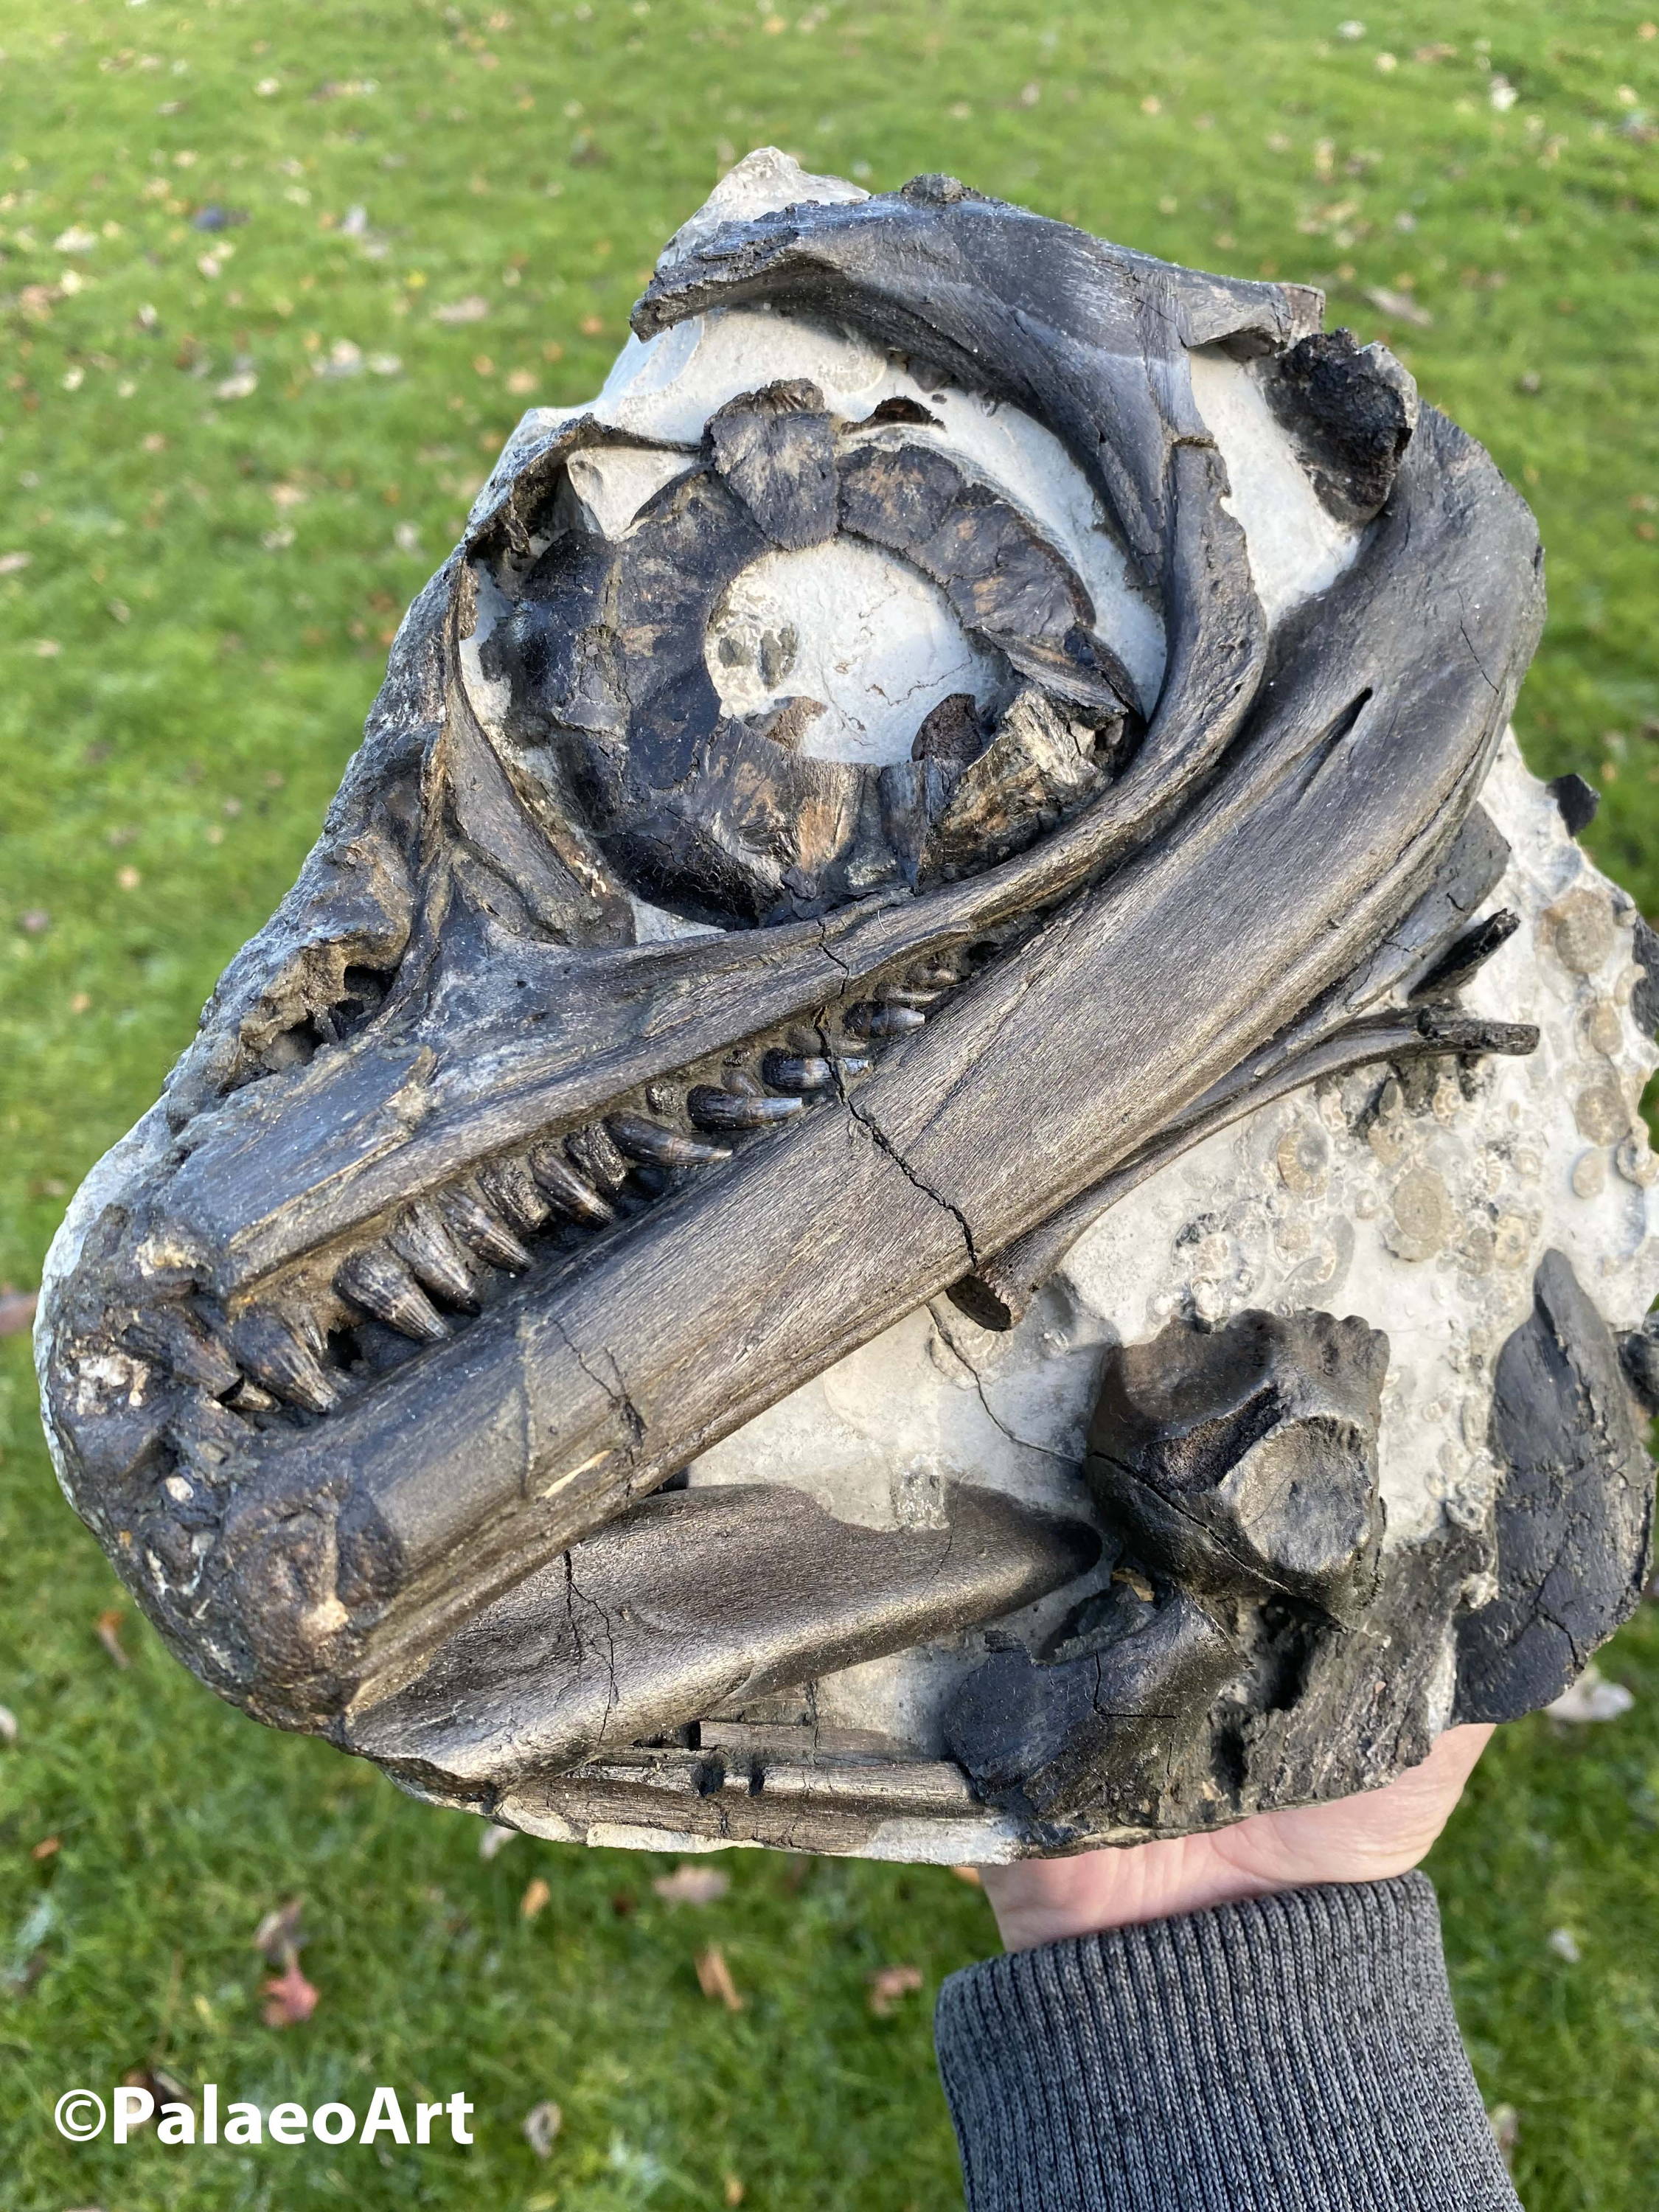
These are some further Ichthyosaurs from the collection of Tom Sermon of PalaeoArt that were acid prepped by Dave Costain. If you are familiar with acid preparation, you will be deeply impressed by these! You might be wondering why the rostrums aren't there. This explanation isn't necessarily the case with these ones, but it's a good chance to explain why this is something you might encounter. It is often the case that the bulk of an ichthyosaur is preserved in a limestone nodule, but the extremities (like the tips of the paddles, end of the snout, etc.) aren't preserved in that nodule and instead shale. If the ichthyosaur is found out on an easy-to-excavate flat surface it is usually recoverable, but more often than not the skeleton is high up in the cliffs. Nobody knows it was there until a part of it falls - and well, who isn't going to pick up a skull in a nodule? Sometimes skeletons are collected by a number of different people over a period of weeks or even years.
Some extra things to be aware of when working with acids
Can I use one acid and then the other?
Combining acids is a no-go. Without extremely thorough washing between acids (say you wanted to do a few rounds of formic and then a few rounds of acetic), extreme damage to the fossil will occur. However, sulfamic acid has been used (as a stronger weak acid) to ‘bulk’ remove matrix (where surface area of matrix is significantly greater than exposed fossil) before moving on to formic acid to great effect. Sulfamic acid is a crystalline solid that is easy to store, easy to handle and produces less toxic vapours.
We will be very honest and say that we are not chemists and are not sure how using sulfamic acid and then another acid would work in terms of safety for both human and fossil. Any chemists out there, we would appreciate your input!
Workspace and Safety - a few considerations when working with acids.
Although a fume hood is highly recommended when working with chemicals, we know that it is not likely that many home preparators either have one or will rush out and buy one. Do keep an eye open though, they pop up second hand from schools and labs occasionally. Good ventilation is essential, but there are some other factors to consider.
Acid vapours in the air might cause rust. Treat all surfaces that are iron or iron alloy with anti-rust paint or simply oil machines in the vicinity. This typically means doing acid prep in the same room you do your prep in is probably ill advised with expensive tooling. You also really don't want to be doing it in a room that you also live in. Don't try acid prep unless you have a suitable space to do it in.
Disclaimer
ZOIC PalaeoTech are in no way liable for any damages incurred to self or property as a result of purchasing products or following preparation guidance in this article. It is the sole responsibility of the end user to ensure their own safety, the safety of those around them and their property at all times. If in doubt, contact a professional fossil preparator who offers chemical preparation services.
Learn more about each of the techniques by clicking the links below:
SHARING OUR KNOWLEDGE
We are committed not only to making the best fossil preparation tools, but we also love to share our knowledge to help you prep your best. If you feel that we are missing something important from this article, or have any photographs you would be happy to share with us we would be delighted if you drop us an email! We love to see before and afters, learn new tricks and see what you've been up to! We can be contacted using the link below or on info@zoicpalaeotech.co.uk.